
A laser cutter focuses a high-energy laser beam downwards onto a flat material, resulting in a fast and accurate cut. The cutter can perform two different operations, or a combination of the two:
In a Vector Cut, the laser travels along a path and fires a powerful beam that cuts all the way through the material.
In a Raster Etch, the laser travels back and forth rapidly and fires a less powerful beam, engraving a shape row-by-row.
Software Download
Files must be edited in Adobe Illustrator, regardless of where your file was originally made. The software that the laser cutter interfaces can be downloaded here. All workstations in the laser cutting room will have this software pre-installed.
Safety Considerations
Credential Policy
- After completing an in-person Laser Cutter Training, you will receive the “Novice” level credential. This does not grant door access to the room.
- An “Independent” level credential will allow you door access to Laserworks. To get an independent credential you must:
- Sign up for our Canvas course HERE
- Take the online module entitled “Laser Cutter- Getting Independent Credentials“
- Ask an explorer to supervise your hands-on assessment. This is a pass/fail assessment.
- Upon successful completion of the independent credential assessment, you will be granted door access, this may take a few days to activate.
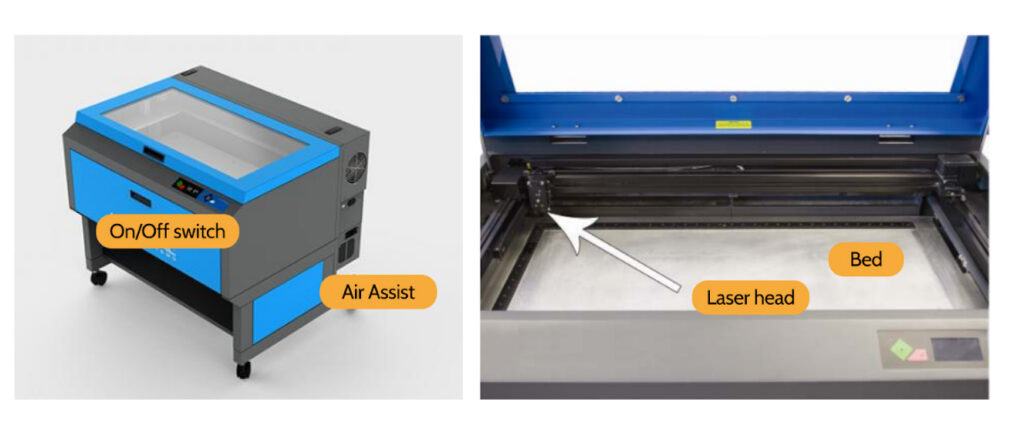
Machine Anatomy
Laser Head: The part that moves to project the laser.
Bed: What your stock lies on
Air Assist: blows air at the beam’s point of contact.
Cutting Procedure
Create a Vector file of what you would like to cut
- Adobe Illustrator lets you create designs or import images and transform them into vector patterns. It also interfaces directly with the laser cutter. In Illustrator, create what you want to cut, or open an image and click “Image Trace.”
- If you have a part in SolidWorks, Fusion360, or AutoCAD, you can export a 2D drawing as a DXF file and open it in Illustrator as well. Just make sure the units and scaling of your piece in your modeling software and the units and scaling of your piece in Illustrator are the same. If you make your drawings in a CAD software, you will still have to import it into illustrator to change the stroke size and colors to ones that the laser cutter will understand.
- Set your strokes according to which lines are meant to be cut and whatever else is meant to be rastered. The laser cutter recognizes any RED line with a stroke of 0.001” as a line meant to be cut, and anything BLACK as a line/shape to be rastered.
- Make sure that the black is an RBG black (hex #000000) , and the red is an RGB red (hex #FF0000). Any other types of black or red might read as an error when you send it to the laser cutter.
- Any strokes that are not 0.001” may be interpreted as rastering.
- Technically green and blue can be used as well as you can change the settings for each color, but please check in with an Explorer if you want to use multiple colors (and thus raster/cut) settings on one file.
- If you are cutting multiple pieces, tessellate them closely to save material. Don’t let the pieces touch, but get them pretty close together.
- You can also change the number of pieces and their orientations on the bed in the ULS software, which might be more helpful if you’re cutting on a weirdly shaped piece of stock as the ULS software controls the laser cutter directly.
- Using the artboard tool, shrink the board to barely bigger than your piece. The artboard is the material you will use, so you don’t want to use more than you need. Make a note of your artboard size – you’ll need to know it later.
Cutting from AutoCAD
To cut from AutoCAD, follow the tutorial here. You will need to be logged into your Northeastern email address to download the AutoCAD template.
- AutoCAD template: EXP PLS6.150D Laser cutting template.dwt
- User guide:
Set up Settings
Under “File,” click “Print” to pull up a menu like this:
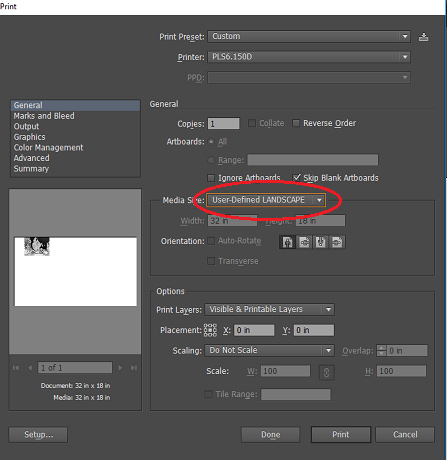
- The only settings you need to choose here are placement and media site. Placement defaults to the center, but you should switch it to the upper left corner. It is much easier to line up a piece by the corner than by the center. You can also change the placement later on in the Universal Control Panel (UCP), which is the software that directly controls the laser cutter. Media site should be a user defined landscape.
- Make sure that the printer is set to PLS6.150D and hit print to send your file to the laser cutter. It should open up a window that looks like this, with your file in the white print-bed area:
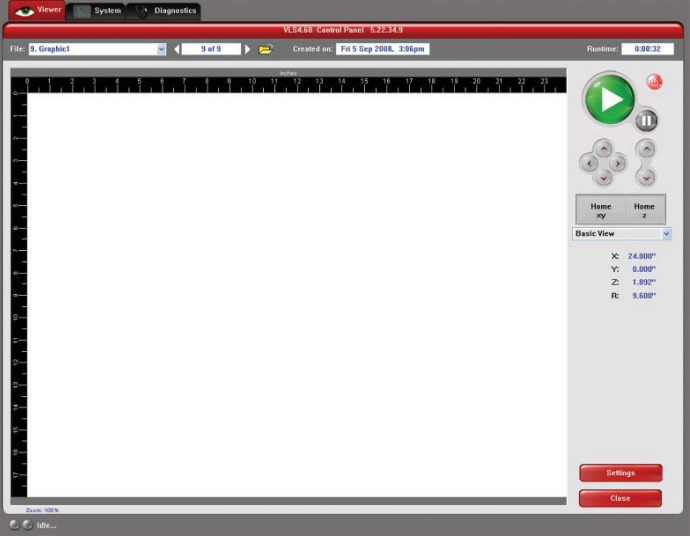
- Click on the red “Settings” button in the lower right-hand corner to open up the printer settings.
- Use the category section to pick out the type of material that is the most applicable to your project. Make sure to adjust the material thickness at the bottom as well (and double check your units). These settings are optimized for the specific laser cutter. If they don’t cut or raster effectively, please let an Explorer or the makerspace technician know, because this means that there may be maintenance needed on the machine.
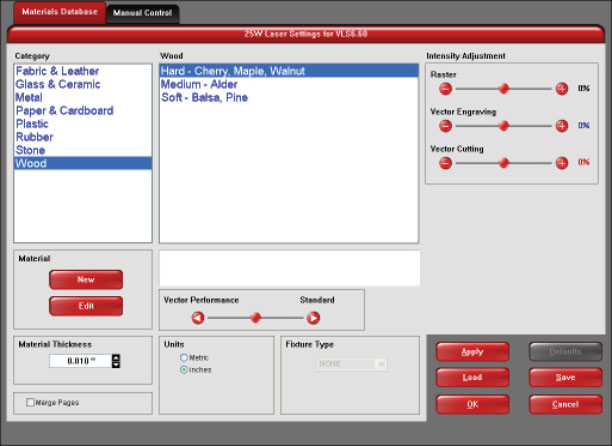
- What does each setting mean?
- Speed is how fast the head travels. A slower cut is more powerful but more likely to start a fire, since the laser fires in the same place for longer.
- Power is misnamed. It’s a setting that takes a lot of things into account, but it’s also the one we care about the least. You will set the power to 100% for most jobs, and a few materials will warrant lower power for engraving.
- Frequency is how quickly the laser beam oscillates. Without getting too much into the science, a higher frequency beam carries more energy and is, therefore, hotter and can cut through more, but it also carries a greater risk of catching on fire.
- Changing the placement and number of cuts: In the “Viewer” tab, there is a drop down menu on the right side of the screen. There are a few types of “View” modes here:
- Basic view: Shows a preview of whatever is going to be printed. Your cursor can magnify the print bed if needed.
- Focus view: This is where you can manually move the laser to different parts of the print bed, which is especially useful if you have oddly shaped stock on the print bed. To move the laser, type in X and Y coordinates (look at the rulers on the print bed to help you estimate).
- Estimate view: This is how you can estimate how long your job will take. For more complex jobs, this may take longer to calculate.
- Relocate view: This allows you to move your job to other parts of the print bed, which is especially useful if you have oddly shaped stock on the print bed. When this is activated, your job is surrounded by nine small squares (anchor points) representing the edges and center of your graphic. You can do a few things here:
- You can select and hold an anchor point and drag that anchor to move the image around in the field.
- You can select an anchor point and type a new X-Y coordinate for that anchor point in the X-Y fields to the right of the preview screen.
- Using the X-Y manual motion buttons, you can move the laser to a location on the print bed. Using the red laser as reference, select an anchor point in your image and press the TO POINTER button to move that anchor point to the current focus carriage location.
- Duplicate view: This allows you to duplicate your image in a grid pattern if you want to make your print multiple times. Once you have your grid (you can set how many rows/columns), you may delete certain instances and move instances around until you get the number you need.
Setting up Laser Cutter
- Turn on your blast gate, hit the timer, and open your air line. The blast gate vents out any toxic fumes and you compressed air line prevents fires.
- Choose your material. If your piece fits on scrap, please use scrap! Ensure the piece you have chosen is not warped or torn in the cutting area.
- Home your X-Y Axis. This is done on the printer interface.
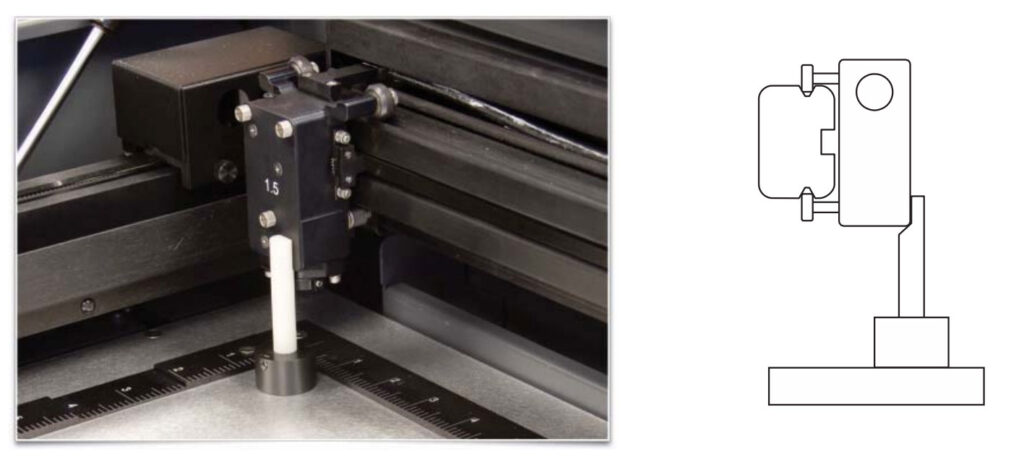
- Set your Z Axis. Level the print bed to whatever you’re cutting. There is a small tool, called the calibrated focus tool, that will be with the laser cutter that will help you adjust the height of the bed (see the white tube of plastic on the left photo). Place your material onto the bed. With the lip of the tool underneath the edge of the laser head, use the software to adjust the height of the print bed. You want the bottom of the tool to be just barely touching your material, and the lip of the tool firmly underneath the bed (see the photo below right). Use the up/down arrows on the machine to move the bed level.
- Square your material up to the top left corner of the honeycomb laser bed.
- In the ULS software, you can adjust the X/Y location of the laser to wherever you would like the cut to start. DO NOT move the laser head with your hands! Only use the software to move the laser head! Use the arrows underneath the green arrow-right icon to move the laser head.
- SAFETY NOTE: Never use the software to move the laser head when your hands are in the machine. Always remove your hands from the machine before moving the laser head.
- Note that the upper left corner of your cut is not necessarily the upper left corner of the bed if you are cutting somewhere else on the piece.
Test Run
- With the pointer on and the laser cutter lid opens so that the beam cannot fire, press the green “Go” button. The laser will move as though it is cutting, but without actually firing.
- There are a few things you are to watch out for here:
- Ensure the laser won’t go off the bed and hit the metal frame. You can see scars where the laser has gone off the bed before, and it’s bad for the machine, and your piece will turn out wrong.
- Ensure it cuts correctly and in the correct order. The laser is smart enough that it almost always gets the order right, so if it is cutting multiple lines, it will cut the inside ones first, so no piece gets cut loose and drifts around.
- Ensure that your cuts are actually on your piece! If the laser passes over the bed and not your piece, it will keep firing onto the bed, which obviously is not good for our machines.
- Try not to start a cut too close to the ruler, just in case the laser is improperly calibrated. It may hit the rules on the edge of the bed and damage the machine. If you notice anything that shouldn’t be happening, adjust the file or the location of the zero, and do another test run.
- At the end of each test run, the laser head should automatically return to the home position. If you pause a cut for some reason, it won’t do this automatically. Press the “Reset” button to return the head to home.
Making your Cut
- Once you have done a test run that you are satisfied with, let the head return to home, then close the lid. Closing the lid will engage the magnets, enabling the laser to fire.
- Make sure you still have your PPE on – it’s easy to take your safety glasses off while preparing the cut, so double-check. Also, ensure your shop buddy can still see you since you’re about to do the dangerous part of the operation.
- Turn the ventilation on using the box on the wall. Press “Reset” and then “Start.” The light should turn green, and the vents will start sucking fumes out of the laser.
- When you’re sure that all the safety protocols are in place, press the green “Go” button again. It will do the same path again, but the laser will fire this time.
- You DO NOT want to stare at the laser as it cuts! If you do, please wear tinted safety glasses as provided. NEVER view the laser with any type of magnifier, such as binoculars. Check on it especially as it starts, and every few minutes afterwards to make sure it doesn’t catch on fire. If it does, follow the fire extinguisher procedure – open the lid, use the spray bottle, and if that doesn’t work, use the fire extinguisher. You may not leave the room as your job is running. For longer cuts, you may ask someone who is trained to watch over the machine for you if you need to step out.
Cleaning up
- When the cut is done, wait thirty seconds so the vents can take care of the last fumes. Then you can turn off the laser and the vents and open the lid of the laser cutter. Remove your piece and any other material, like the piece you cut it out of. Don’t worry about touching the bed – because of its shape; it is not hot.
- If the leftover material is usable, put it on the scrap shelf. Otherwise, either recycle it or throw it away, depending on the material.
Acceptable Materials
- Plywood
- Cardboard
- Fiberboard
- Paper
- Acrylic
- Natural, Neoprene, and Silicone Rubbers
If you want to cut any of the following, you MUST check with an Explorer first!
- Other Woods
- Leather
- Fabric
- Cloth
- Plastic
- Mylar
- Fiberglass
- Corian
- Cork
- Multilayer corrugated cardboard
Some materials can be engraved but not cut:
- Glass
- Clay
- Tile
- Marble
Disallowed Materials
Certain materials are extremely hazardous and should never be cut on the laser cutter:
- PVC
- Vinyl
- Artificial Leather
- Polycarbonate/Lexan
- ABS Plastic
- HDPE
- Polystyrene Foam
- Polypropylene Foam
- Polyurethane Rubber
- Fiberglass
- Carbon Fiber
Two types of material are special cases. Some metals are okay to engrave, but others can create toxic fumes and start fires. If you want to cut metal foils, ask an Explorer. Sheet metal can often be cut with the waterjet on the first floor! Painted materials can be used the same as the unpainted version but check with an Explorer first to ensure the paint isn’t toxic or flammable.