Vinyl is a material that can stick to walls, computers, tables, the floor, or any smooth surface. One side is a matte or glossy finish, while the other is adhesive and covered by a peel-off backing. The vinyl cutter uses a small blade to cut the vinyl, which follows a path input from the connected computer. A software called Adobe Illustrator can be used to create sticker designs and send them to the vinyl cutter.
Safety Considerations
Machine Anatomy
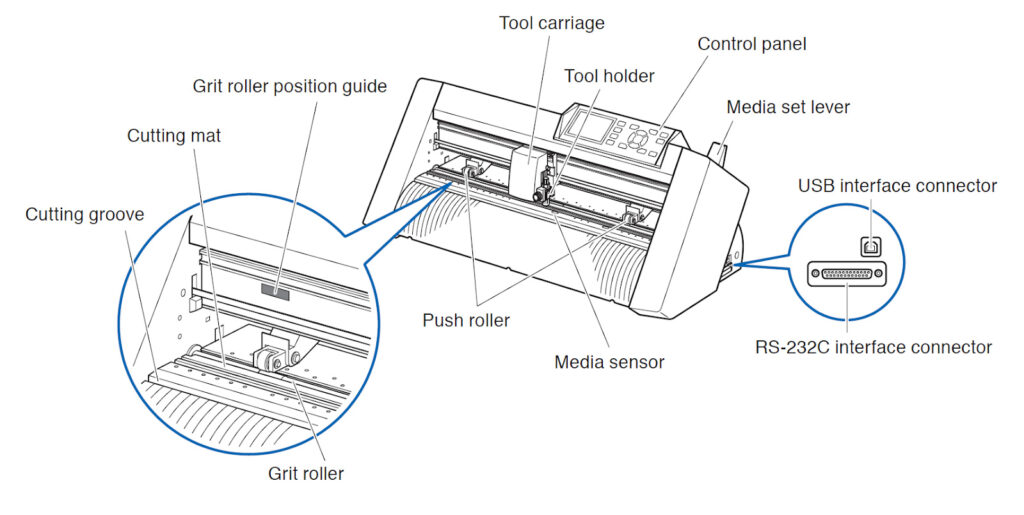
- Control Panel: Controls the vinyl cutter’s settings.
- Grit Roller: A roller that pushes the vinyl through the cutter.
- Push Rollers: Wheels that hold the vinyl against the grit roller.
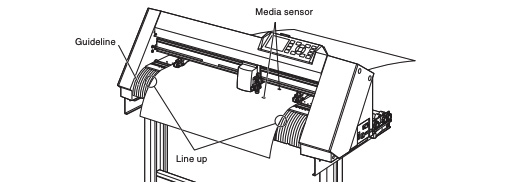
- Media Sensors: One on the front, one on the back. Detect both ends of the “media,” or the vinyl piece.
- Tool Carriage: Moves side-to-side with the blade in the tool holder.
- Tool Holder: Holds the blade and engages/disengages it from the vinyl.
- Grit Roller Position Guide: Blue marks show the acceptable placement for the push rollers, where they can fully engage the grit rollers.
- Cutting Groove: A straight groove is used to line up the media when you load it.
- Media Set Lever: Raises and lowers the push rollers to clamp or release the media.
- USB interface Connector: A USB interface cable is used to connect the vinyl cutter to the computer.
- RS-232C interface Connector: Used to connect the vinyl cutter to the computer with an RS-232C interface cable.
Operating the machine
Attaching the tool
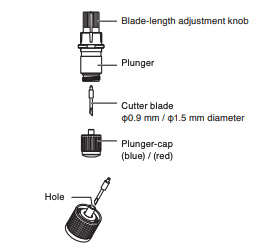
The cutter blade goes blade down, with the top of the blade going into the plunger and the pointy side of the blade capped by the plunger cap. The knob at the top of the plunger is controls the depth of the blade.
Attaching/Replacing the blade:
- Loosen the tool holder screw.
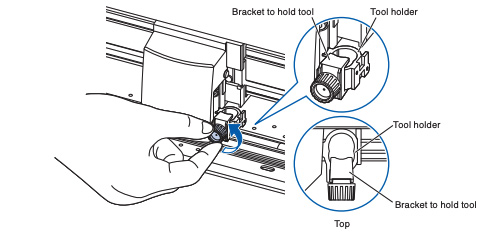
- While pushing up the tool holder, push until its flange completely touches the upper part of the holder.
Loading the machine
- Turn the machine on with the on/off switch on the left side, right above the power cable port.
- The control panel screen should have a message telling you to load media. To do this, place a vinyl roll on the rollers behind the machine.
- Feed the roll through the back of the vinyl cutter and guide it through, so it sticks out the other side. You must ensure the Media Set Lever is lowered to do this.
- Ensure that the vinyl is below the rubber wheels and the grit rollers on both ends of the machine. These hold the material in place while it is being cut.
- You can manually slide the rubber wheels 15mm from the edge of the vinyl sheet and pull the material taught between the rollers.
- Set the sheet media, so the paper’s edges line up with the guideline on the front side. Make sure that the sheet media completely covers the media sensor.
- Raise the Media Set Lever to clamp the material in place.
- A menu should appear on the screen with items corresponding to the numbered buttons.
- Press 1 for “Roll-1 Front Edge” if the front edge of your sheet is in a perfectly straight line.
- Press 2 for “Roll-2 Current Position” if a section is cut out of the front edge (this option will set the workspace up in whatever configuration you have loaded the roll without moving the roll).
- The sensors in the cutter will automatically determine the width of the roll (the length is however much material is left on the roll). It is a good idea to make a note of this value.
- If you are cutting from a smaller sheet or a scrap piece, load in the piece and move the roller wheels so they hold your piece in place.
- You can only move the roller wheels when the Media Set Lever is up.
- You can only move the roller wheels to a section with a grit roller. The blue rectangles indicate these sections along the front of the cutter.
- Once your piece is secured, lower the Media Set Lever and press 3 for “Sheet.”
- The sensors in the cutter will automatically determine the dimensions of your sheet. It is a good idea to make a note of these values.
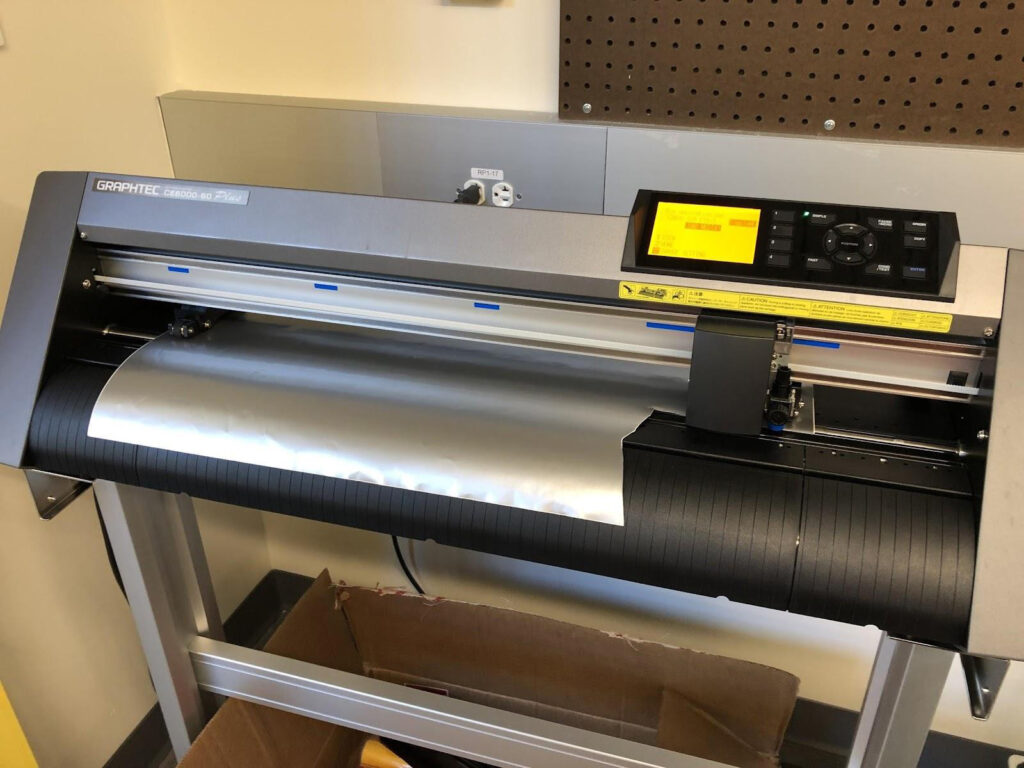
Vinyl is loaded into the vinyl cutter. Because this piece has a chunk out of the front edge, you’d want to select option 2 (“Roll-2 Current Position”) when loading. A close-up of a properly loaded piece of vinyl. Note that the piece is secured by being sandwiched between a grit roller and the moveable rubber wheel.
Preparing and Cutting Your Design
- The vinyl cutter software interfaces with Adobe Illustrator. You can download the Cutting Master 5 software here.
- When you first open Illustrator and create a new document, the first thing to do is set the size of your artboard. You can do this by pressing Ctrl+O to get to the Artboard Tool, then selecting the size of your artboard by dragging the handles or entering dimensions into the width and height boxes at the top of the screen.
- You should set your artboard dimensions to fit within the roll or sheet dimensions measured by the cutter! This is why it is a good idea to make a note of them.
- Next, you can start creating your design within Illustrator. Illustrator is an excellent tool for creating vector drawings, the kind of input read by the vinyl cutter.
- The simplest way to start is by drawing basic shapes or typing words.
- You can also load an image from the internet into Illustrator and run an image trace to turn the image into a vector drawing. Single-color images work best for this.
- Once you load your image into your artboard, select it with the Select Tool (V) and then click on the “Image Trace” button at the top of the screen. This should default to creating a single-color silhouette of the image.
- Next, click the “Expand” button at the top of the screen. You may also need to ungroup (right click → Ungroup) the vector and delete or modify anything you don’t want cut.
- Save as an .AI file with the smallest canvas size possible
- Once your vector art is how you want it, in Illustrator, go to File → Cutting Master 5 -> send to Cutting Master 5.
- Cutter Master Software should automatically open.
- For Illustrator to work, you must close Cutting Master.
- You will see your design appear inside a large white rectangle; this space represents the available area to cut. You can move your design around in this space, but to conserve material, it’s best just to leave it in the corner.
- Zoom in on the design and ensure there aren’t any extra lines you don’t want to cut. Any lines shown in this space will get cut. If you see stray lines, close out of this window and fix your drawing.
- When you are happy with your drawing and its position, click the “Output” button. This will send the design directly to the vinyl cutter.
- If the software doesn’t work properly, you can change the drop down next to “Output” to read “Send to File” instead of “Send to Cutter”. This allows you to save the print job with all your settings to a USB drive instead, which you can plug directly into the machine.
Preparing and Applying Your Sticker
- When the machine finishes cutting your design, grab some scissors and cut out the square of vinyl enclosing your design. If your design takes up the entire width of the roll, you can use an X-Acto knife and slide it across the sheet in the small groove on the front of the machine.
- You may need to lift the Media Set Lever and pull out some more material to cut out your design easily.
- Grab some tweezers and peel away the parts of the vinyl that aren’t a part of your design. Double-check before peeling that the piece you are peeling is supposed to come off!
- Gently peel back a piece of transfer paper and cut it off from the roll. The idea of the transfer paper is that it is just sticky enough to grab onto the vinyl from the backing paper but weak enough that your design will transfer off of it onto a surface.
- Be careful—this stuff is very sticky and will easily stick to itself.
- The piece you peel back should be large enough to cover your entire design.
- Carefully lay down the piece of transfer paper on top of your vinyl. This works best by laying it down from left to right, applying gentle pressure as you go, and ensuring you don’t get bubbles.
- Once your transfer paper is down, smooth out any bubbles and apply pressure to the design. Using a card (e.g., a credit card or your student ID) is a great way to do this.
- Smooth out bubbles by pushing them out toward the edges of the design.
- Flip your design over and peel away the backing from the vinyl. This works best if you move slowly and peel the backing off so that you’re pulling it parallel to the design (keep it flat against the table as you pull it).
- If pieces of your design get peeled up with the backing paper, lay the backing back down and apply more pressure with your card. Keep doing this until it sticks.
- Your design should now be sticky-side-up on the transfer paper.
- Now you’re ready to apply your sticker! Place the design with the transfer paper against the desired surface, laying it down smoothly to avoid creating bubbles.
- Apply pressure again with your card, then slowly peel away the transfer paper.
- Again, if pieces are sticking to the transfer paper and not to the surface, lay the transfer paper back down and apply more pressure.
Finishing Up
- Throw away any trash around your workspace, but also be mindful of material that can be reused.
- The general rule of thumb is to throw away any piece of vinyl that is smaller than you would want to use.
- Any reasonably sized scraps of vinyl should be placed in the scrap vinyl bin.
- Unload your vinyl after you are done and put the roll away out of courtesy for the next user.
- Turn off the machine
- Put away scissors, knives, and tweezers
- Delete your files from the computer and turn off the screen.