
The Bernina can be used for most textile projects, including garments, stuffed animals, bags, pillows, and more. Students should not use the Bernina for sewing thick fabrics or materials as they can get stuck or break the machine. Thicker projects can be sewn on the industrial Sailrite machine.
Safety Considerations
Machine Anatomy

Operating the Machine
Threading the bobbin
If there’s a bobbin with the matching top thread color that’s already filled, you do not need to fill up a new bobbin!
- Turn on the machine with the switch just above the power cord.
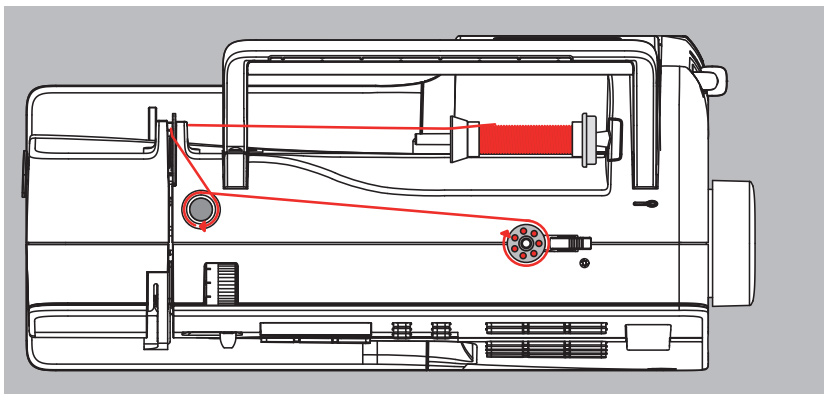
- Put the spool on the spool pin and secure it with a spool disc. Put the tail of the thread through the rear guide and pre-tension stud– there are arrows at the top that you can follow.
- The rims of the bobbin each have holes. Put the thread through one of these holes, from the center going out. Wind the thread a few times around the empty bobbin.
- Put the bobbin on the bobbin winder. This is a white peg on the top of the machine.
- Push the engaging lever against the bobbin.
- Gently press the foot pedal down. The bobbin will start to fill and it’ll stop automatically when finished.
- Cut the thread for the bobbin and set it aside.
Threading the top of the machine
- Lift the presser foot using the lever just behind it and raise the needle with the wheel on the right side of the machine.
- Turn off the power.
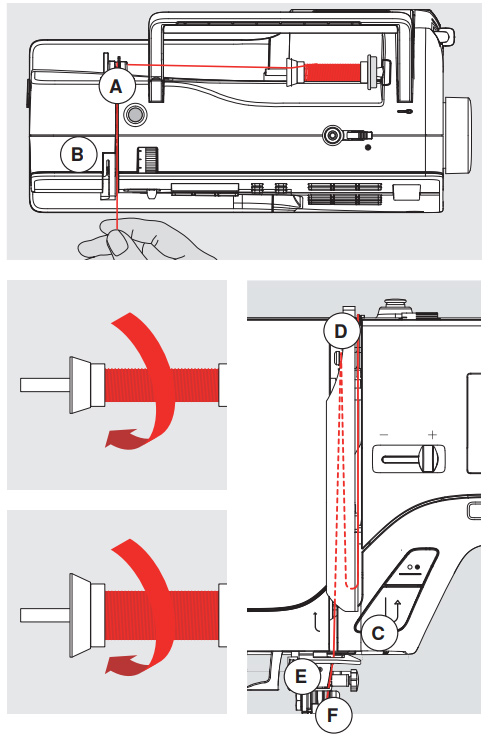
- Put the spool of thread on the spool pin, so that the thread unwinds clockwise.
- Using the arrows and the guide below, thread the machine around the rear guide (A), into the upper thread tensioner (B), down to the right of the take up cover and around (C), up to the left of the cover and around (D) and then down through needle guides (E and F).
- Thread the eye of the needle and you’re done!
Threading the bottom of the machine
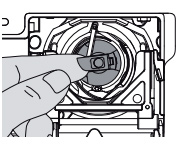
- Insert the bobbin into the case so that the thread runs clockwise.
- Pull the thread counterclockwise into the slot and pull the thread under the spring until it lies in the slit at the end of the spring. If you pull on the thread, the bobbin should spin clockwise.
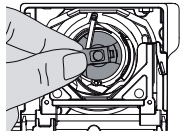
- To remove the bobbin case, raise the needle with the wheel on the right of the machine, and turn off the power. Open the bobbin cover at the bottom of the machine and remove the case by removing the latch of the bobbin.
- To insert the bobbin case, hold onto the latch and insert the case until you hear a click.
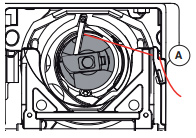
- There’s a bobbin thread cutter to the right of the bobbin (A in the photo below), and once you cut that thread, it should be the perfect length for the machine to grab onto.
Machine Settings
There are many settings you can input on this machine, but the four most important ones are: Stitch Type, Length, Width, and Tension
Stitch Type
The stitch type is set using the buttons on the front for the 10 most common stitches, and the rest of the stitches (numbers 11 through 115) are done by hitting # twice and then entering the numbers you want. Refer to the platform Bernina to see the other stitches. There are many types of stitches, but you will almost always want a straight or a zig-zag stitch (type A or type B on the guide above). A straight stitch is used to stitch fabric together. A zigzag stitch is usually for stitching together stretchy types of fabric, the thread in a straight stitch will break if you pull on it if you sew on particularly stretchy fabric.
Stitch Width
- The top arrow key buttons to the left of the screen alter stitch width. The left button narrows the width, and the right button widens it.
- When making a straight stitch, stitch width doesn’t matter, but by convention is set to 0.
- When making a zig-zag, stitch width is the amount it will move side-to-side. A good width depends on context, but a zig-zag with a width of 0 is just a line.
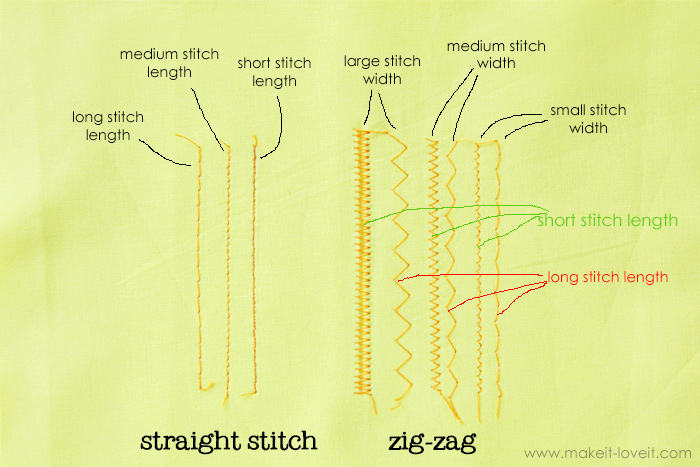
Stitch Length
- The bottom arrow keys to the right of the screen change the stitch length. The left button shortens length, and the right button elongates the length.
- The standard speed is 2.5, and you should set the speed to this unless you have a good reason to do otherwise. For example, maxing out the speed to 6 is often used for making basting stitches.
- Setting a higher speed will make the stitch faster, but looser and messier. Setting it lower will make the stitch tighter but slower. You can even set it to zero, which will make the fabric not move at all but is helpful for tacking things in place.
Tension
- The tension wheel is at the top of the machine, towards the front and next to where you thread the top spool. It should be set to the red line, and this is a factory setting. It’s a very finicky setting, so please do not change it without telling an Explorer. If you think the tension needs to be changed, tell an Explorer so they can help you change it.
- Reasons that you might have to change the tension include using non-standard types of thread or sewing on particularly delicate or stretchy types of fabric, such as silk or chiffon.
Preparing your piece to sew
- If you are sewing something to be a particular size, add a half inch to each side when cutting it out.
- Lay the pieces of fabric with their outsides, so your finished seams face out when done.
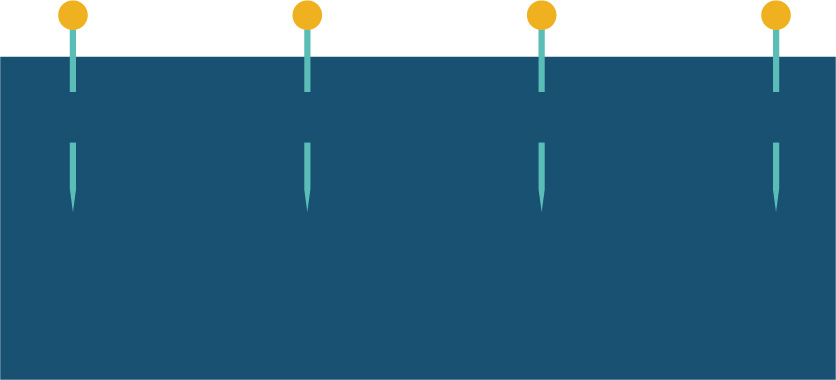
- Pin your fabric along the edges with the pins facing inwards, perpendicular to the edge.
Sewing with a sewing machine
- If you’ve just rethreaded the machine, test out a straight stitch on a piece of test fabric first. This just ensures that the machine is running properly, and can save your fabric from getting eaten in the machine.
- Raise the presser foot using the lever behind it.
- Place your piece under the presser foot, with the majority of your excess hanging off the left.
- Align the right edge of your piece with one of the straight lines next to the foot.
- Lower the presser foot.
- Gently press the foot pedal. The needle will start to move and the fabric will go forward. Only sew a few stitches forwards.
- Hold down the quick reverse button to sew backward over these first few stitches. This locks your stitches into place and prevents them from unraveling.
- Continue to sew forward until you reach the end of your piece. Once you’ve done a few stitches, you can press harder on the pedal to speed them up.
- Hold down the reverse pedal and sew backward over the last few stitches to lock them in place.
- Turn the hand wheel to bring the needle up out of the fabric.
- Raise the presser foot.
- Pull your piece away from the machine and cut the threads it trails behind.
- Flip your piece inside out to hide the seams, and you’re done!
Hand sewing
- This is a useful skill to learn, especially if you are new to sewing. Hand sewing is often used to finish pillows, mend small projects, or do detailed designs.
- Thread a hand-sewing needle and measure out a piece of thread about the length of your arm.
- Line up the two ends of the thread, so your needle sits in the center of a loop.
- Tie a knot at the end of the threads, making it one thick thread.
- Sew up and down through your layers of fabric
- Tie a knot at the end of your project and cut the threads.
Troubleshooting the Bernina: Something is wrong– what do I do?
- Ask an Explorer!
- If something doesn’t seem right, tell an Explorer. Even if you can fix the problem independently, we’d like to know what it is.
- Re-thread the whole machine: This is the sewing machine equivalent of “have you tried turning it on and off again?”
- Make sure the bobbin is in correctly.
- Make sure the top thread is correctly in line.
- Check the needle.
- Is it broken? Is it bent?
- If it is, tell an Explorer. They will either help you replace it or get you a new needle so you can do it yourself.
- Is it broken? Is it bent?
- Do your first few stitches with the hand wheel, not the foot pedal.
- Sometimes slowing down and holding your fabric in place can prevent the machine from “eating” your piece or getting tangled.
- Check the thread tension.
- Typically you should avoid touching the tension on the machine, but you can if you are comfortable with sewing machines. If you need to adjust the tension, take a piece of test fabric and sew lines, making minor changes to the tension wheel at the top left of the machine.
- If you change the tension, please tell an Explorer, so we are aware of the state of our machines.
- These are examples of what stitches look like when the tension is incorrect:
