If you want to train yourself on a sewing machine, you will need to have a thorough understanding of what is covered in this user guide. A staff member can give you a credential allowing you to use a sewing machine independently if you can demonstrate an understanding of the sewing process. This includes:
- A walkthrough of how you would thread the machine and bobbin
- Sewing straight lines
This document will walk you through the basics of sewing. Text in black explains certain concepts.
Text inside blue boxes are steps you should actively take to guide you through this process.
How do sewing machines work?
Sewing machines stitch together fabric with two different spools of thread: the top spool (what you’d buy at a store) and a bobbin (the smaller spool that you have to wind yourself). Typically, a user will wind a bobbin with the thread that they buy at the store, so the two of them match.

Here are some key parts of the machine:
- Thread guide: Guides the thread through the needles.
- Bobbin Winder: What you put a bobbin on to put thread on it.
- Width and length selection: Changes the width of stitches (such as embroidery and zigzag) and lengths.
- Hand wheel: Moves the needle up and down manually.
- Stitch selection: Changes the type of stitch the machine will do.
- Reverse switch: Makes the machine sew in reverse when held down.
- Presser foot: Presses the fabric down.
- Bobbin casing: Holds the bobbin into the machine.
There are four main settings to a sewing machine. In short:
- Length should be set to 2.5 by industry standard. A higher length will move faster but make a looser, messier stitch. A shorter length will move slower and make a tighter stitch. A length of zero will not move the fabric at all, and is used to tack something down.
- Stitch type is the wheel below length. You usually want to do a straight stitch, but might want a zigzag in some circumstances.
- Width is how wide a stitch is. Zero is the default, and should be used when sewing a straight stitch. If you are doing a zig-zag, the width will come into play.
- Don’t adjust the tension wheel without consulting a Explorer. This setting is very finicky, and it’s easy to mess it up.
Below are more detailed explanations of each of the settings.
- Stitch Length: The bottom arrow keys to the right of the screen change the stitch length. The left button shortens length, and the right button elongates the length–it does this by adjusting the feed of your material. The standard feed is 2.5, and you should set the feed to this unless you have a good reason to do otherwise. For example, maxing out the feed to 6 is often used for making basting stitches. Setting a higher feed will make the stitch faster, but looser and messier. Setting it lower will make the stitch tighter but slower. You can even set it to zero, which will make the fabric not move at all but is helpful for tacking things in place.
- Stitch Type: The stitch type is set using the buttons on the front for the 10 most common stitches, and the rest of the stitches (numbers 11 through 115) are done by hitting # twice and then entering the numbers you want. Refer to the platform Bernina to see the other stitches. There are many types of stitches, but you will almost always want a straight or a zig-zag stitch (type A or type B on the guide above). A straight stitch is used to stitch fabric together. A zigzag stitch is usually for stitching together stretchy types of fabric, the thread in a straight stitch will break if you pull on it if you sew on particularly stretchy fabric.
- Stitch Width: The top arrow key buttons to the right of the screen alter stitch width. The left button narrows the width, and the right button widens it. When making a straight stitch, stitch width doesn’t matter, but by convention is set to 0. When making a zig-zag, stitch width is the amount it will move side-to-side. A good width depends on context, but a zig-zag with a width of 0 is just a line.
- Tension: The tension wheel is at the top of the machine, towards the front and next to where you thread the top spool. It should be set to the red line, and this is a factory setting. It’s a very finicky setting, so please do not change it without telling an Explorer. If you think the tension needs to be changed, tell an Explorer so they can help you change it. Reasons that you might have to change the tension include using non-standard types of thread or sewing on particularly delicate or stretchy types of fabric, such as silk or chiffon.
There are three main skills you should practice:
- Threading the machine
- Winding a bobbin
- Threading a bobbin
Winding the bobbin
NOTE: If you see a bobbin in your thread color, do not fill a bobbin! Please use the bobbin that already exists.
- Turn on the machine with the switch just above the power cord.
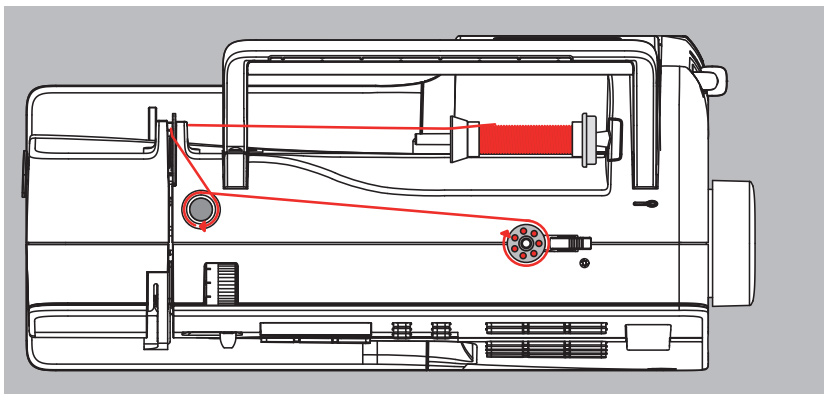
- Put the spool on the spool pin and secure it with a spool disc. Put the tail of the thread through the rear guide and pre-tension stud– there are arrows at the top that you can follow.
- The rims of the bobbin each have holes. Put the thread through one of these holes, from the center going out. Wind the thread a few times around the empty bobbin.
- Put the bobbin on the bobbin winder. This is a white peg on the top of the machine.
- Push the engaging lever against the bobbin.
- Gently press the foot pedal down. The bobbin will start to fill. Release the foot petal when the bobbin is about a third full.
- Cut the thread for the bobbin and set it aside.
Winding the bobbin: Video instructions
Threading the top of the machine
- Lift the presser foot using the lever just behind it and raise the needle with the wheel on the right side of the machine.
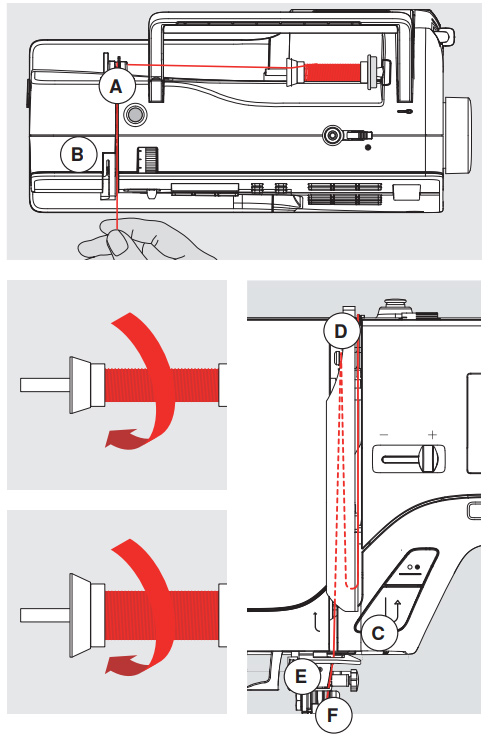
- Put the spool of thread on the spool pin, so that the thread unwinds clockwise.
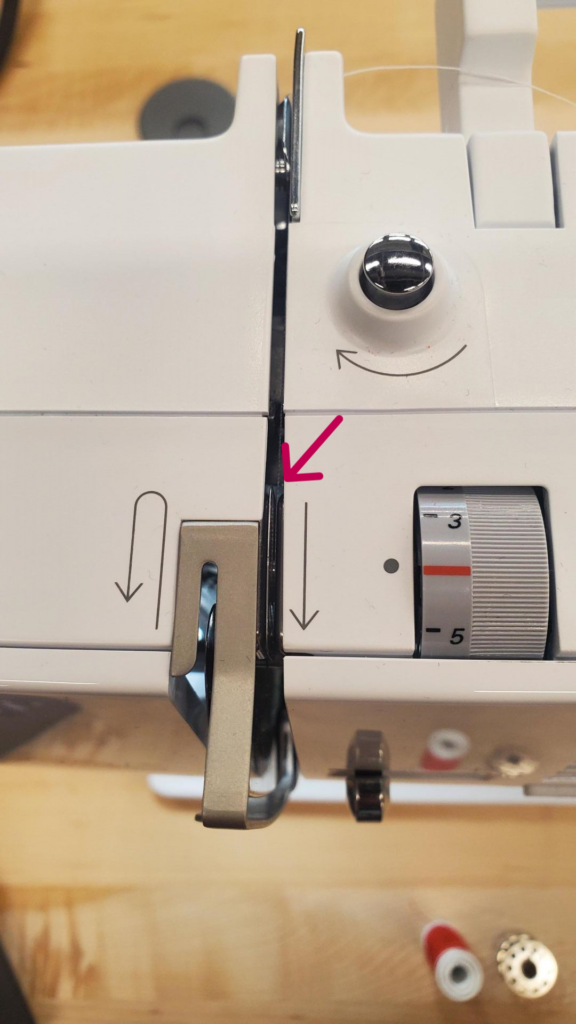
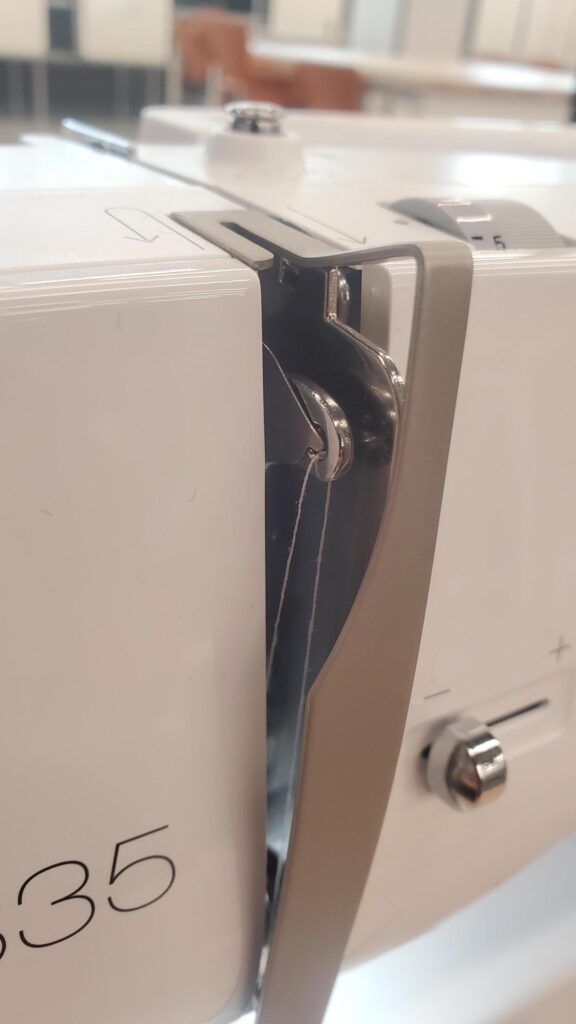
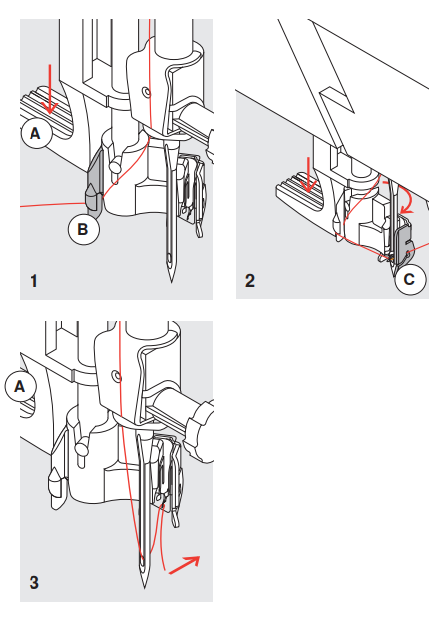
- Follow the photo on the right: thread the machine around the rear guide (A), into the upper thread tensioner (B: Make sure that the thread it on the right of the metal sliver next to the down arrow. See the photo on the bottom left), down to the right of the take up cover and around (C), up to the left of the cover and around (D: Make sure your thread catches on the little metal hook, see the photo on the bottom right) and then down through needle guides (E and F).
- Thread the eye of the needle and you’re done!
Using the automatic threader
Threading the eye of the needle may be difficult. These sewing machines come with automatic needle threaders.
- Press the lever down. Raise the needle up, lower the presser foot, hold the thread to the left and back of the threader, and press down lever A while guiding your thread to hook B.
- Guide the thread to the front of the needle into guide C until it catches into the wire hook.
- Release the lever A and the thread you’re holding. The thread should be dragged into the eye of the needle.
Threading the top of the machine: Video instructions
Threading the bottom of the machine
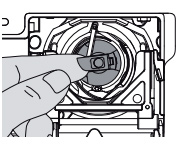
- Insert the bobbin into the case so that the thread runs clockwise.
- Pull the thread counterclockwise into the slot and pull the thread under the spring until it lies in the slit at the end of the spring. If you pull on the thread, the bobbin should spin clockwise.
- To remove the bobbin case, raise the needle with the wheel on the right of the machine, and turn off the power. Open the bobbin cover at the bottom of the machine and remove the case by removing the latch of the bobbin.
- To insert the bobbin case, hold onto the latch and insert the case until you hear a click.
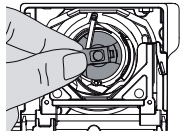
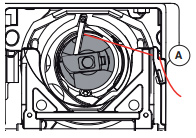
- There’s a bobbin thread cutter to the right of the bobbin (A in the photo below), and once you cut that thread, it should be the perfect length for the machine to grab onto. The machine essentially threads itself, but that the overhanging thread is what will typically cause a thread jam.


Threading the bobbin: Video instructions
Practicing sewing!
*If you’ve just rethreaded the machine, test out a straight stitch on a piece of test fabric first. This just ensures that the machine is running properly, and can save your fabric from getting eaten in the machine.
Grab a piece of test fabric and try sewing a straight stitch:
- Raise the presser foot using the lever behind it.
- Place your piece under the presser foot, with the majority of your excess hanging off the left.
- Align the right edge of your piece with one of the straight lines next to the foot.
- Lower the presser foot.
- Gently press the foot pedal. The needle will start to move and the fabric will go forward. Only sew a few stitches forwards.
- Hold down the quick reverse button to sew backward over these first few stitches. This locks your stitches into place and prevents them from unraveling.
- Continue to sew forward until you reach the end of your piece. Once you’ve done a few stitches, you can press harder on the pedal to speed them up.
- Hold down the reverse pedal and sew backward over the last few stitches to lock them in place.
- Turn the hand wheel to bring the needle up out of the fabric.
- Raise the presser foot.
- Pull your piece away from the machine and cut the threads it trails behind.
Practice the following skills:
- Sewing with no hands! Let your hands off the test fabric. The machine will sew straight if you don’t touch it since the feed dogs (the bumpy metal under your fabric) will move the fabric.
- This is just like driving a car: the car will go straight if you don’t steer it, but you should always have your hands on the wheel.
- Sewing curved lines: Simply move the fabric while you’re sewing. Notice how easy it is to curve your stitches, but that it’s harder to make sharp turns quickly.
- Speed: This is controlled by the foot pedal. Press down hard on the foot pedal to make it move faster, and ease up to make it go slower.