The Serger, or Overlocker, is a specialized sewing machine that uses three or four threads at once to bind fabrics together and leave a clean edge. The Serger sews much faster than a regular sewing machine, and the setup is particular, making it a more advanced specialty machine. This machine can be used to create a more professional finish on projects but cannot replace all the functions of a regular sewing machine, as it cannot be used for topstitching, zippers, buttons, etc.
Safety Considerations
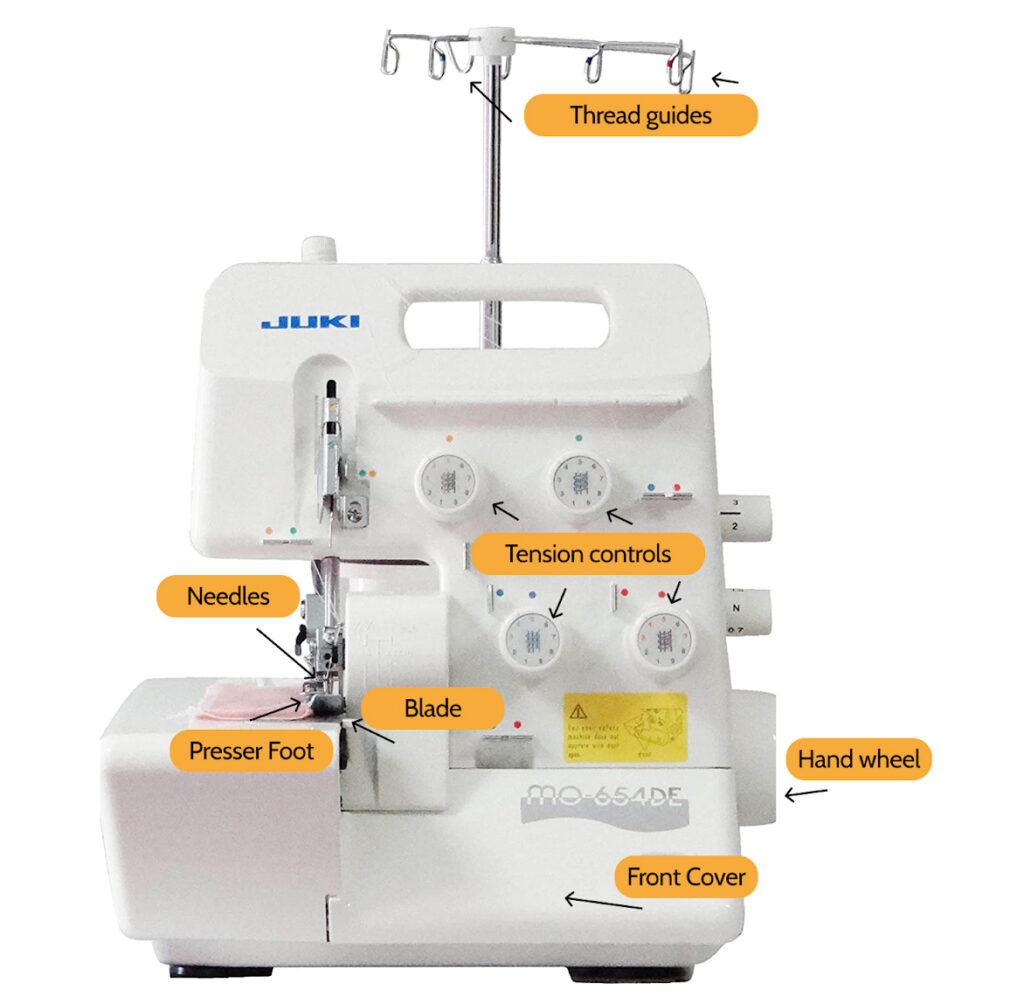
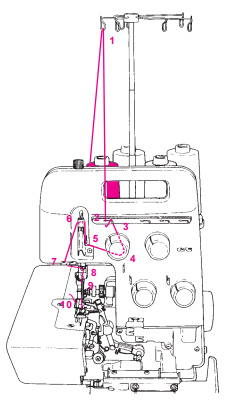
Parts of a Serger
Operating the Machine
Threading the Machine
We will keep the machine threaded with grey thread. You may thread the machine with other colors if you’d like, but threading the serger often takes at least 20 minutes. Our training to use the serger will not cover threading the machine for this reason. If you do decide to rethread the machine, please let an Explorer know.
Threading the serger is the most complicated part of using the machine; follow these steps to ensure the machine doesn’t break.
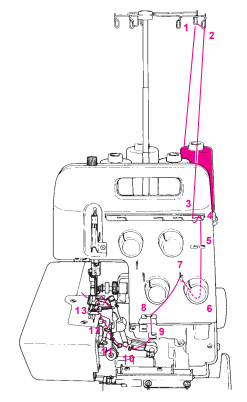
- Place your thread on the thread holders on the back of the machine. You will need four cones or spools of thread. The two right threads correspond with the ‘loops’, and the left two correspond to the ‘needles’.
- Lift the presser foot using the lever on the right of the machine
- To properly set up the Serger, you need to thread the parts of the machine in a specific order. Using the corresponding tension wheels, that order is: blue, red, green, and yellow.
Threading the blue channel (upper looper thread)
- Place the spool on the spool holder pin right under blue marking on the retractable support rod thread guide.
- (1) Bring thread up from the rear of the retractable support rod thread guide with blue marking.
- (2,3) Pass the thread through the thread guide plate.
- (4) Bring the thread on to the thread guide.
- (5) Lay the thread between the thread tension dial discs.
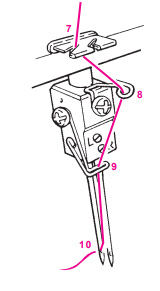
- (6,7,8,9,10,11) Thread the thread guides.
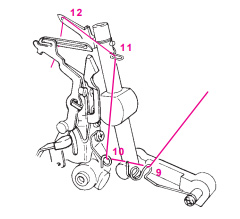
- (12) Turn the handwheel until the upper looper is fully raised. Thread upper looper eye.
- (13) Pull about 10 cm of the thread out. Place the thread under the presser foot, and pull the thread from behind the presser foot.
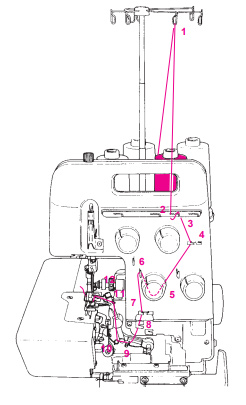
Threading the red channel (lower looper thread)
- Place the spool on the spool holder pin right under red marking on the retractable support rod thread guide.
- (1,2) Bring thread up from the rear of the retractable support rod thread guide to the front of it.
- (3,4) Pass the thread through the thread guide plate.
- (5) Bring the thread on to the thread guide.
- (6) Thread the thread tension dial.
- (7,8,9,10,11) Thread the thread guides.
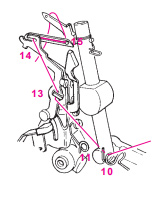
- (12) Raise the needle fully and press the lever of the threading device down.
- (13,14) Thread the guide and then the slit on the device. Holding the thread loosely with the left hand, turn the handwheel until upper and lower loopers just cross. The threading device will automatically return to the normal position. (15) Thread the lower looper eye and place thread under the presser foot. If the lower looper thread is broken or slipped, cut both needle threads off at the needle. Then remove the thread. Thread the lower looper and then the needles.
Threading the green channel (right-hand needle thread)
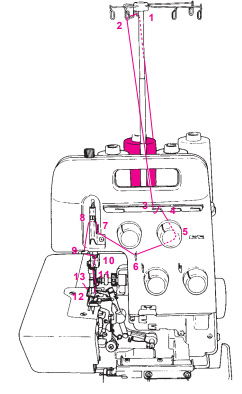
- Place the spool on the spool holder pin right under the green marking on the retractable support rod thread guide.
- (1,2) Bring thread up from the rear of the retractable support rod thread guide with the green markings to the front of it.
- (3,4) Pass the thread through the thread guide plate.
- (5) Thread the thread tension dial.
- (6,7) Thread the thread guide.
- (8) Lay the thread in the notch on the thread take-up lever.
- (9) Thread the thread guide.
- (10,11) Thread the thread guides on the needle bar.
- (12) Turn the handwheel toward you until the needles are fully raised. Thread the right-hand needle.
- (13) Bring the thread through under the presser foot and pull about 10 cm of the thread out behind the presser foot.
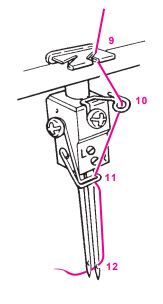
Threading the yellow channel (left-hand needle thread)
- Take your thread on the leftmost thread holder and run it under the tension plate lining up with the yellow channel.
- Using the small lever above the yellow tension wheel, release the thread tension and bring the thread down past the tension wheel and arrow marked 4.
- Following the arrows marked 4 and 5, bring the thread through the correct channel and down towards the needles.
- Tuck the thread behind the metal hook at the top of the needles
- Thread the left needle and bring the thread back and under the presser foot.
Testing the machine
- Check to make sure all four threads are under the presser foot
- Lower the presser foot using the lever on the right of the machine
- Close the front of the machine
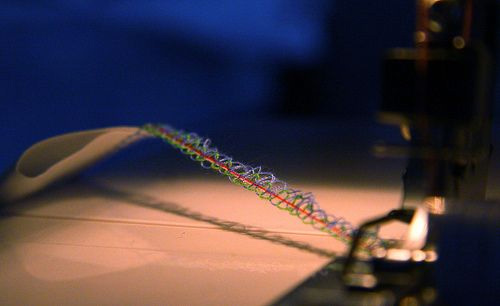
- Hold all four threads in one hand and use your other hand to move the hand wheel towards you to ‘chain off’ the threads. The threads should form a single ‘chain’ that looks like this:
Preparing your piece to serge
- Serging can be used to prepare individually cut pieces or to create a clean edge when sewing two pieces of fabric together.
- Never serge over pins; it will damage both the machine and the pins.
- Leave extra seam allowance on the edges of your piece because the serger will trim the edges as you sew.
Sewing with a Serger
- Lift the foot pedal using the lever on the right of the machine.
- Line up your piece with the edge of the metal plate on the machine.
- Lower the foot pedal
- Gently apply pressure to the foot pedal to serge along the entire edge of your fabric. The machine will cut off excess fabric with the blade.
- When you get to the end, let the serger chain off for a few inches and trim with scissors.
- Continue this process with all the edges or seams you would like the serge.