The Sailrite is a sewing machine that works similarly to a smaller sewing machine but can be used for thicker or stronger fabrics. The Sailrite can duplicate the functions of the smaller machine but is often overkill on thinner fabrics. You should only use this tool when the material requires it. This sewing machine only sews straight stitches.
Safety Considerations
Machine Anatomy
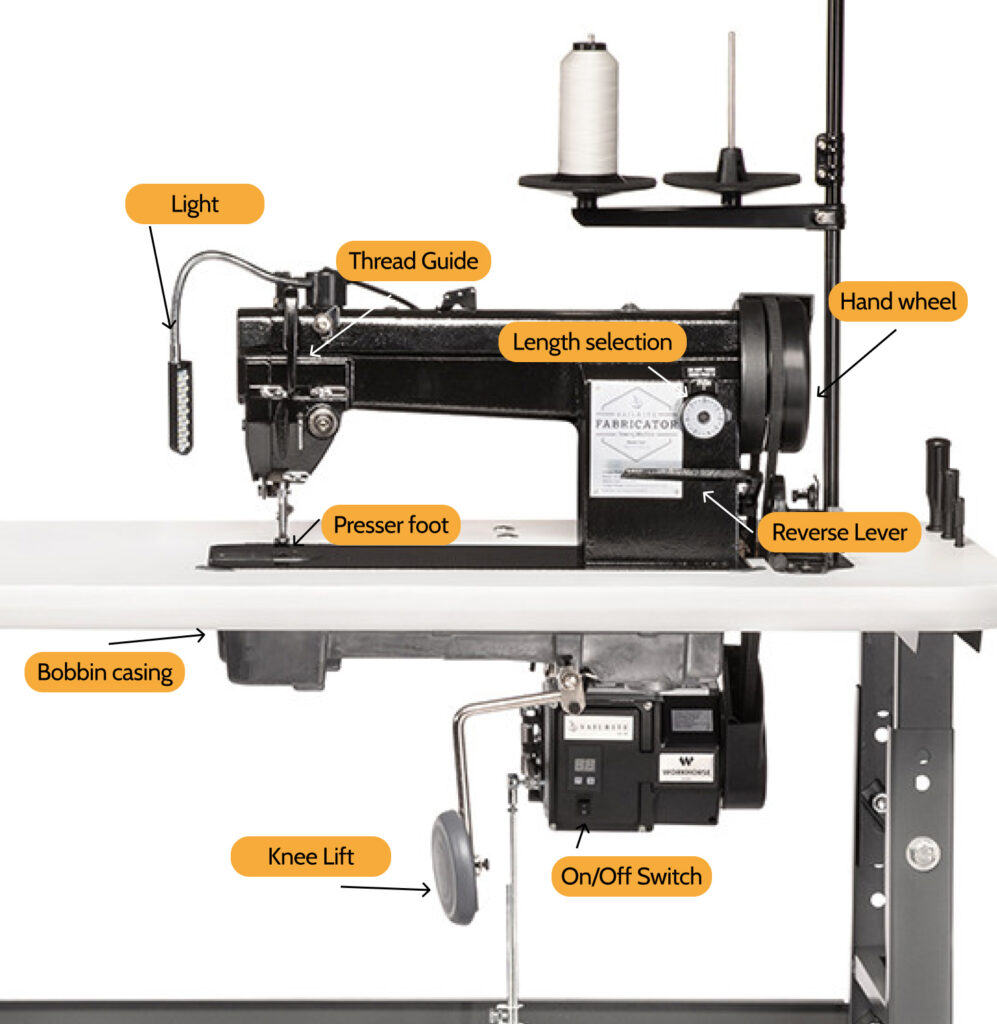
Operating the Machine
Setting up the Machine
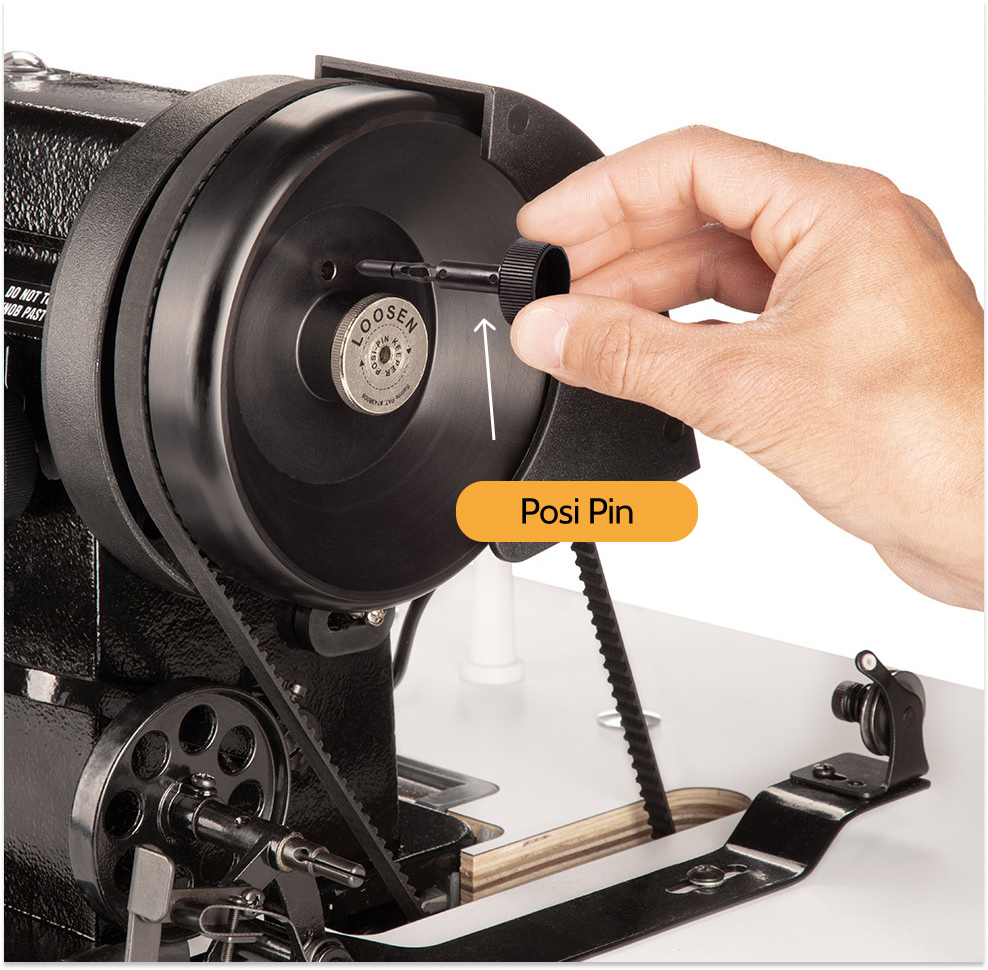
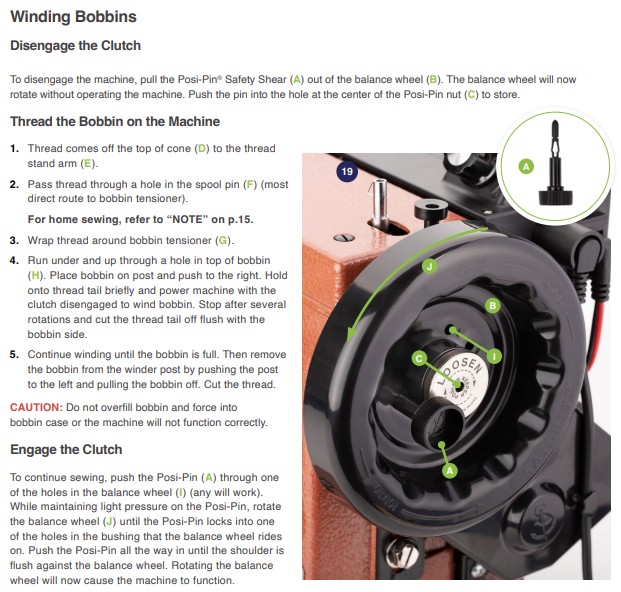
Understanding the Posi-pin
- The Sailrite Ultrafeed has a unique feature of the Posi-pin, a pin that controls whether or not the needle moves when using the hand wheel or foot pedal. Before setting up the machine and sewing with it, you must make sure the Posi-pin is in the correct position for that task:
- Winding the bobbin: Disengaged
- Threading the top of the machine: Engaged
- Sewing: Engaged
- Steps to Engaging the Posi-pin
- Remove the Posi-pin from the metal disk at the center of the hand wheel, this is the Posi-pin Keeper
- Push the pin into the hole next to the metal disk on the hand wheel
- Apply light pressure until the pin slots in, or you hit metal
- If the Posi-pin has not gone all the way in, rotate the hand wheel until the pin drops into one of the four holes inside the hand wheel
- The pin should be able to be pushed in and spring out a little bit
- Steps to Disengage the Posi-pin
- Remove the pin from the hand wheel
- Place the Posi-pin in the keeper
Winding the bobbin
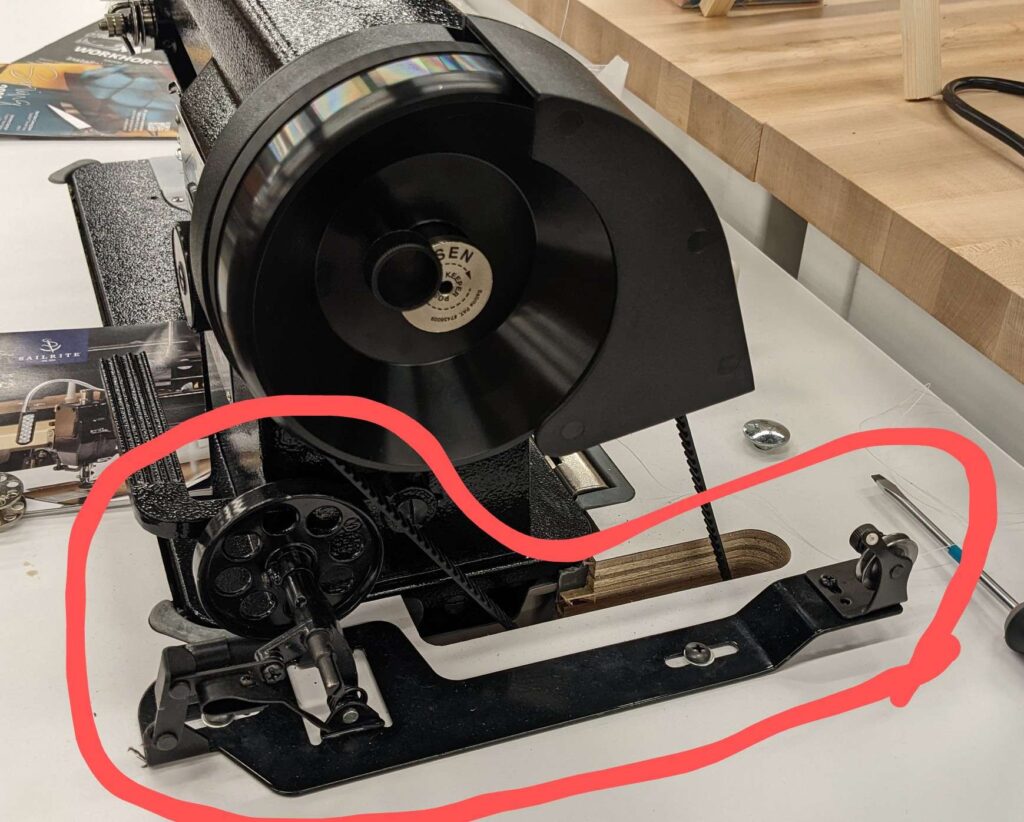
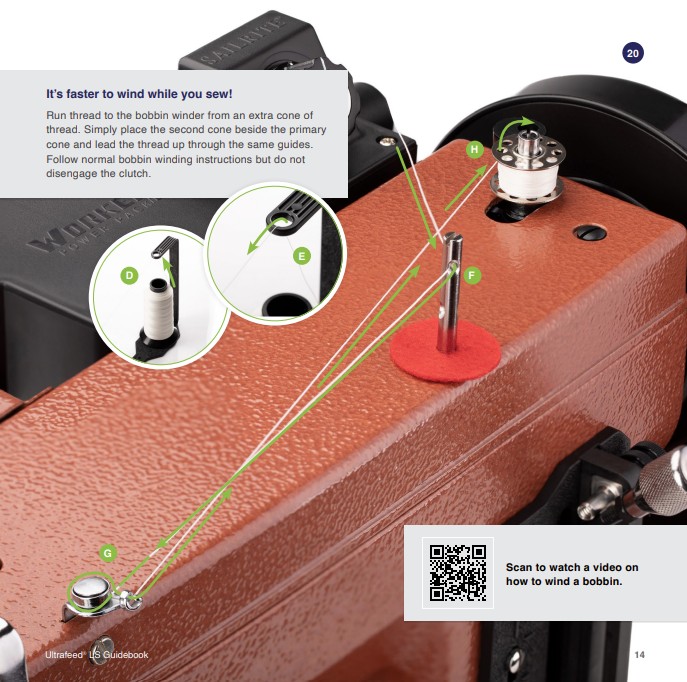
The circled section of the machine is the bobbin winder. It has two important components: The bobbin winder spindle, at the front, is what holds the bobbin. The thread tensioner, at the back, controls the thread as the bobbin is being wound.
- Start by disengaging the Posi-pin and putting it in the keeper.
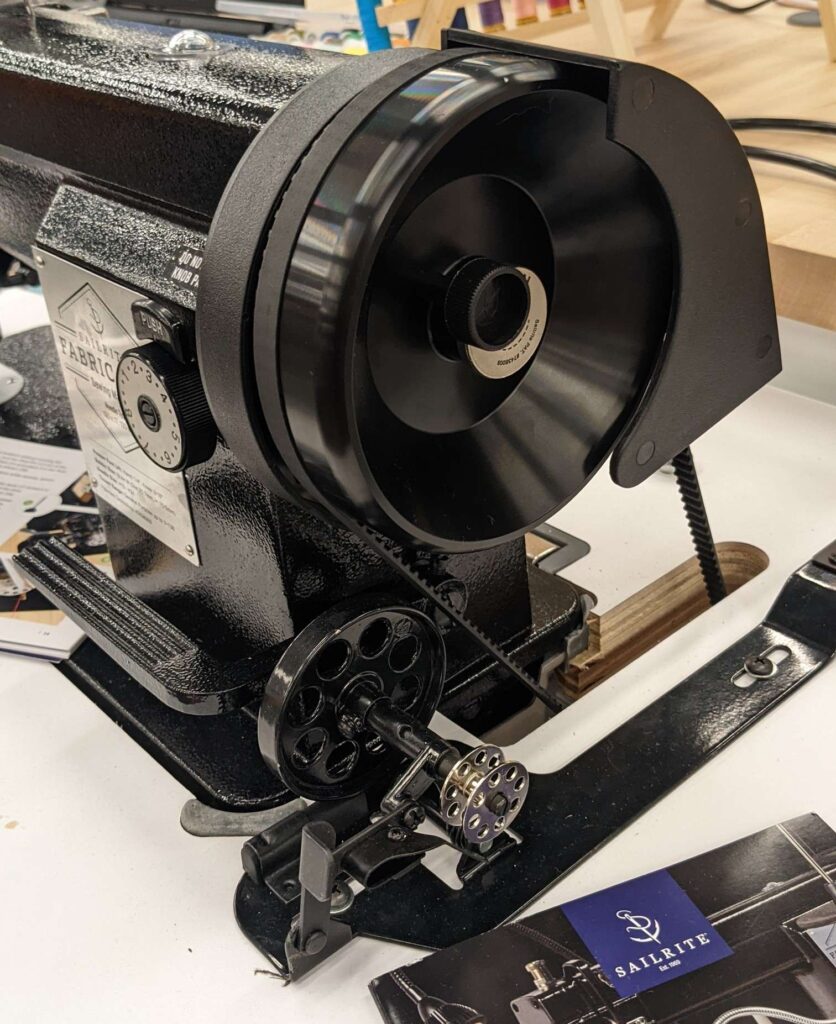
- Take your empty bobbin and put it on the bobbin winder spindle. It should be a tight fit! If the bobbin can turn freely on the spindle, take a flathead screwdriver and pry the two prongs apart a bit.
3. If there’s no thread on the holder behind the machine, place a spool of thread on one of the cone shaped thread stand and run the end of the thread through the guide hole above, then down to the machine.
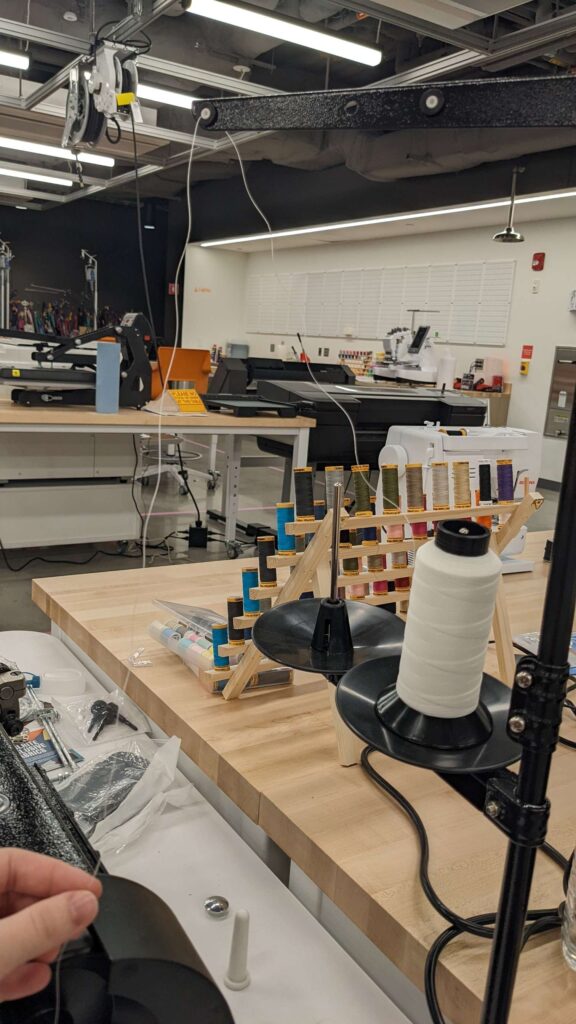
4. Take the end of the thread and pull it through the small white hole by the thread tensioner. Then, slot it between the metal disks of the tensioner, and pull it behind and under.

5. Put the thread through one of the holes of the bobbin, from inside to out. Leave a tail of about 8 inches.
6. Push the lever in front of the bobbin spindle down. This will push the wheel behind the bobbin spindle against the rubber belt of the machine.
7. Hold the thread tail, and gently press the foot pedal to wind the bobbin
8. To avoid damaging the machine while sewing, only wind the bobbin to about 80% full. When you think you’re about done, snip both threads and pull your wound bobbin off the spindle.
Threading the bottom of the machine


- Pull the tab on the front of the bobbin case out in order to remove the bobbin case from the machine
- Insert the bobbin into the bobbin housing so the thread rotates clockwise.
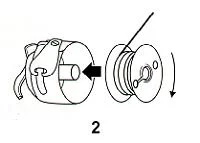
- Pull the thread counterclockwise through the slit to the opening at the top of the bobbin case.
- Pull the front tab again and re-insert the bobbin casing into the housing.
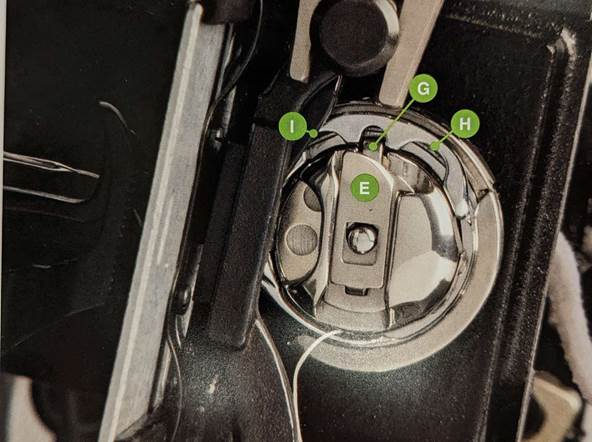
- The casing should click into place. Make sure that the nub by the front tab (G) is NOT in cutout I or H, as this will cause the machine to get stuck.
Threading the top of the machine


Picking up Bobbin Thread

Stitch length, Reversing, and Speed settings
- Stitch length is altered with the wheel at the front of the machine. To set stitch length, make sure your presser foot is up, then push the tab labeled “push” on the stitch wheel while also pushing down the reverse lever. This allows you to move the wheel to adjust stitch length. Industry standard is 2.5mm.
- To sew in reverse, push down on the reverse level on the front of the machine.
- Above the on switch is a display that shows the top speed of the machine. It can go very fast as it’s an industrial machine, but for safety purposes we will keep this at 5.
Sewing with the Sailrite
Using the presser foot:
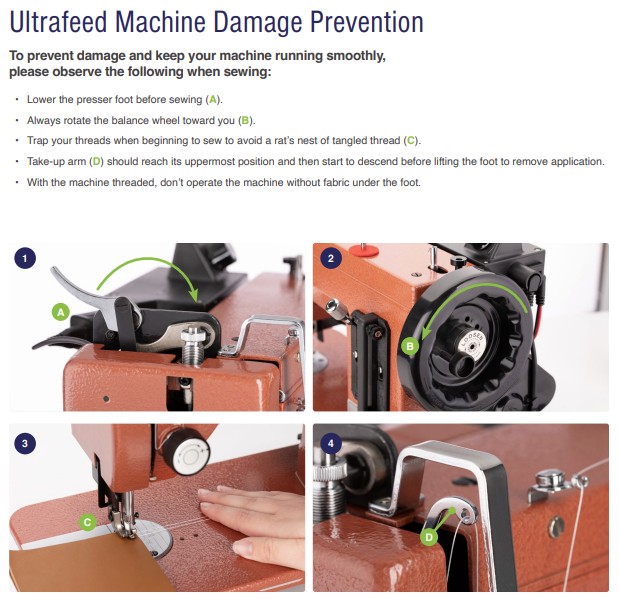
The way the presser foot functions on the Sailrite is a bit different from other machines. The Sailrite has the unique feature of a knee-lift: the gray circular pad below the table. This is used to raise and lower the presser foot, and as the name indicates, can be operated with your knee. Before you start sewing, it’s important to understand how this works.
- Locate the foot lock lever behind the machine near the presser foot. Make sure you can find this by feel, since craning around to see it is difficult while sewing
- Use your knee to press the knee lift to the right and up. You should see the presser foot rise as you do
- Keeping the presser foot up, reach behind the machine and flip the foot lock lever up. Now you should be able to take pressure off the knee lift and the presser foot will stay locked up
- Position your fabric under the presser foot, then reach behind the machine and flip the lever back down. The presser foot should snap down to hold your fabric in place. Now you’re ready to sew!

Ultrafeed LS (Tabletop Sailrite)
We have a second Sailrite next to the sewing machines; it operates very similar to the Sailrite Fabricator but there are a few differences to mention. First the way you lower the presser foot is with a lever on the top of the machine as opposed to using your knee on the fabricator.
On this machine, the on button is on the top back of the machine on the black box shown below. The speed control is on the top of this box.

Winding the Bobbin
Installing the bobbin case is the same as on the Fabricator. Place the bobbin in the bobbin case with the bobbin turing clockwise then tilt the Sailrite back and press the bobbin case into the machine until you hear a click.
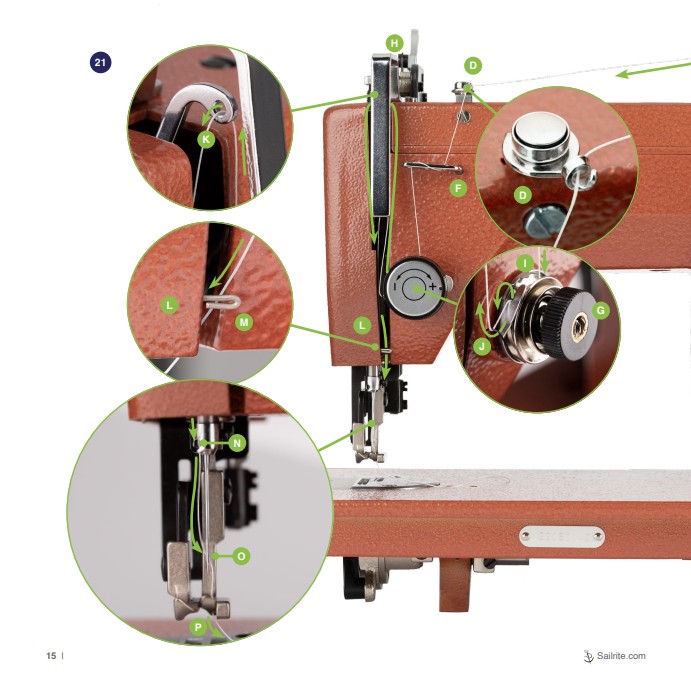
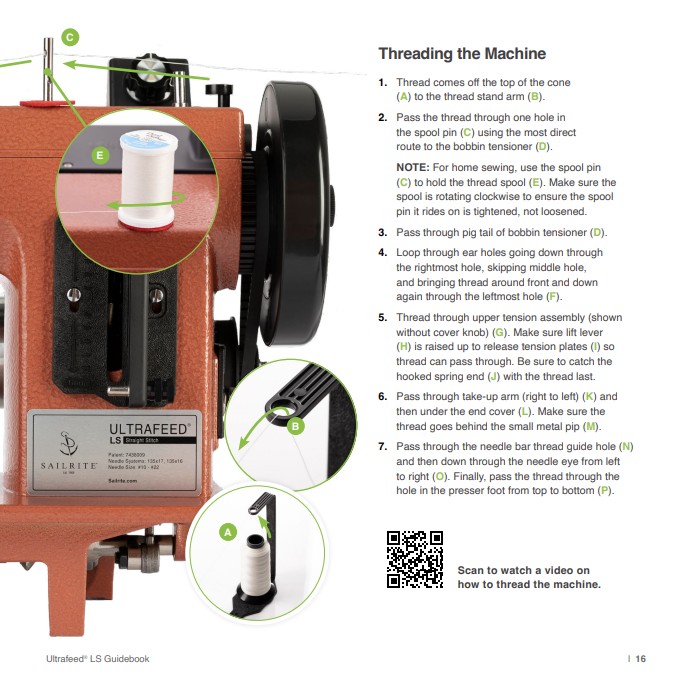
Threading the Machine
Reverse Switch
The last difference you will find on this machine is that the reverse lever is shaped slightly differently. This is what it looks like –>

1″ Swing-Away Binder
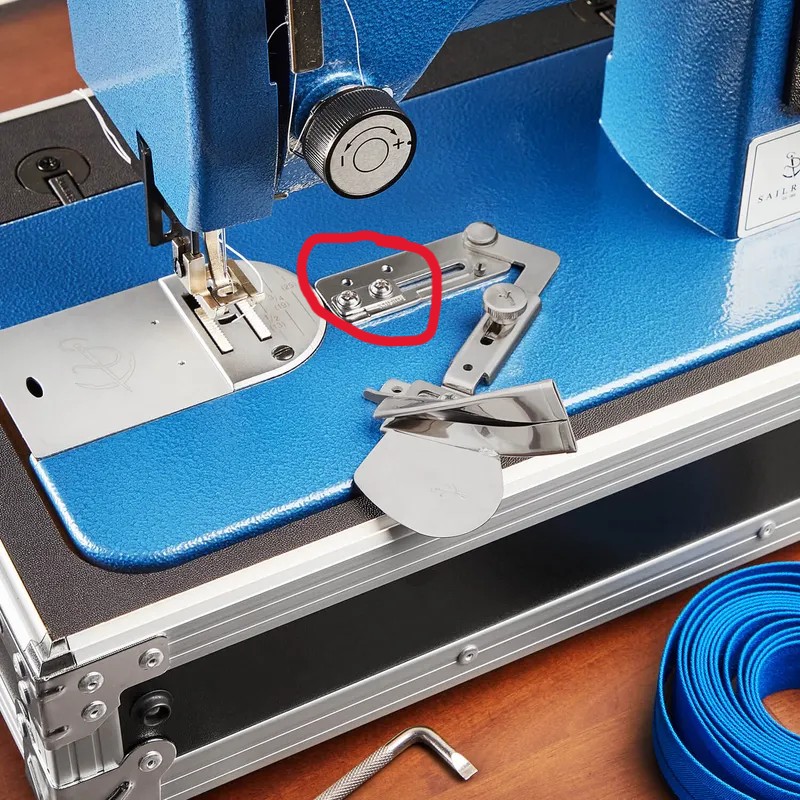
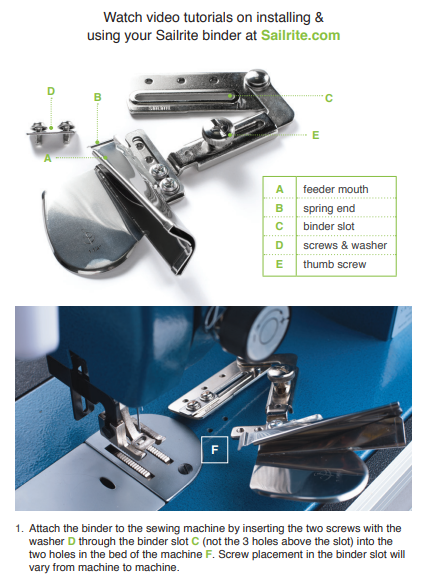
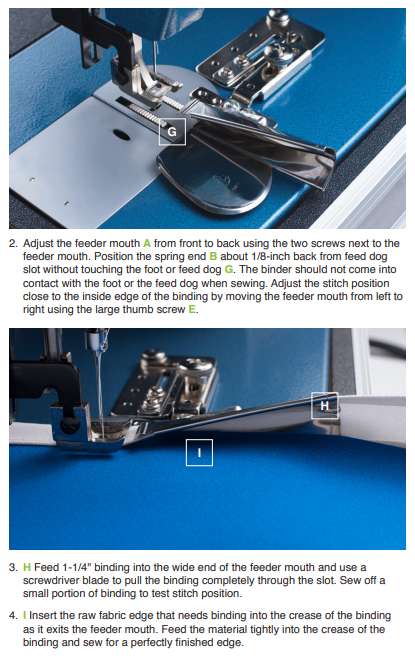
If you want to sew bias tape onto something using the Sailrite, adding this Swing-Away Binder will be very helpful. It guides 1″ bias tape onto both sides of your fabric evenly. Please ask an explorer if you want to use this tool; we have them in the back. There are two screws shown below that you will need to use to attach it to the machine
Here are more details on how to use it:
Start to sew!
Find your materials and begin construction
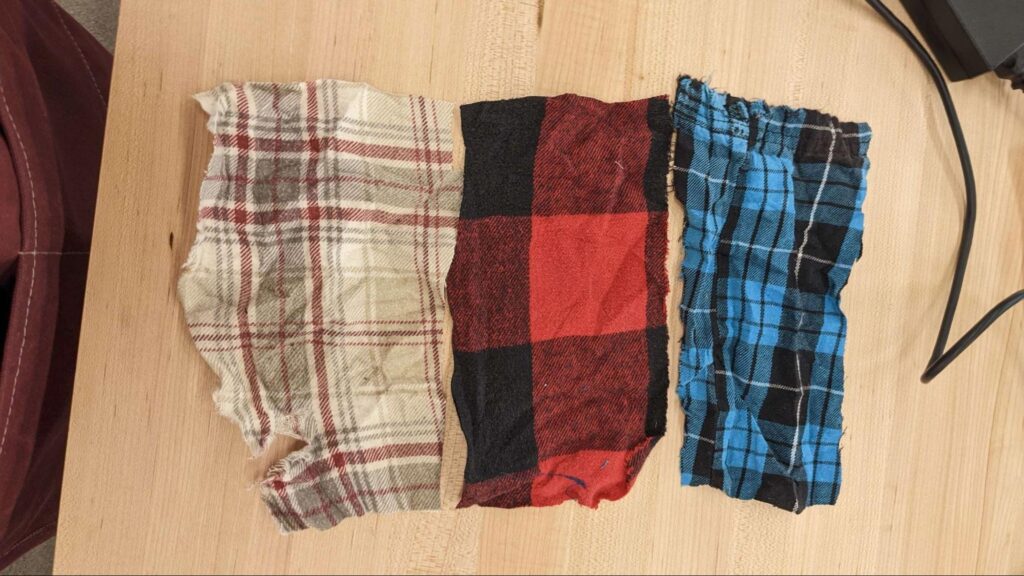
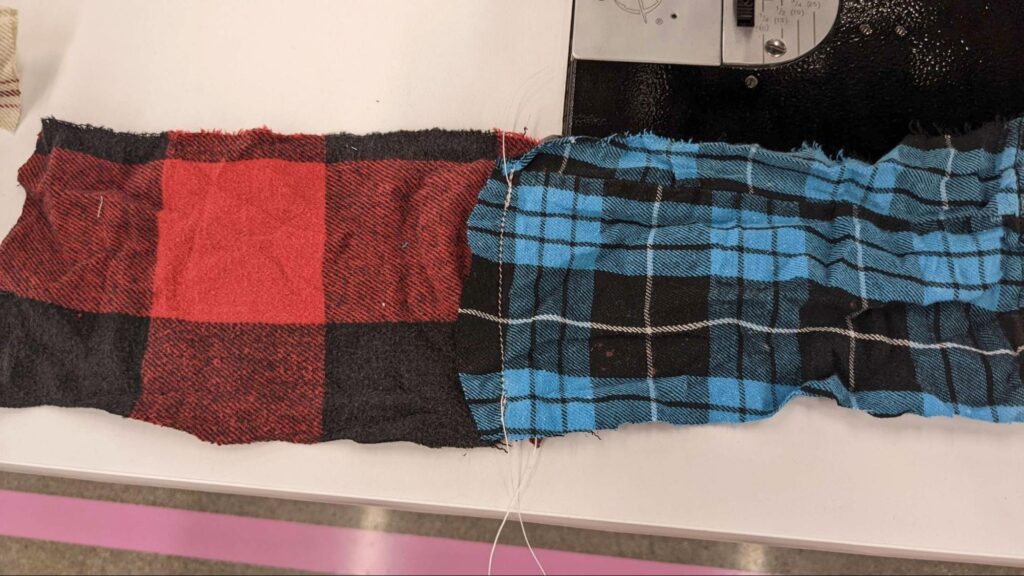
- Find 3 pieces of relatively thick fabric you like from the fabric bin, and cut them into 3 roughly equally sized rectangles (see left photo).
- We want to sew the short ends of these pieces of fabric together.
- Take two pieces of the fabric and overlap their edges
- Lift the presser foot
- Use your knee to press the knee lift lever up and to the right. This should raise the presser foot.
- To lock the presser foot up, reach around the back of the machine and flip the presser foot lock lever up.
- Clamp the presser foot down on the overlapped edges of your fabrics
- Step gently on the pedal beneath the table to sew a few stitches forward.
- Press down the reverse lever on the front of the machine and keep your foot gently pressed on the pedal to sew backwards over your first few stitches. This will lock them in place and prevent unraveling
- Release the lever and continue sewing forward till you reach the bottom of the fabric. Repeat the reversing process to lock this end in place as well.
- Repeat with the third piece of fabric, sewing it to the edge of one of the other two. Trim the extra string. (See right photo).
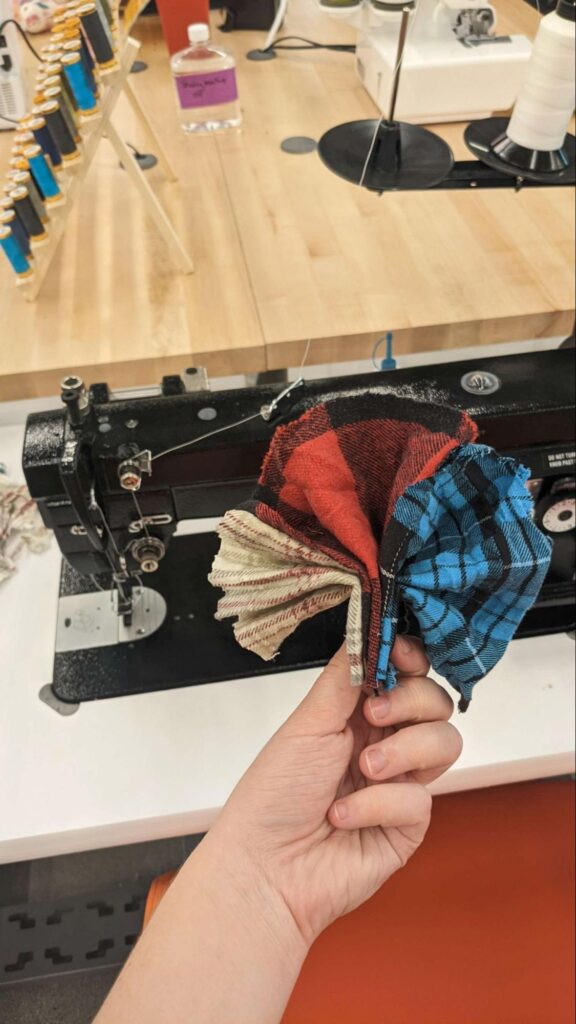
Lets make a fan!
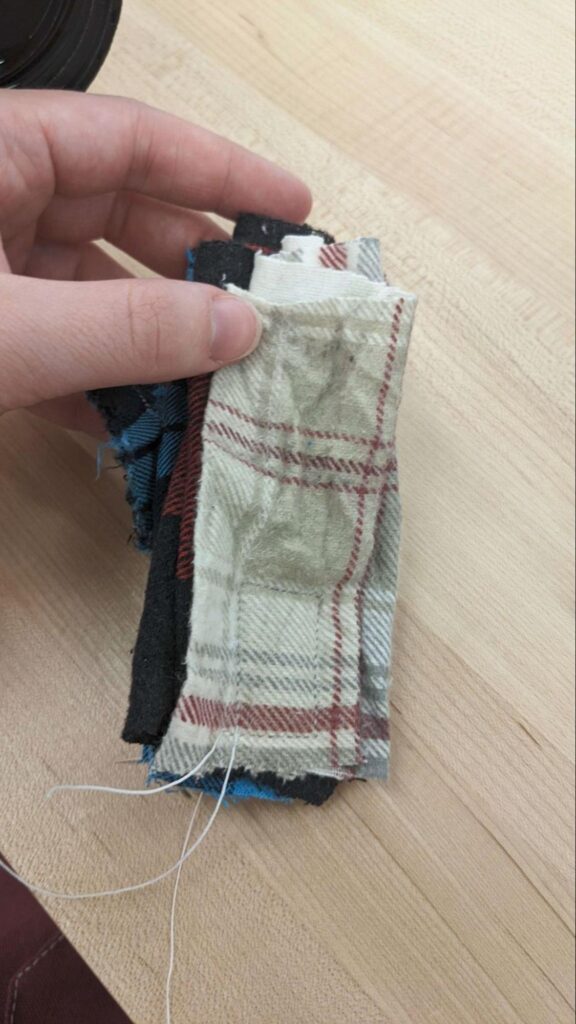
To show off the power of the Sailrite, we’re going to take this long strip of fabrics and turn it into a fan.
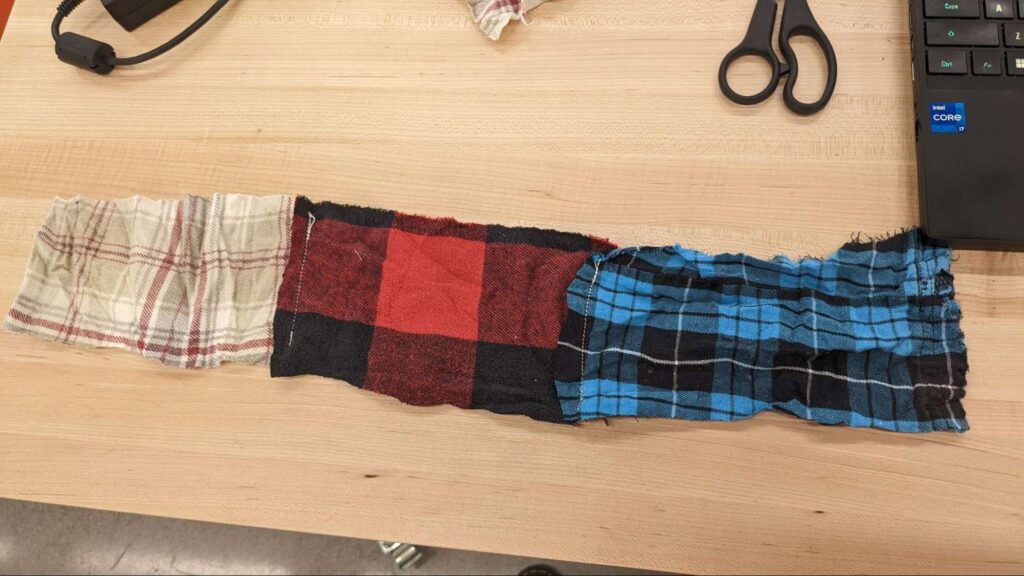
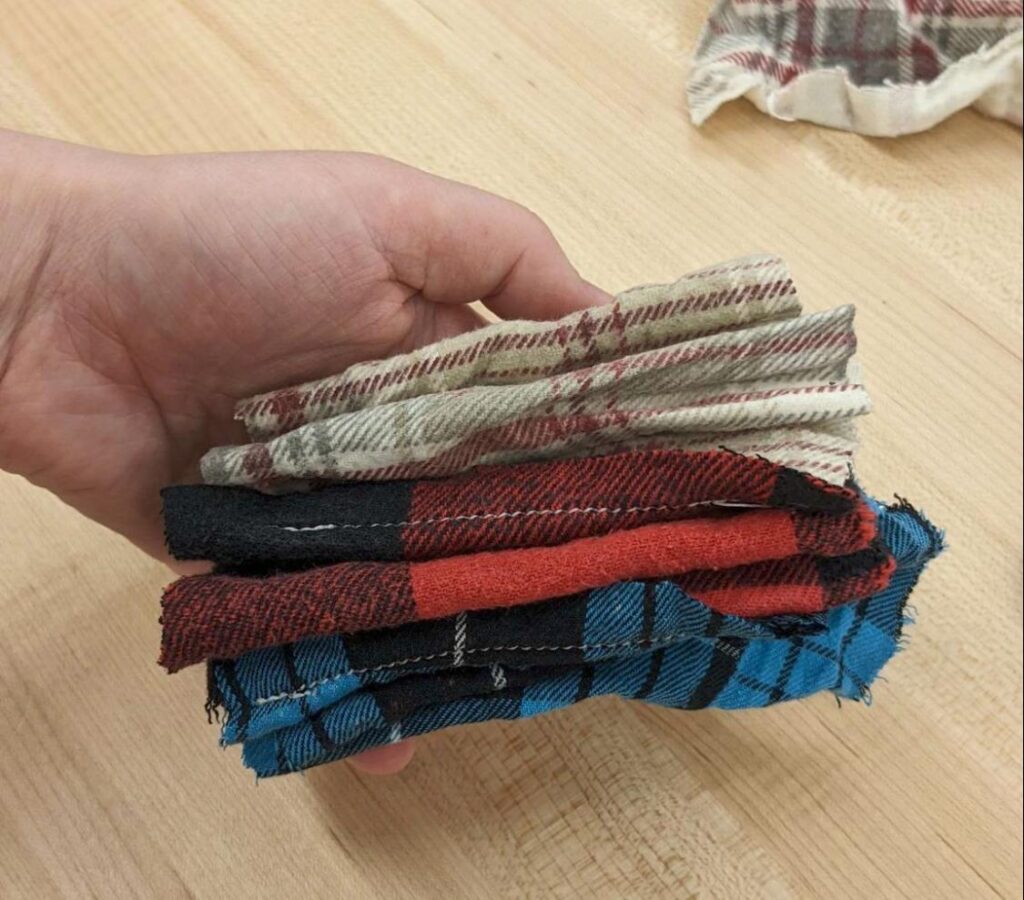

- Take your long strip of fabric and fold it back and forth over on itself, accordion style (See above). If it’s unwieldy to hold it together by hand, try using a pin to hold the folds together.
- Take your folded stack of fabric back to the Sailrite, and clamp the edge of the bottom (short) side beneath the presser foot. If you’re having trouble fitting this big stack of fabric, use the hand wheel to make sure the needle is at its highest position and press the knee lift as far as it will go to lift the presser foot high.
- Sew forward along this edge. Stop when you reach the next corner
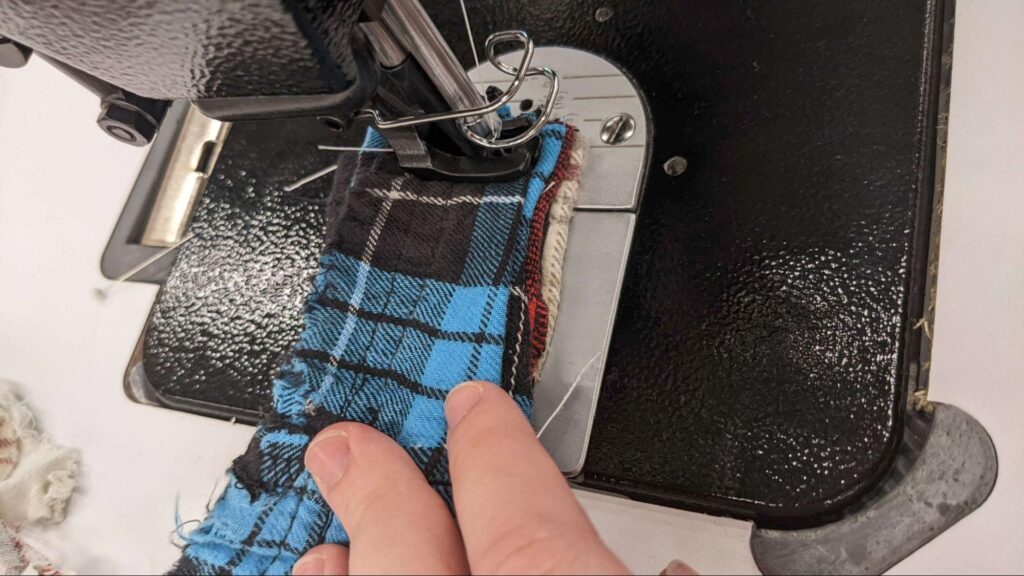
- Turn the hand wheel until the needle is pressed into the fabric, then raise the presser foot and turn the fabric 90 degrees. The needle should hold it in place. When the fabric is in position, clamp the presser foot back down. (See below.)
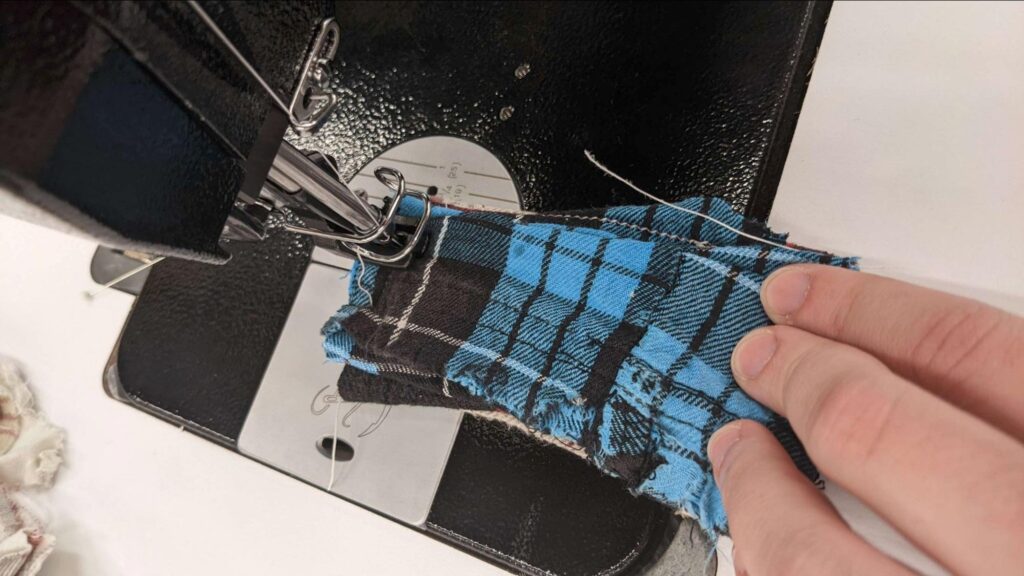
- Sew forward a few inches, then repeat the turning process
- Continue doing this until you’ve wrapped back around to where you started sewing, forming a rectangle. (See below.)
- Trim the extra strings off and unfold your fabric. Congratulations, you’ve made a fan! You now know everything you need to operate the Sailrite independently.
