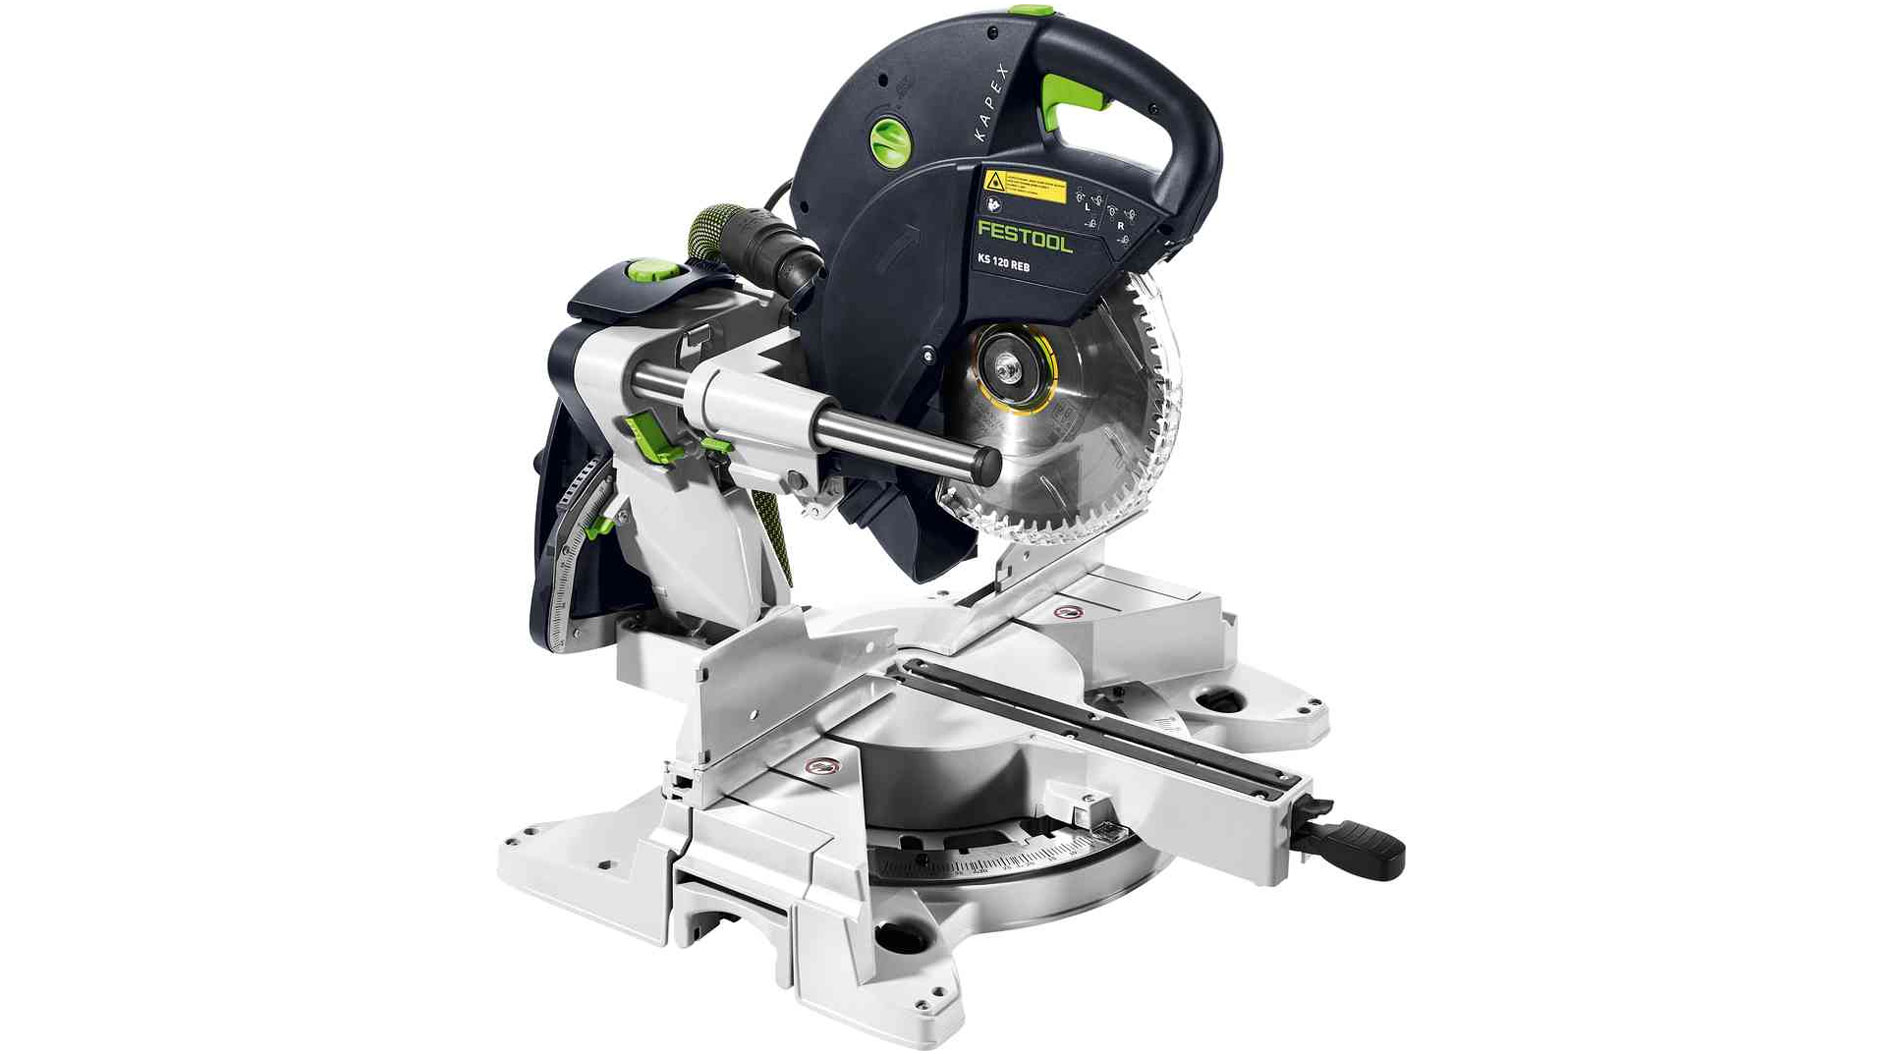
The miter saw is a power tool that can be used to make straight, mitered, beveled or compound cuts in wood. The Festool KAPEX saw can cut wood up to 12” wide and 4” thick; these exact dimensions obviously differ for different The saw blade hinges downward to cut through the material and can extend outward for wider cuts.
Safety Considerations
Terminology
A miter saw is technically a different tool than a chop saw. While both saws have circular blades that drop downward on an arm, chop saws can only make 90° cuts, whereas miter saws can make mitered, beveled and compound cuts, in addition to 90° cuts. While not technically correct, the names are sometimes used interchangeably.
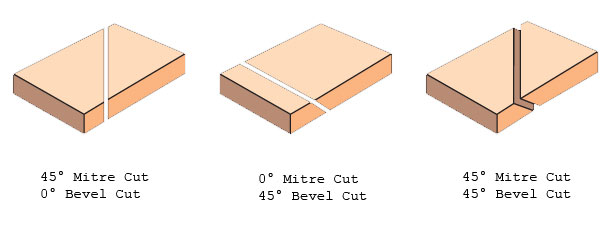
Miter Cut Bevel Cut Compound Cut
A miter cut (sometimes referred to as a horizontal miter cut) is a cut angled across the horizontal plane (the surface) of the material.
A bevel cut (sometimes referred to as a vertical miter cut) is a cut angled through the vertical plane (the thickness) of the material.
A compound cut combines a miter cut and a bevel cut and is therefore angled both across the horizontal plane and through the vertical plane of the material.
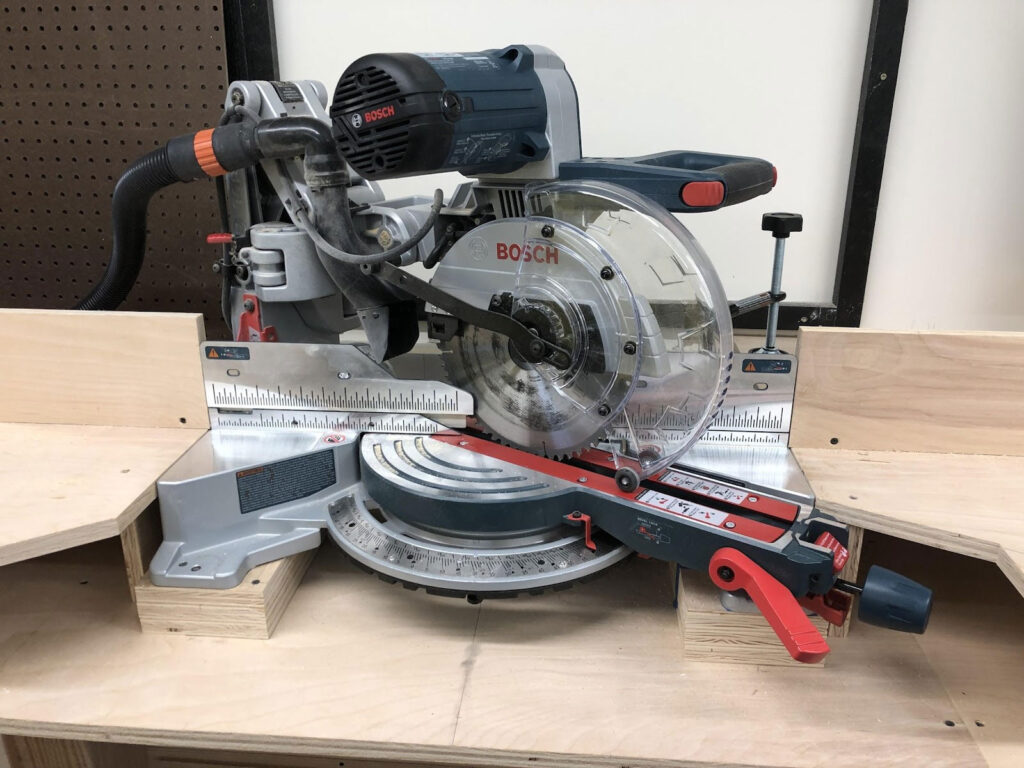
Machine Anatomy
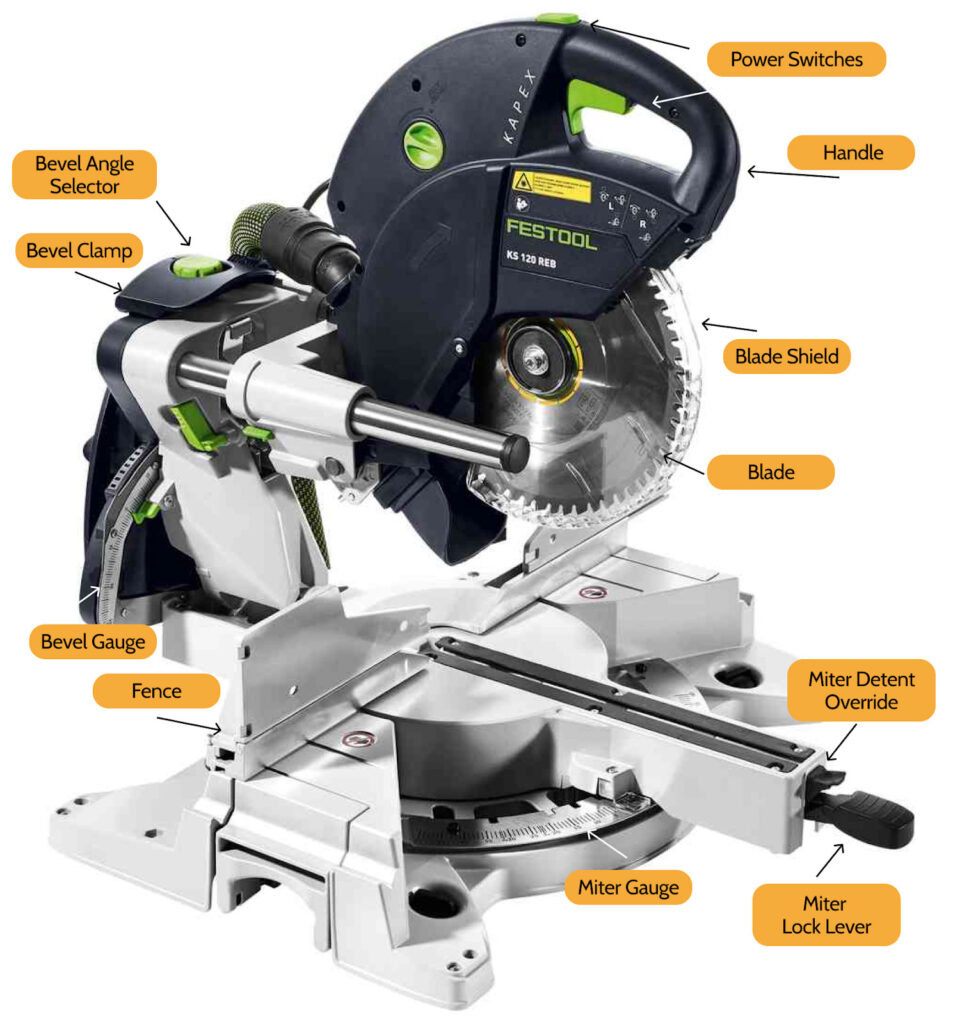
- Power Switches: A rectangular button on the inside of the handle and on the outside of the handle. Depressing the power switch, in conjunction with pressing one of the off release buttons, will start the blade spinning.
- Handle: Allows you to move the blade into and out of the material you are cutting.
- Blade: Circular blade that spins in order to cut through your material. At the Foundry the blade is an ⅛” wide, which means that an ⅛” of material will be removed from your material when you cut. The width of material removed is referred to as the kerf.
- Blade Shield: Protects you from the spinning blade when cutting.
- Miter Detent Override Lever: Allows detent action (the automatic setting of the blade to ten, preset common miter angles) to be ignored, and allows for micro adjustments.
- Miter Lock Lever: When pressed down, locks the blade at any desired miter angle.
- Miter Gauge: Indicates the miter angle of the blade.
- Bevel Angle Selector: Allows you to easily choose what angle the bevel should be placed at. The options here are pre-selected to the most common bevel angles.
- Bevel Clamp: When clamped down, locks the blade at any desired miter angle.
- Bevel Gauge: Indicates the bevel angle of the blade.
- Fence: Supports the workpiece while cutting and has a ruler to help measure.
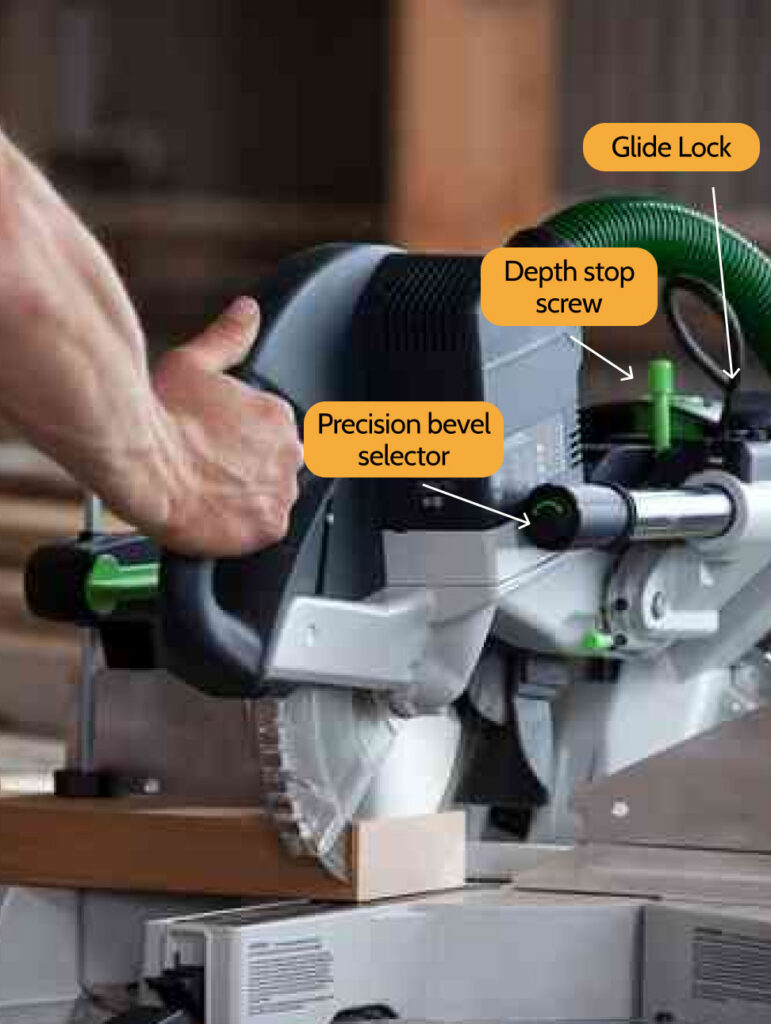
- Glide Lock: Locks and unlocks the gliding feature of the saw.
- Precision bevel selector: Allows you to pick a bevel angle outside of the most common bevel angles.
- Depth Stop Screw: Turn this to adjust the blade depth, good for cutting grooves.
Operating the Machine
Marking Your Stock
- Using a measuring tool, measure and mark the place you want to cut your material with a pencil. Remember to account for the width of the blade (kerf), which is about 1/8″.
- Clearly, indicate on which side of your line you want to cut to account for this. This can cut up to 12” wide in a single cut and up to 5” thick.
Cutting Straight Cuts (Without a Miter or a Bevel)
- Check that you are in compliance with all aforementioned safety procedures.
- Make sure that the vacuum hose is connected to the machine.
- Turn on the dust collector.
- Make sure the miter gauge is set to 0°. If it is not, loosen the miter lever, lift up the miter detent lever and slide the blade to 0° by lining up the pointed edge of the red indicator to the “0” mark.
- Place your marked stock flush up against the fence.
- Without squeezing the handle, slowly lower the handle to align the blade with the mark on your material.
- You may wish to clamp down your stock to the table once it is in place. If you are not clamping down your stock, hold your stock with your non-dominant hand and grab the handle with your dominant hand. DO NOT place your hands or fingers within the “no hands zone” (as marked in red on the machine).
- Press and hold the green handle lock button with your thumb. There is a lock button on both sides of the handle, one for left-handed and one for right-handed users.
- While pressing the handle lock button, also squeeze the handle trigger to start the saw. The saw will not start spinning until both triggers are pressed simultaneously. Only start the saw when the handle is all the way up, otherwise, it will jerk backward.
- Move the handle straight down into your stock and do not release the handle lock button and the handle trigger until the blade has cut entirely through the material.
- Release the trigger and leave the saw down in the material until the blade stops spinning.
- After the blade has come to a complete stop, raise the saw back up
- Once you have finished all of your cuts, continue to the Finishing Up section.
Cutting Straight Cuts on Stock Wider than 5”
This operation is almost identical to a normal straight cut but it uses the saw’s linear extension to extend the distance you can cut.
- Unlatch the glide lock on the left side of the saw so it can move forward and backward as well as up and down.
- Place your marked stock flush up against the fence.
- Without squeezing the handle, slowly lower the handle to align the blade with the mark on your material.
- You may wish to clamp down your stock to the table once it is in place. If you are not clamping down your stock, hold your stock with your non-dominant hand and grab the handle with your dominant hand. DO NOT place your hands or fingers within the “no hands zone” (as marked in red on the machine).
- Fully extend the handle toward you before making your cut.
- Press and hold the red handle lock button with your thumb. There is a lock button on both sides of the handle, one for left-handed and one for right-handed users.
- While pressing the handle lock button, also squeeze the handle trigger to start the saw. The saw will not start spinning until both triggers are pressed simultaneously. Only start the saw when the handle is all the way up, otherwise, it will jerk backward.
- Plunge the handle downward and push back into the stock when cutting. DO NOT lower the blade and pull it towards you while cutting, otherwise, you will damage your material.
- Once you have completed all cuts on material that is wider than 5”, re-latch the glide lock on the left side of the saw.
Cutting Miter Cuts
Making a miter cut is similar to the other saw operations outlined above, except that the cut will not be perpendicular to the fence, rather it will be at an angle.
- Pull up the miter lock lever and slide the blade along the miter gauge.
- If you release the red miter detent lever, the saw will automatically lock to 0°, 15°, 22.5°, 45°, 60°.
- Set the miter gauge to your desired angle by lining up the pointed edge of the red indicator to the appropriate number.
- If you don’t want the saw to automatically snap to the previously mentioned values, you can lift up on the miter lock handle and then press down on the miter detent override lever right. To release this, lift up on the miter lock handle again.
- You can rotate the saw in either direction, left or right.
- Lock the saw in this position by pressing down the miter
- You can then follow the standard cutting procedure as described in Cutting Straight Cuts.
Cutting Bevel Cuts
Making a bevel cut is similar to the other saw operations except that the blade is rotated along the vertical plane. You can also make a bevel cut while making a miter cut at the same time, this is called a compound cut.
- To make a bevel cut, lift the bevel lock clamp on the back of the machine.
- This will unlock the saw so it can be rotated up to 45° left or right.
- Rotate the saw by putting one hand on the handle and the other on the motor block. DO NOT try to rotate the saw by pushing on the blade or the blade cover.
- The saw blade will default to rotating left, but it can be rotated right as well. To rotate the blade to the right, rotate it back to the left slightly and then turn the green bevel angle selector on the back of the machine to “0-45° Right”.
- Rotate the blade to the right to the desired angle as indicated on the bevel gauge.
- For any bevel cuts beyond 15°, you will need to remove the fence so the blade can come down without cutting the fence. This is extremely important to remember, otherwise, you may end up cutting into the fence and damaging the blade.
- Before cutting, lock down the bevel lock lever by pressing it back down.
- You can follow the standard cutting procedure as described in Cutting Straight Cuts.
- When you are done with your bevel cuts, return the saw to its original position and put the fences back up.
Cutting Notches/Grooves (Advanced)
This saw has an additional feature that allows you to make cuts without the blade going all the way through your material. This could be useful in creating notches in your material.
- To do this, locate the green depth stop screw next to the safety lock that has a spring built into it. This is a screw that goes through a black metal plate.
- By sliding out this black metal plate to the right and twisting the red cap, you can set a distance for the saw to go down.
- Fully extending this screw raises the saw blade about 2 ¼” above the table.
- Using this feature, you can create notches in your stock by making repeated cuts next to one another to cut away an entire section of material.
This is a more advanced operation and should only be done with the assistance of an Explorer.
Finishing Up
When you are finished making your cuts, please make sure to leave the saw cleaner than you found it.
- Use the shop vac or dust bin to suck up any loose sawdust in the workspace to make it cleaner for the next person.
- Turn off the vacuum.
- Make sure the bevel gauge is set back to 0° and the miter gauge set to 60°.