The VLS3.75 Laser System is a free-standing platform designed to be the ideal entry point into light duty manufacturing. The VLS3.75 is also installed in many educational institutions around the world for architecture, product and graphic design, and material research programs. The VLS3.75 offers a material processing envelope of 24″x 12″ x 9″, (610 x 305 x 229mm), the VLS3.75 can be equipped with one of six ULS laser cartridges ranging in power from 10-75 watts.
Laser Type:
This cutter uses a single CO₂ laser, typically available in configurations ranging from 30W to 75W. It’s great for cutting and engraving organic materials like wood, paper, fabric, and acrylic. Unlike the PLS 6.150D, it does not have a fiber laser, so it can’t engrave or cut metals or composites.
Computer:
The VLS3.75 connects directly to a computer via USB and uses Universal Laser Systems’ Control Panel software. You’ll send your Illustrator or CorelDRAW file from the connected computer – no flash drive needed.
Bed Size:
This is a desktop-sized laser, so the bed is much smaller than the PLS 6.150D. The VLS3.75 has a bed size of 18″ x 12″, which is fine for most small to medium-sized projects but limiting for larger cuts.
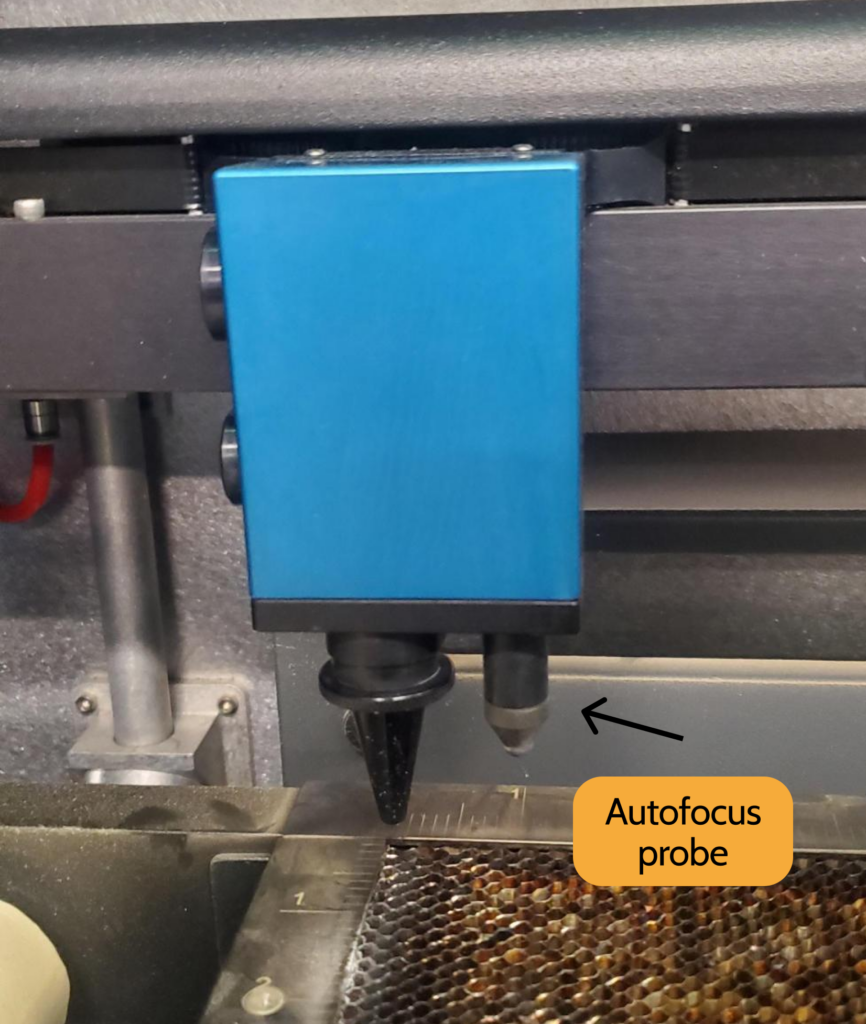
Autofocus:
It includes an optional autofocus feature, but many users manually focus using the focus tool. Autofocus is less precise, so for high-precision work (like microfluidics), manual focus might be better.
What is a CO₂ laser?
Uses CO₂ gas to generate a laser beam, which is directed with mirrors and focused through lenses.
– Best for organic materials (wood, paper, fabric) and acrylic.
– Can cut through thicker materials like ¼” acrylic or ½” plywood depending on wattage and speed settings.
Safety Considerations
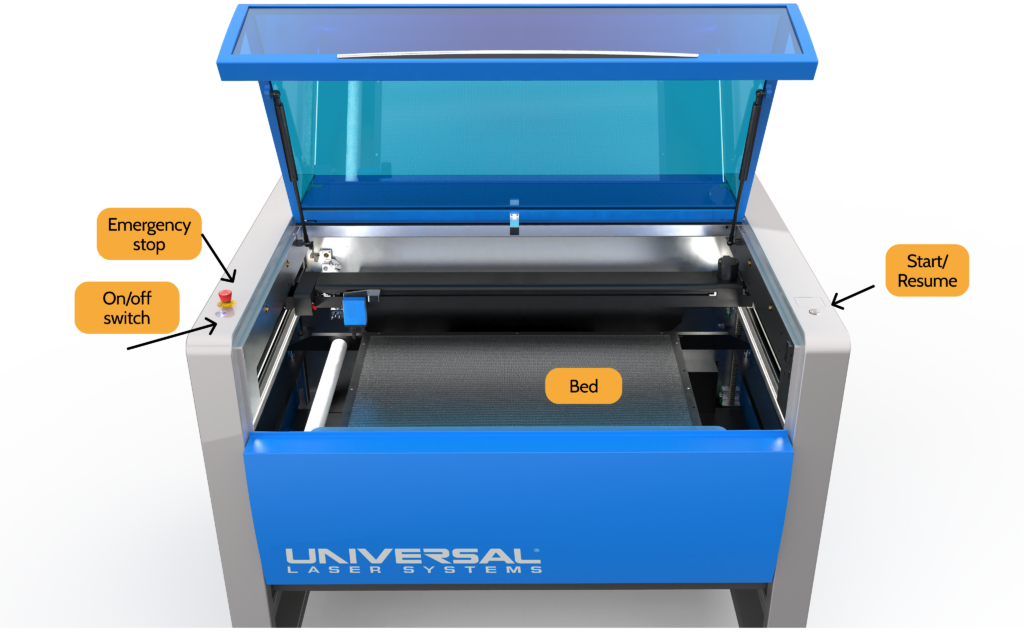
Machine Anatomy
- Laser Carriage: The part that moves to project the laser.
- Bed: What your stock lies on
- Start/resume button: This button also exists on the built in computer, but it’s easier to pause the machine here
- Emergency stop: Will stop all power and air assist to your part.
- Auto focus probe: You can set your job so that before the laser fires, it will focus the carriage above your stock with an autofocus probe. It will lightly touch the tip of your stock.
Making your file
Create an Illustrator or PDF file of what you would like to cut
- Adobe Illustrator lets you create designs or import images and transform them into vector patterns. It also interfaces directly with the laser cutter. In Illustrator, create what you want to cut, or open an image and click “Image Trace.”
- If you have a part in SolidWorks, Fusion360, or AutoCAD, you can export a 2D drawing as a DXF file and open it in Illustrator as well. Just make sure the units and scaling of your piece in your modeling software and the units and scaling of your piece in Illustrator are the same. If you make your drawings in a CAD software, you will still have to import it into illustrator to change the stroke size and colors to ones that the laser cutter will understand.
- Make sure your file is in an RGB color mode; the laser cutter may not recognize it
- Set your strokes according to which lines are meant to be cut and whatever else is meant to be rastered. The laser cutter recognizes any RED line with a stroke of 0.001” as a line meant to be cut, and anything BLACK as a line/shape to be rastered.
- Make sure that the black is an RBG black (hex #000000) , and the red is an RGB red (hex #FF0000). Any other types of black or red might read as an error when you send it to the laser cutter.
- Any strokes that are not 0.001” may be interpreted as rastering.
- Technically green and blue can be used as well as you can change the settings for each color, but please check in with an Explorer if you want to use multiple colors (and thus raster/cut) settings on one file.
- Make sure your artboard or PDF size is the size of the bed (24″x48″) or smaller, or else you will get an error when trying to upload it to the computer.
- Save your piece to the USB drive.
Setting up laser cutter
- Turn on the ventilation and wait for the green light to turn on.
- Turn on the compressed air line.
- Turn on the machine. Wait until the computer screen turns from blue to red– do NOT touch the screen as it’s loading or it may freeze up.
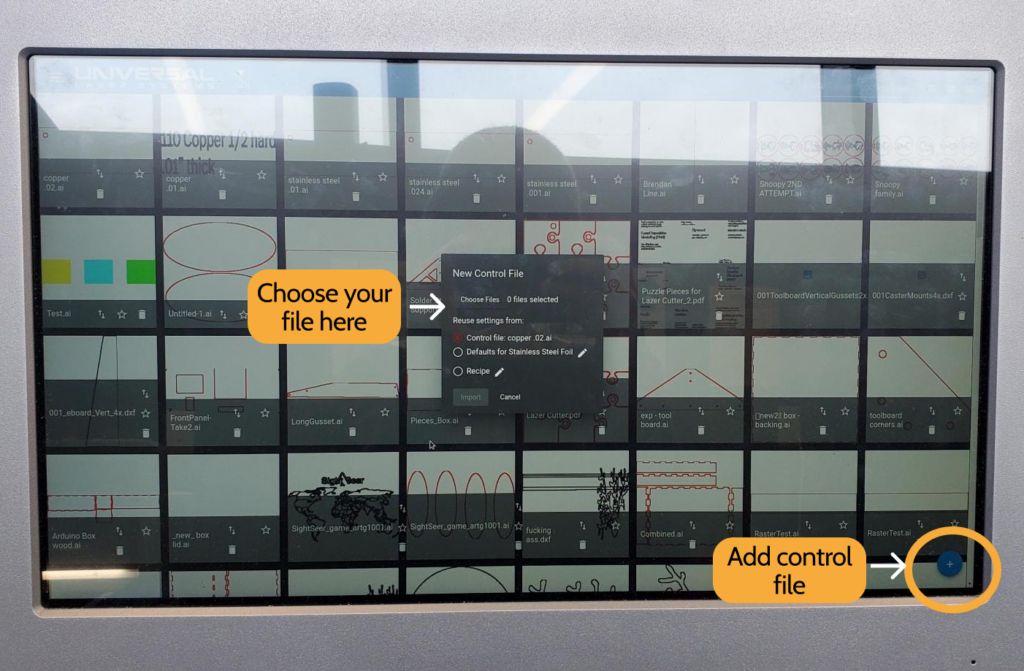
- Plug in your USB. Go to Control Files -> + -> Upload from USB. Files should be formatted the same way they are formatted for the small lasers, and saved as an Illustrator file or PDF. Open your file.
Software Overview
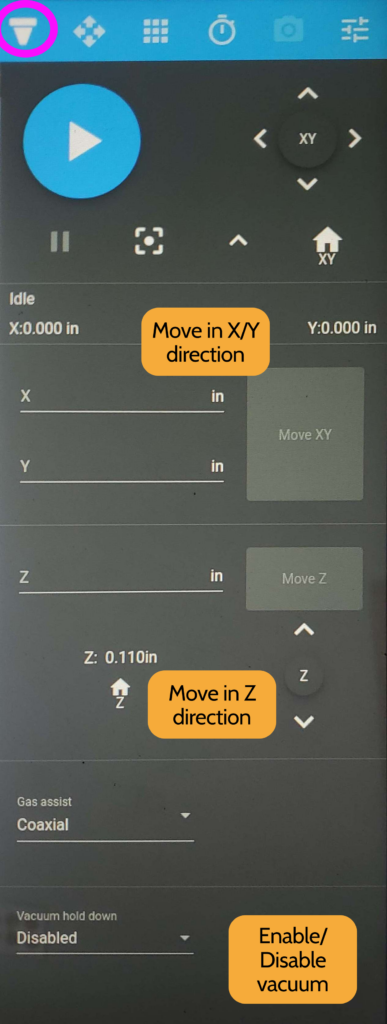
Please make sure to keep your hands out of the laser cutter when using the software and move the bed in the Z direction in small increments. The carriage moves extremely fast and it’s very easy to crash it.
Focus View (left)
The first button on the top menu is the focus view (circled in pink). Here you can move the laser head in the X/Y direction and up and down in the Z direction. Do not move laser in the Z direction in large increments as it’s easy to crash the carriage.
You can also enable and disable vacuum hold down; this is useful for holding down thin foils.
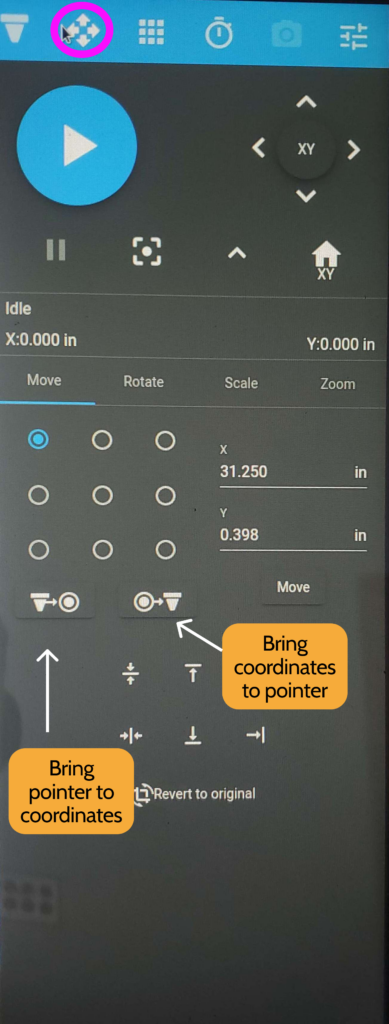
Relocate View (right)
The second button (circled in pink) is the relocate view. Here you can adjust where the laser head is in relation to your part. You can either bring the pointer to the coordinates you set, or the other way around.
You can set the coordinates of different points of your job’s bounding box, as shown by the grid of dots.
You can also rotate and scale your part here.
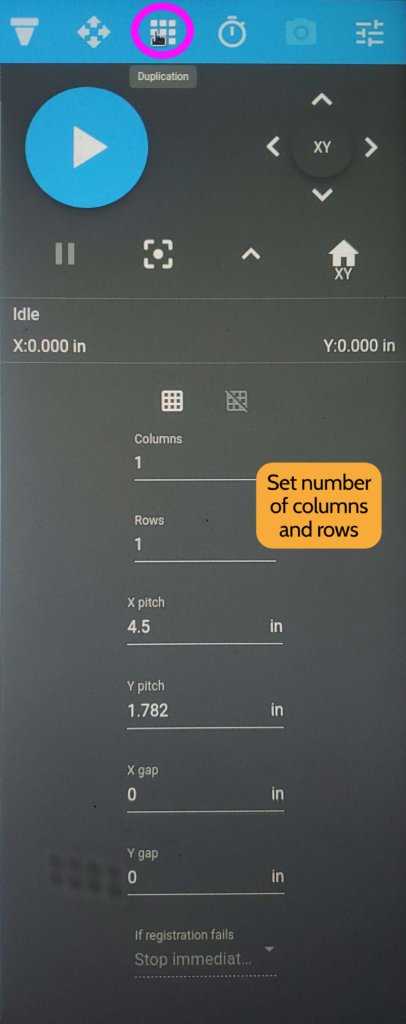
Duplicate View (left)
The third button (circled in pink) is the duplicate view if you want to cut your job multiple times. You can set the number of rows and columns, as well as the spacing between each of the instances.
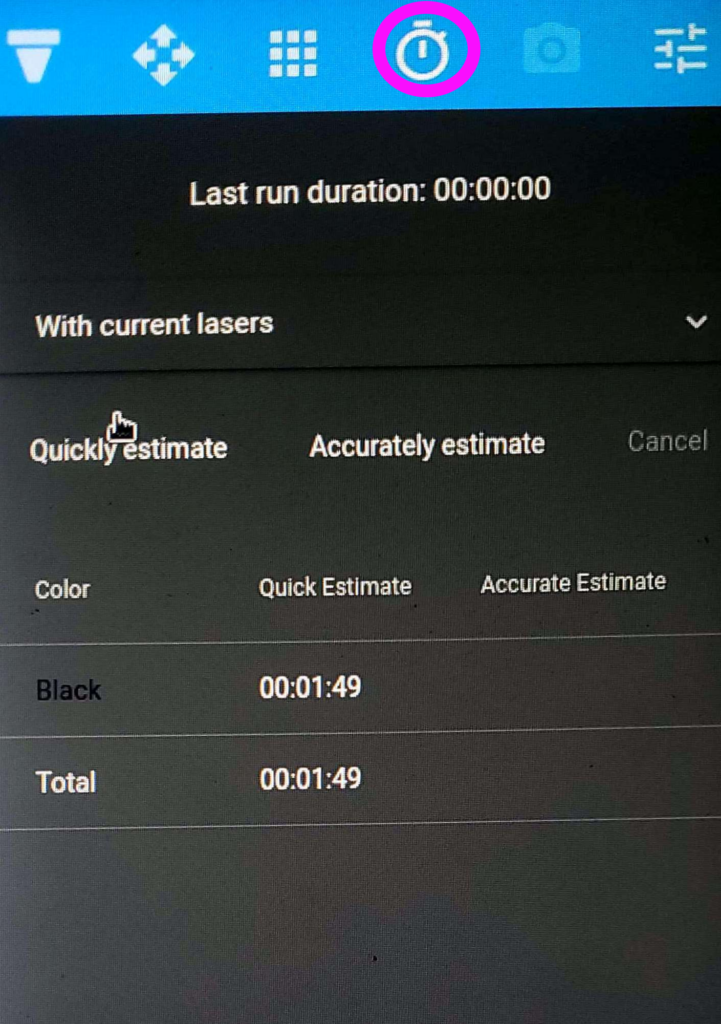
Time Estimate (right)
Once you have your settings, you can quickly estimate how long your job will take (circled in pink). The software divides out its estimates by processes; here, there is only one process assigned to the color black.
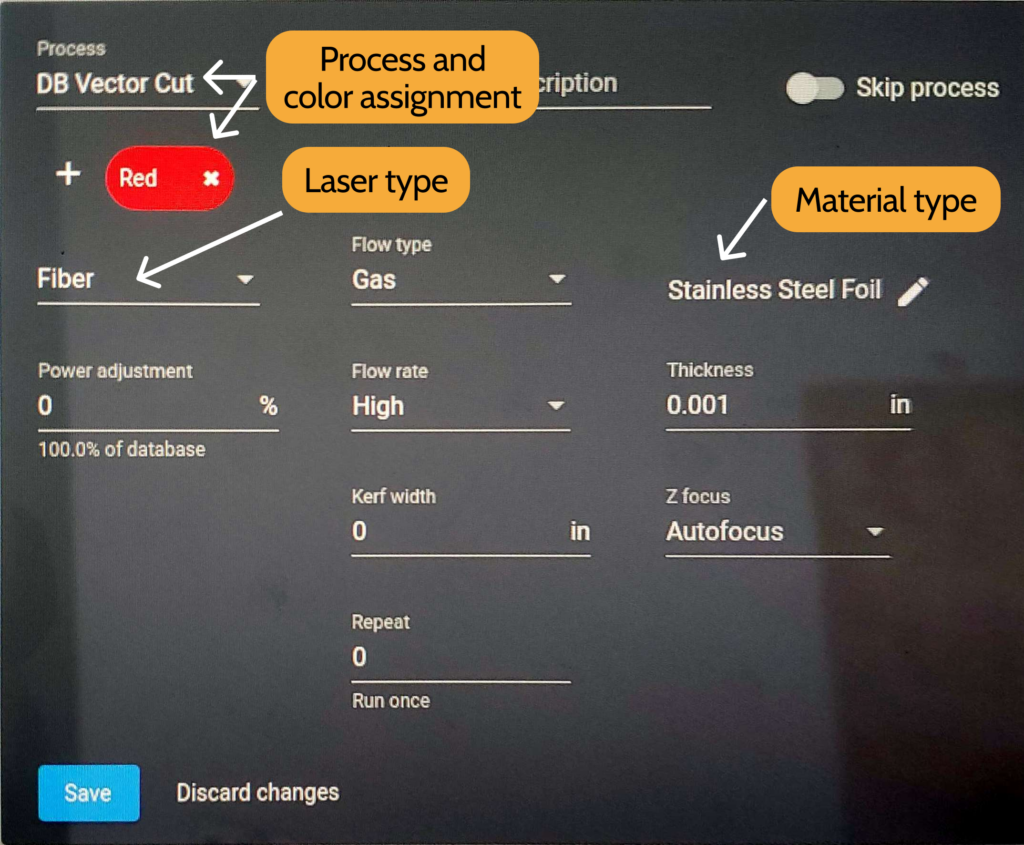
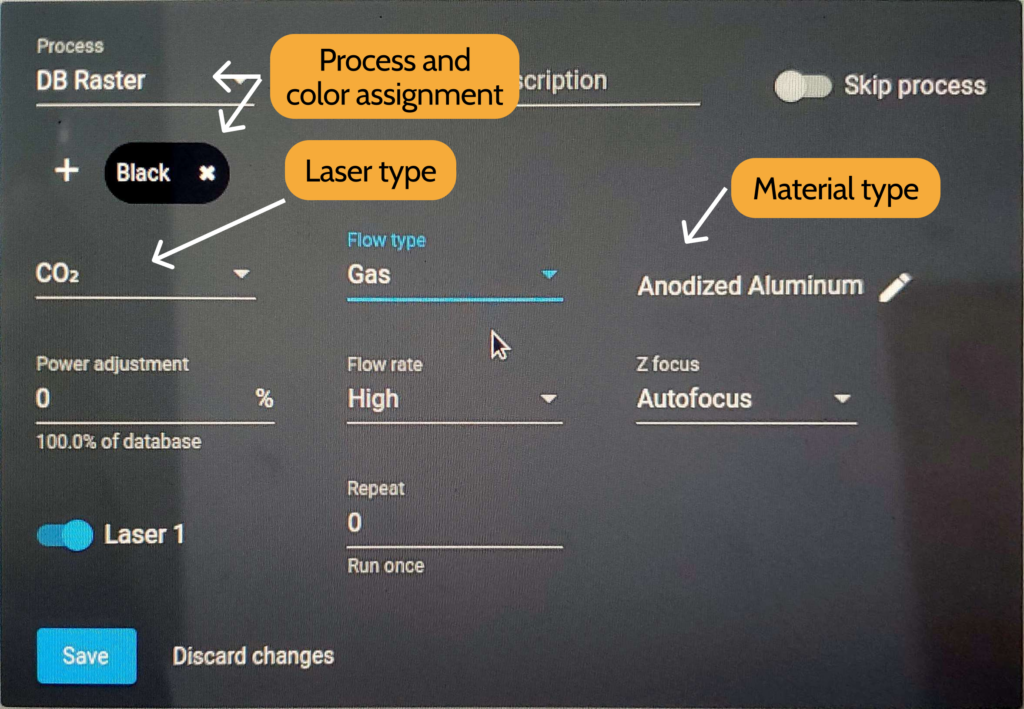
Process Assignment
The final tab is the most important, as it’s where you assign laser processes to the colors you have in your job. The most important settings are as follows:
- Process and color assignment: The processes you are most likely to use are DB (Database) Raster and DB Vector Cut. You can choose which color in your job is rastering and which is vectoring. DB indicates that you will use pre-determined materials settings instead of custom ones.
- Laser type: Either CO2 or fiber. Please refer to the explanations above as to which laser you should use.
- Flow type: This laser cutter is designed to use air or inert gases for cleaner cuts. Select “Gas” as the flow type.
- Material type: Choose which material type you are using.
- Thickness: Set in inches; this is where you can set the thickness of your stock material. This is only viewable during vector cutting operations. You will get an error message if your material exceeds that which is allowable in the default database; please check in with a Lab Assistant before overriding settings.
- Power adjustment: If your process isn’t working the way you want, you can add or decrease the power of the laser here without having to go into manual control.
- Autofocus: This focuses your laser in the Z direction. Typically, you want the first operation (a raster) to have autofocus on, as it saves you a bit of time in processing.
A note on autofocus:
You can set the machine to focus before every process, if you’d like. This is great for high-precision applications but is generally unnecessary. Your FIRST operation should use autofocus, and turning on your autofocus for following operations may be redundant. The autofocus probe will lower down and touch your stock. If your stock is too low, you’ll get an error saying that the focus probe cannot touch the material. Move the bed up until you’re about 1/8th inch above the stock.
Making your Cut
- You can do a test run by running the machine with the lid open. This is helpful to see if you will get any errors, such as your autofocus probe not reaching the material. You should also ensure here that your cuts are actually on your piece! If the laser passes over the bed and not your piece, it will keep firing onto the bed, which obviously is not good for our machines.
- Once you have done a test run that you are satisfied with, let the head return to home, then close the lid. Closing the lid will engage the magnets, enabling the laser to fire.
- When you’re sure that all the safety protocols are in place, press the green “Go” button again. It will do the same path again, but the laser will fire this time.
- You may not leave the room as your job is running. For longer cuts, you may ask someone who is trained to watch over the machine for you if you need to step out.
Cleaning up
- Remove your piece and any other material, like the piece you cut it out of. Don’t worry about touching the bed – because of its shape; it is not hot.
- If the leftover material is usable, put it on the scrap shelf. Otherwise, either recycle it or throw it away, depending on the material.
Troubleshooting messages
Gas assist is off: Just like the small lasers, your compressed air line needs to be turned on. This machine will not start otherwise. If the air line is open but you still get this message, go into your process settings and change them from air to gas.
Autofocus probe could not touch material: The focus probe will only move a small amount. If your bed is too low from the probe, the autofocus probe won’t be able to touch it. Raise the bed up in small increments until you’re about a 1/4″ below the probe.