To gain the embroidery credential you must complete this DIY training and show the completed project to Makerpace shop staff. This DIY training shows you how to use the embroidery patterns that are stored within the machine. After completing this training, you may refer to the “Embroidery User Guide: Using Hatch Auto Digitize” to learn the basics of embroidering custom designs.
You will end this training with a soft fabric “patch” featuring some basic text and a preloaded design.
Text in blue boxes are steps you should actively be taking to practice these skills.
Machine Embroidery
Machine embroidery is the process of stitching designs onto fabric using an embroidery machine, guided by digitized patterns. The machine automatically follows the design, stitching various colors and types of stitches into material that has been stabilized and placed in a specialized hoop
Safety Considerations
Embroidery Parts
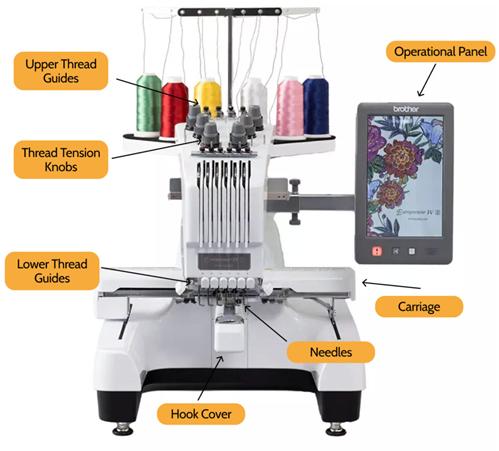
- Spool Stand: Where spools of thread are placed. Spools have specific requirements based on thread type and spool size including adding a cotton spacer to the bottom of the spool and/or adding a plastic cap to the top of the spool.
- Thread Guides (First/Upper/Middle/Lower): Holes or tensioned plates required to direct the path of the thread, ensuring proper tension and preventing tangling during the embroidery process
- Thread Tension Knobs: Where adjustments to thread tension are made. Proper tension, amongst other things, prevents thread breakage and is responsible for the overall quality of the stitch.
- Thread Guide Pins: Pins to guide the thread in between the upper and middle thread guides.
- Needle Bar Case: Moving part. Moves left and right to position the selected needle for embroidering.
- Carriage: Moving Part. Moves the fabric being embroidered forward, back, left, and right to facilitate the embroidery
- Frame Holder/Arms: (Not Pictured) Attaches to the carriage and hold the embroidery hoop
- Hoop: (Not Pictured) Holds the fabric taught, slides into the frame holder/arms
- Hook Cover: Covers the thread picker, bobbin (and casing), and hook. The hook is what the bobbin casing slides into.
- Operation Panel: Touch screen controller for the embroidery machine.
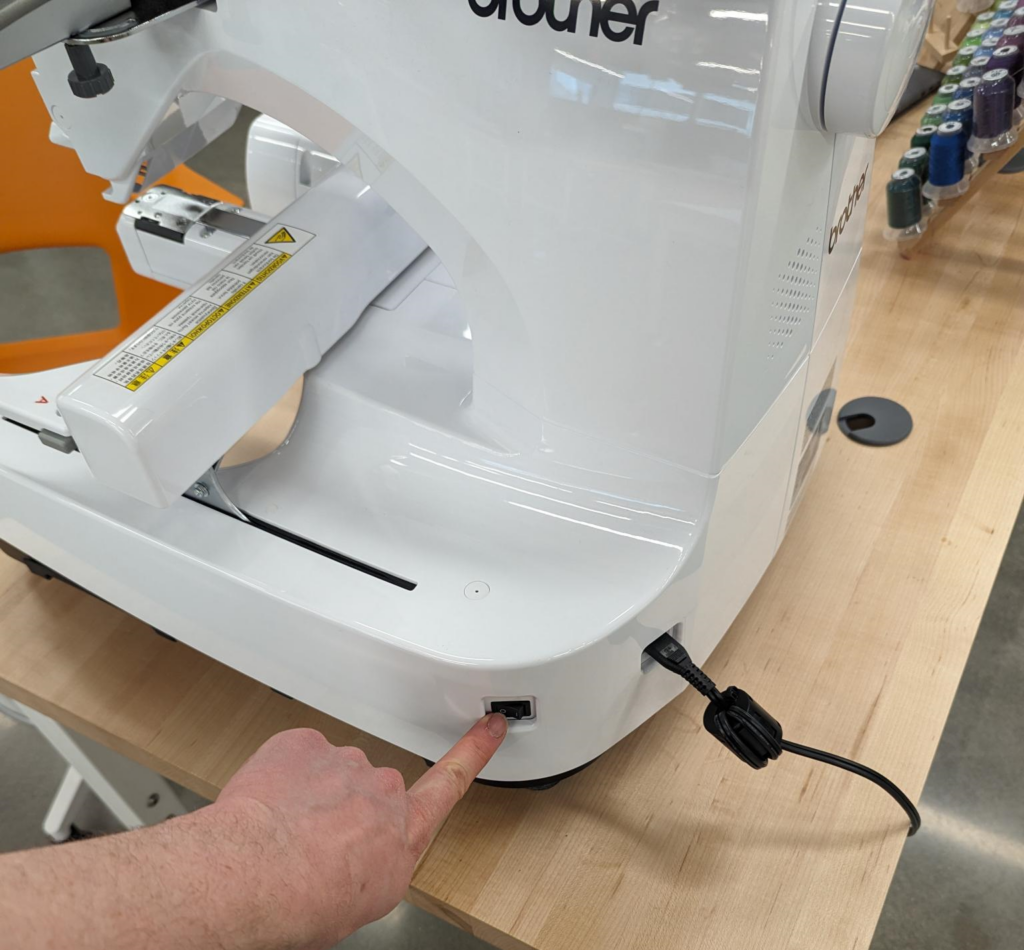
Turning the Machine On
To turn the machine on, use the switch located on the back right of its base
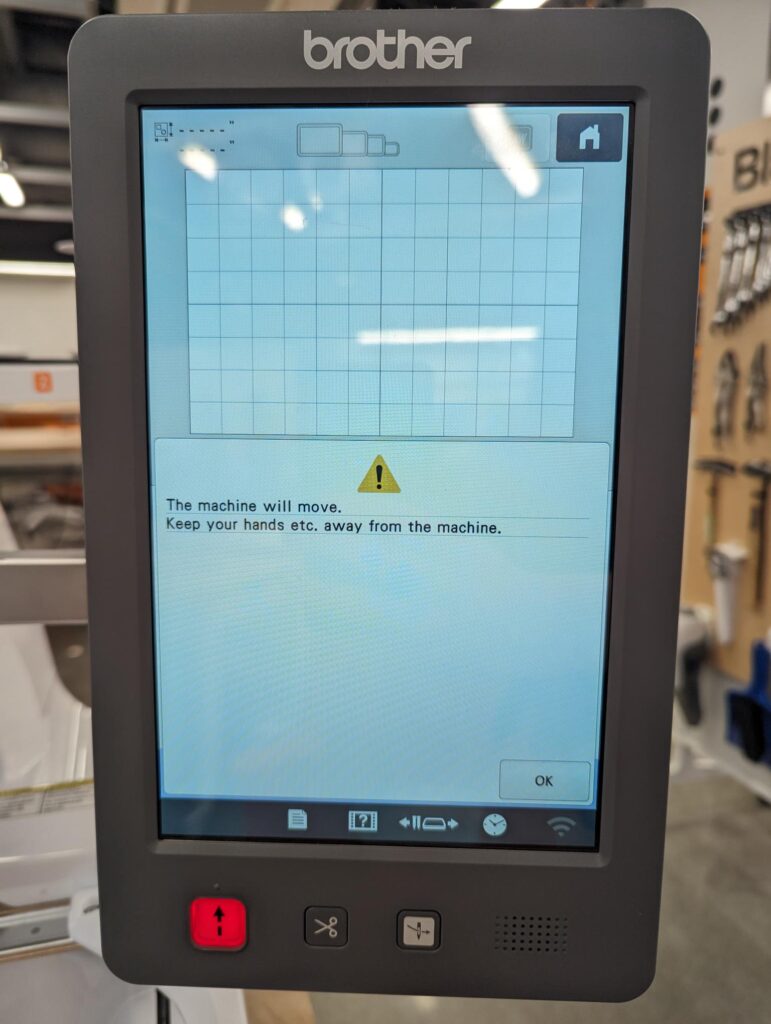
You may have to tap the touch screen to move past a screen saver. Additionally, a message about oiling the machine may pop up before the pictured screen. This message can be safely ignored.
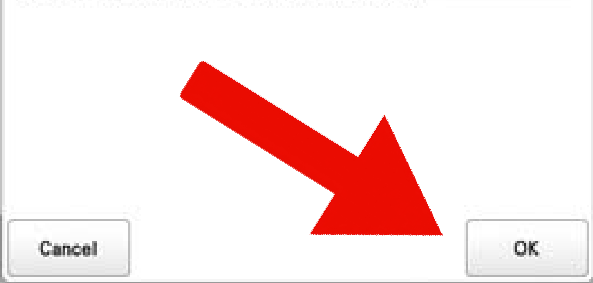
A warning message will appear on the screen informing you that the machine will move. Ensure that any objects and body parts are away from the machine before clicking “OK” in the bottom right of the screen
The machine will move to find its “home” position.
Designing with stored patterns and text
Start your design with text that says “EXP”
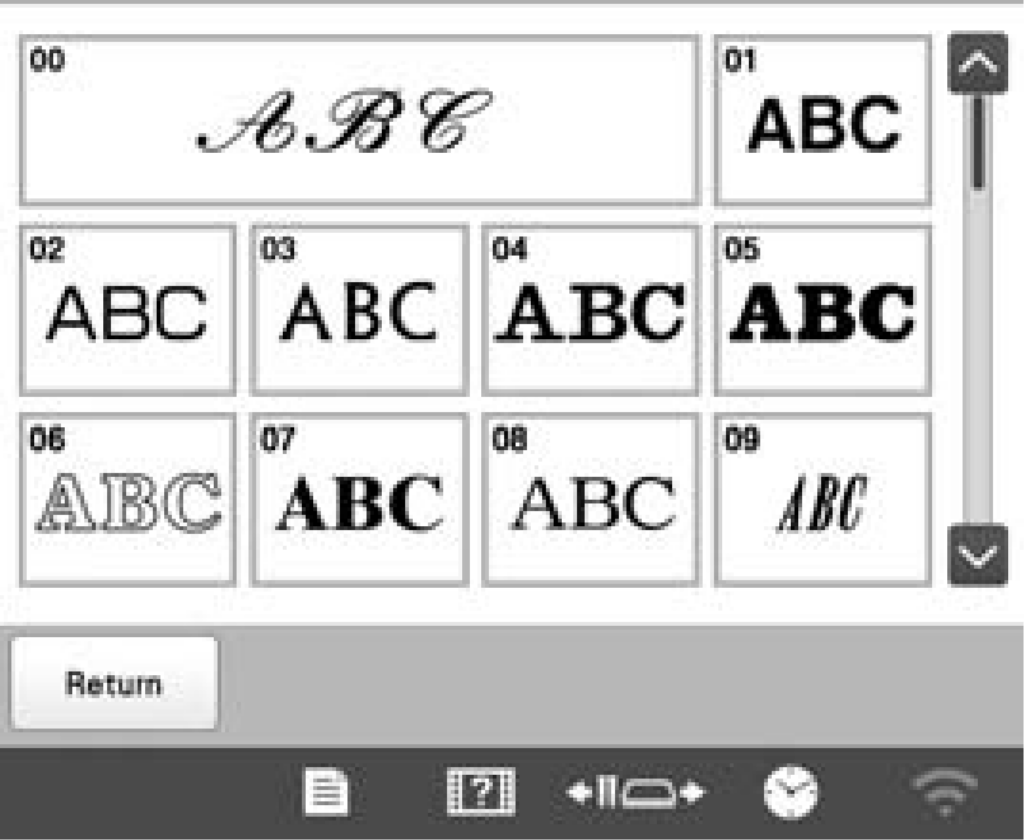
Click on the fonts button located in the lower center of the home screen.

You will be given several options of fonts stored, choose one that you like by clicking on it.
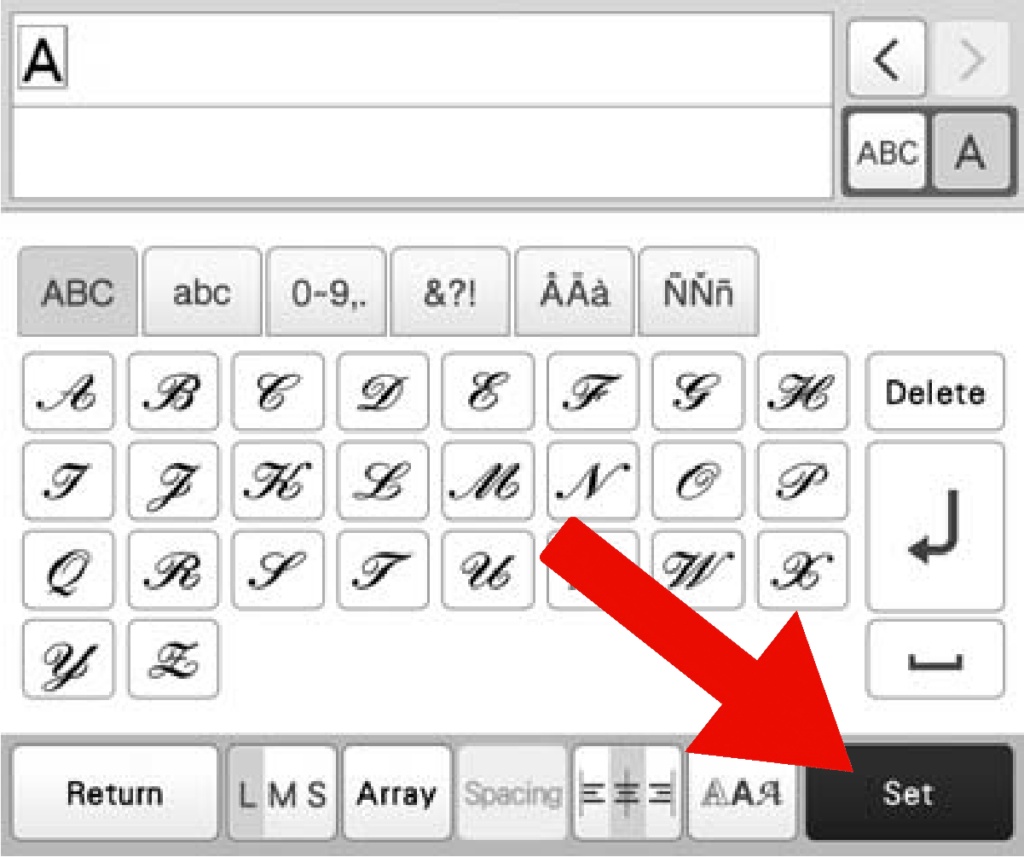
A new screen will pop up with the alphabet in your selected font
Type “EXP” into the field and then click the set button in the lower right-hand of the screen.
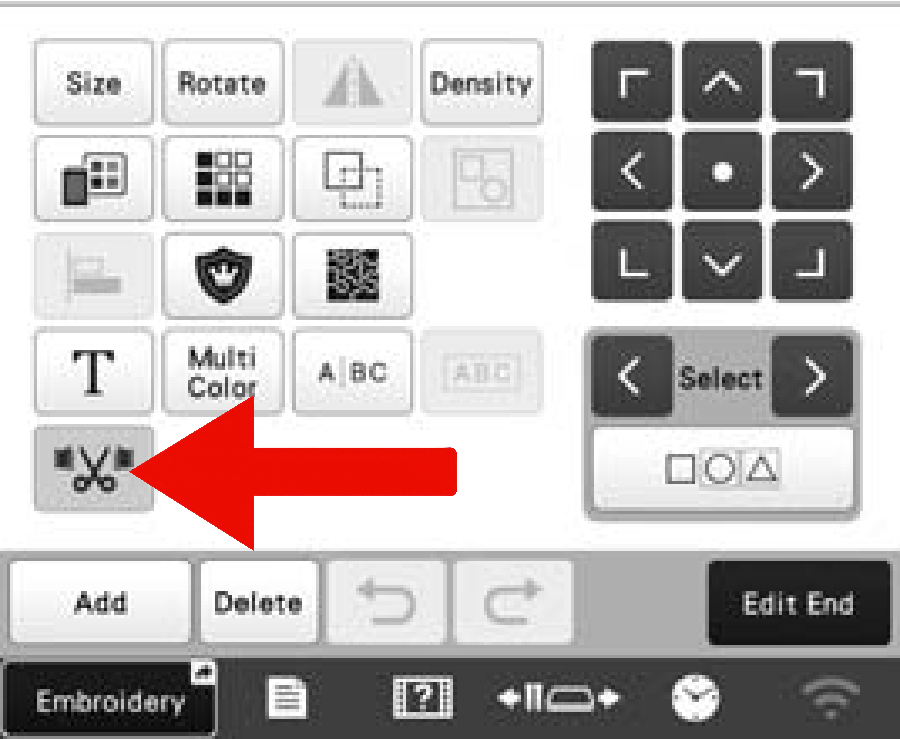
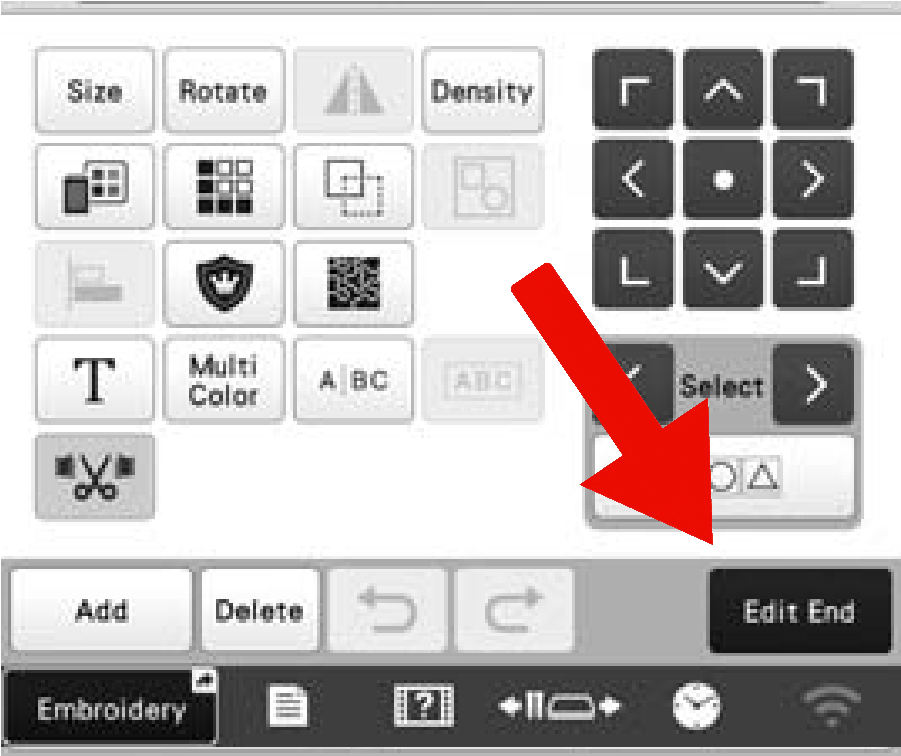
In the next screen, we want to ensure that the trim button is not highlighted.
Trims will stop the embroidery between each element of your design and trim the thread. For the sake of speed and efficiency, we would rather run a jump stitch in this particular design. Jump stitches are meant to be trimmed easily after the embroidery is done.
Click on the Add button. This will add your text to the embroidery design.

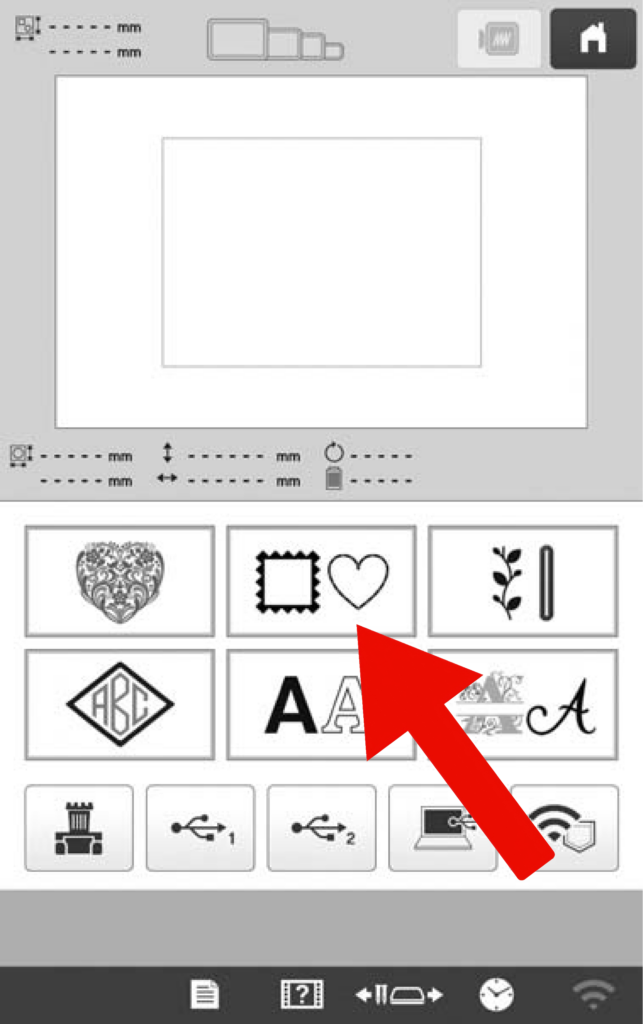
Finish your design by adding a two (or more) color border around your text
Click on the “Frame Patterns” button
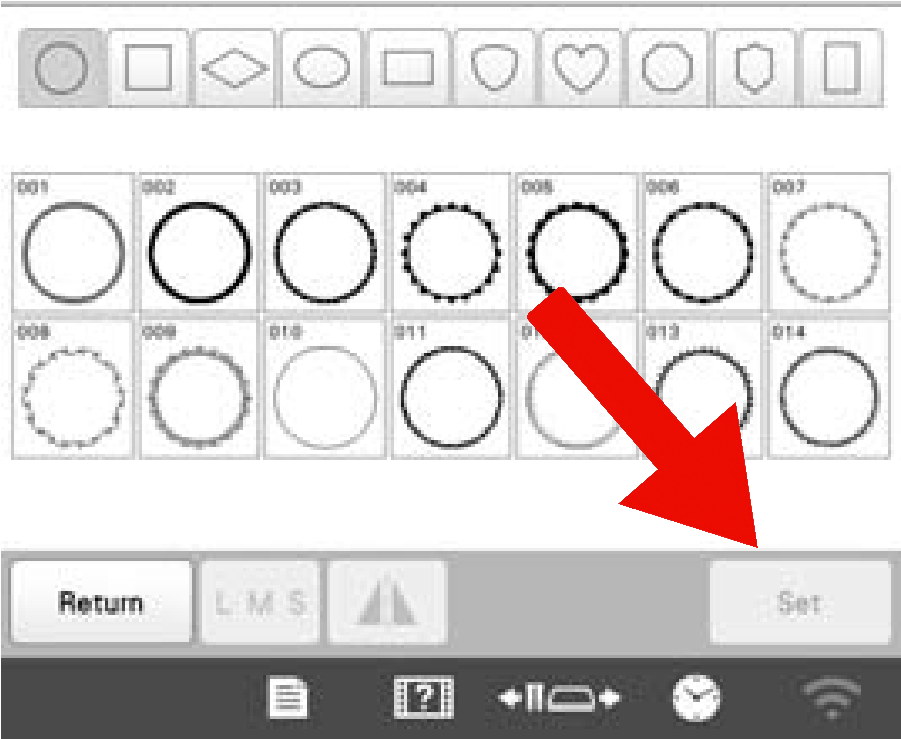
Select a frame pattern, with more than one color, that you like.
It is softly suggested that you use an oval-based frame. A good option is oval frame number 8.

Click on the “Set” button in the lower right-hand corner
Click on the “color selection “Color Selection” button. This will
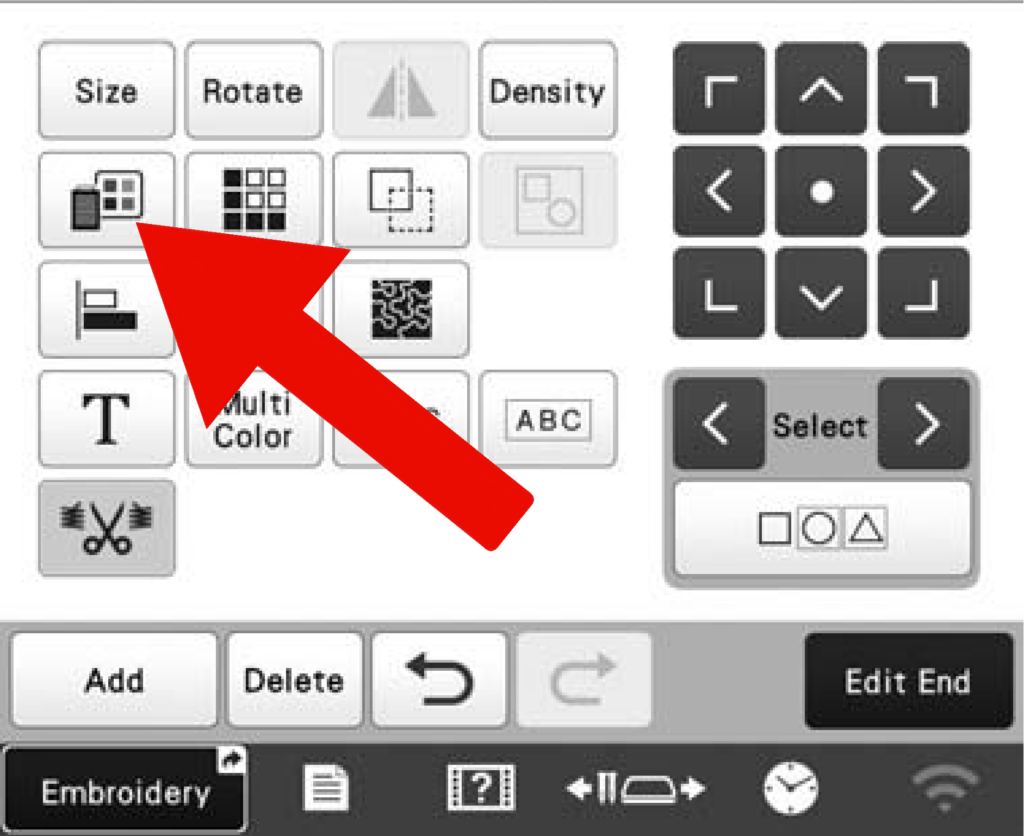
Each color on the menu to the left has an associated element. Select one of the (at least two) elements.
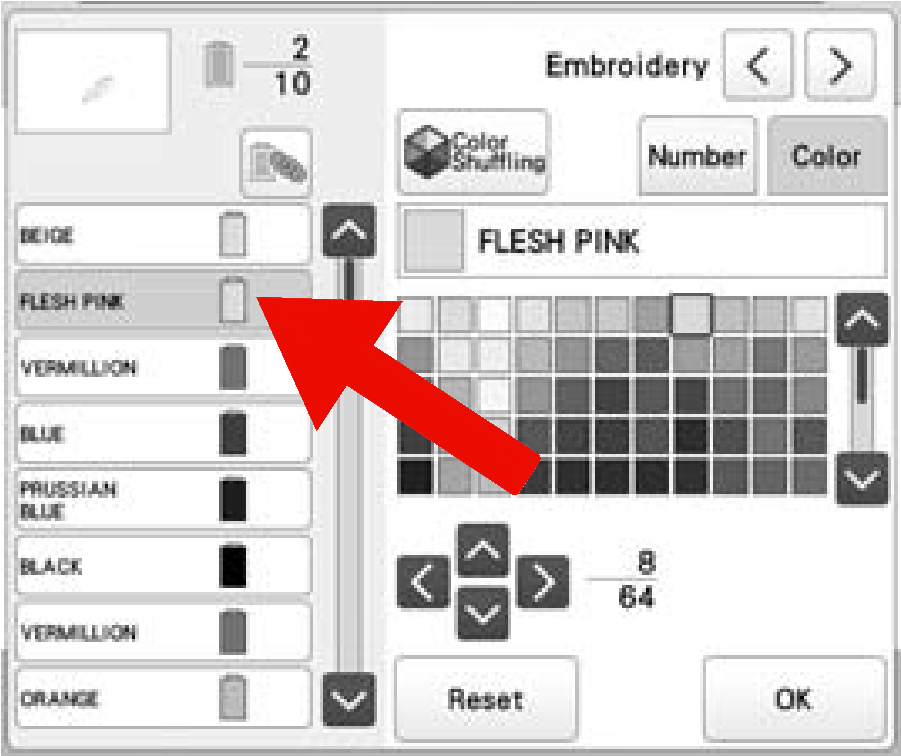
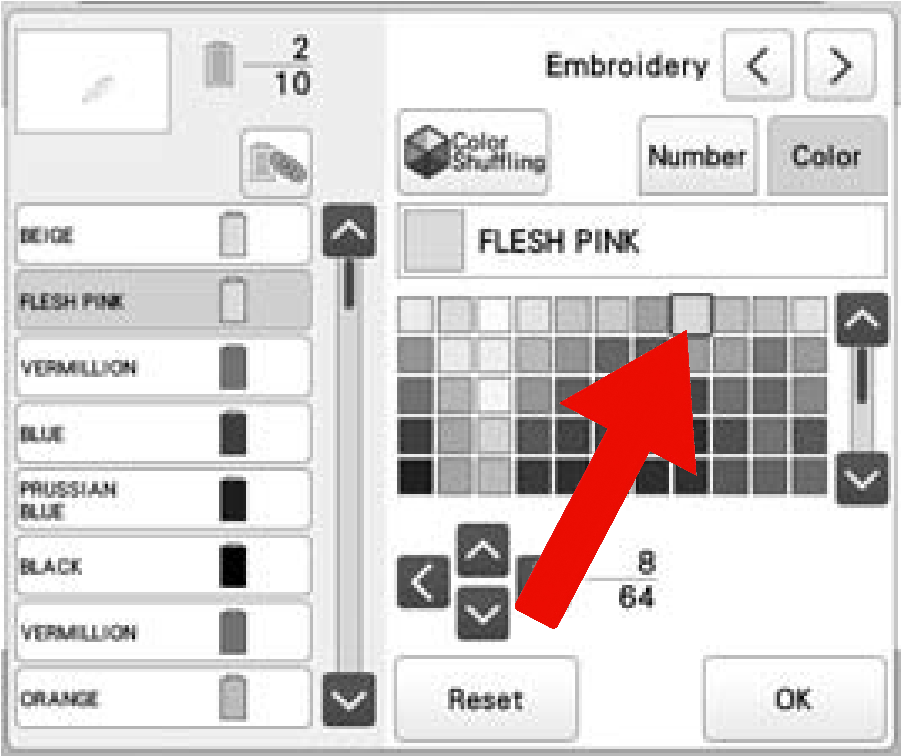
Select a color in the menu on the right. This will change to the color of the element you have selected. The color you choose can be an approximation of the thread you choose to use, but make sure it is close.
Repeat this process for other elements of your frame you would like to change the colors of.
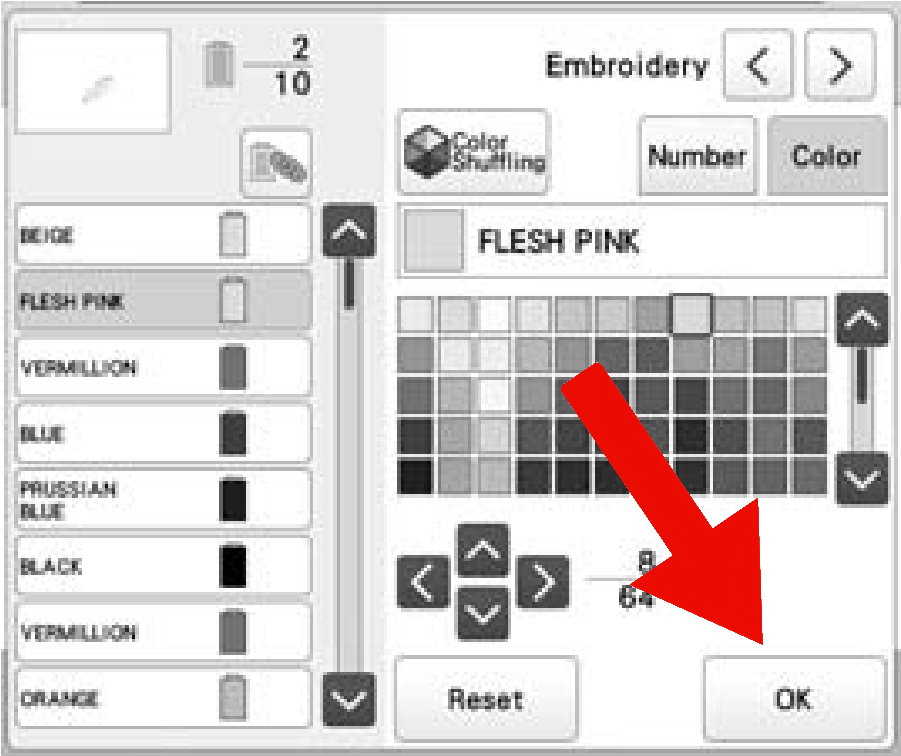
Click “OK” in the bottom right of the screen
Ensure that the trim button is not highlighted
This is especially important when linking small objects together. Trimming on your frame can sometimes add over 25 minutes of machine time to your projects
Click “Edit End” in the bottom right of the screen when you are finished editing your design.
You can get back to this screen by hitting the “Edit” button on the next screen
Threading the Machine
Start by seeing what colors your design requires and where those colors need to be loaded.
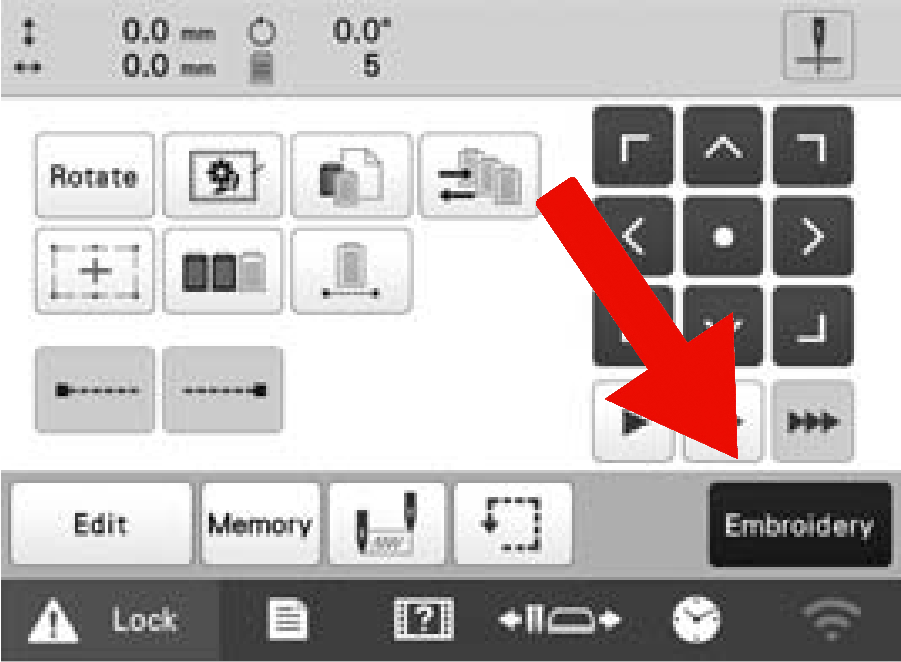
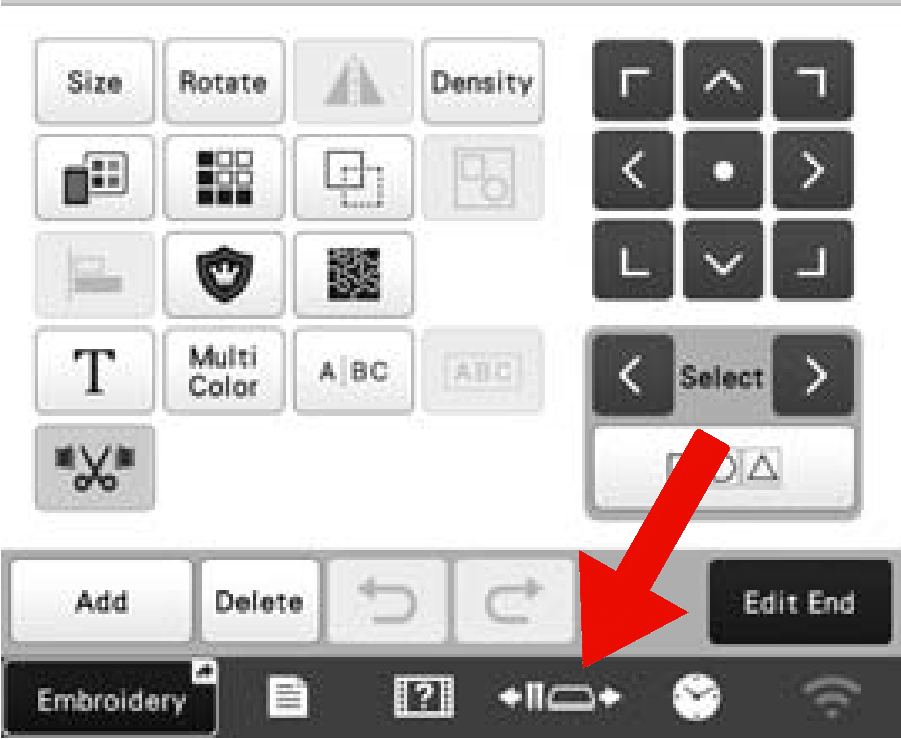
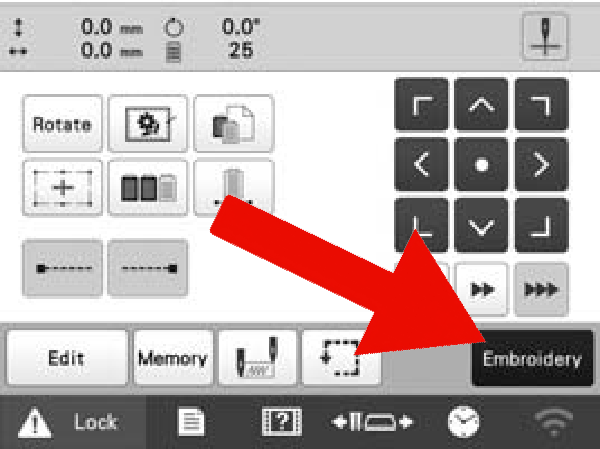
Click on the “Embroidery” button in the bottom right of the screen.
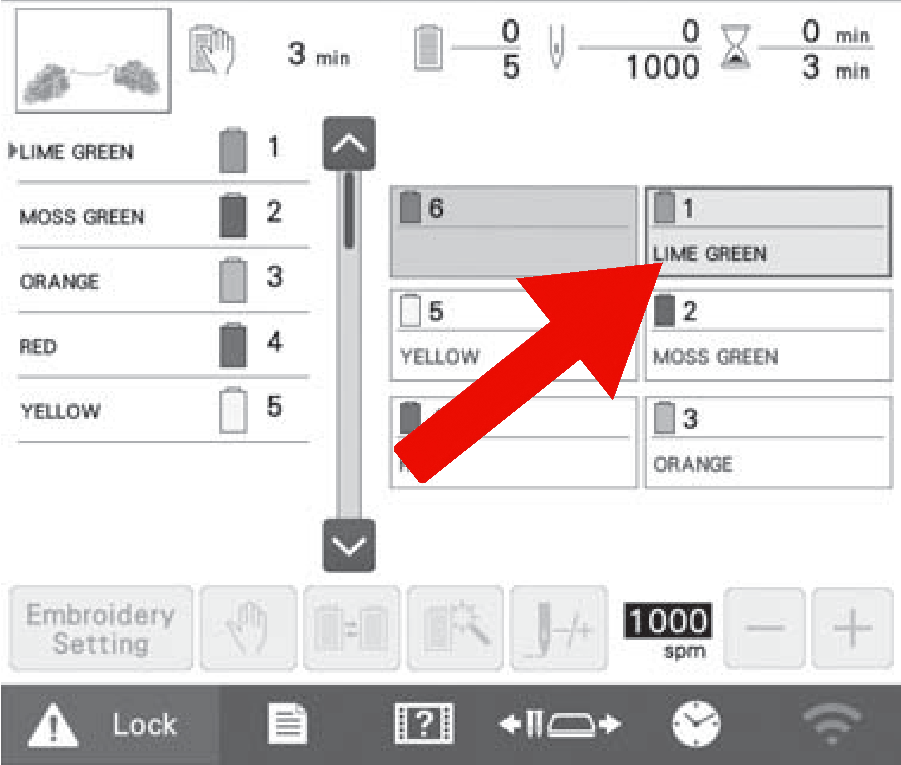
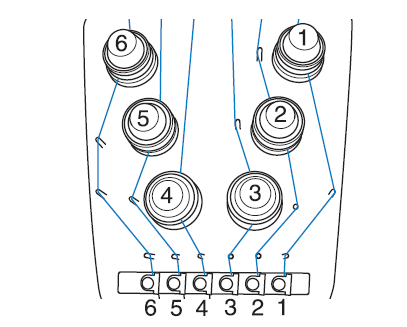
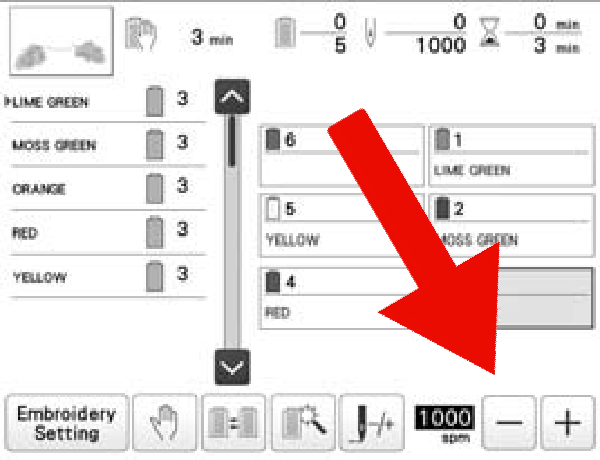
On the example screen shown, we can see that the “Lime Green” color needs to be loaded into spool number one, “Moss Green” into spool number two, and so on.
Take note of what colors need to go where here.
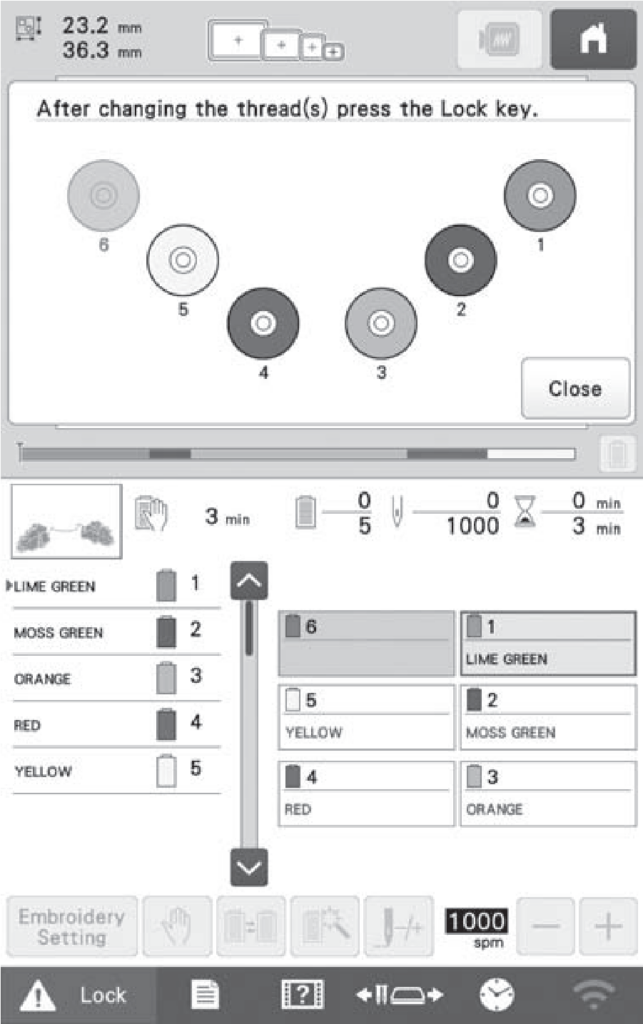
Click on needle number one if it’s not already selected. This will move the needle carriage so that needle number one is in the active position, which is needed to thread the machine.
This guided training will ask you to repeat the following steps until all spools are threaded into the machine. When you are threading a needle that needle needs to be in the active position
Thread your required spools into the correct needles
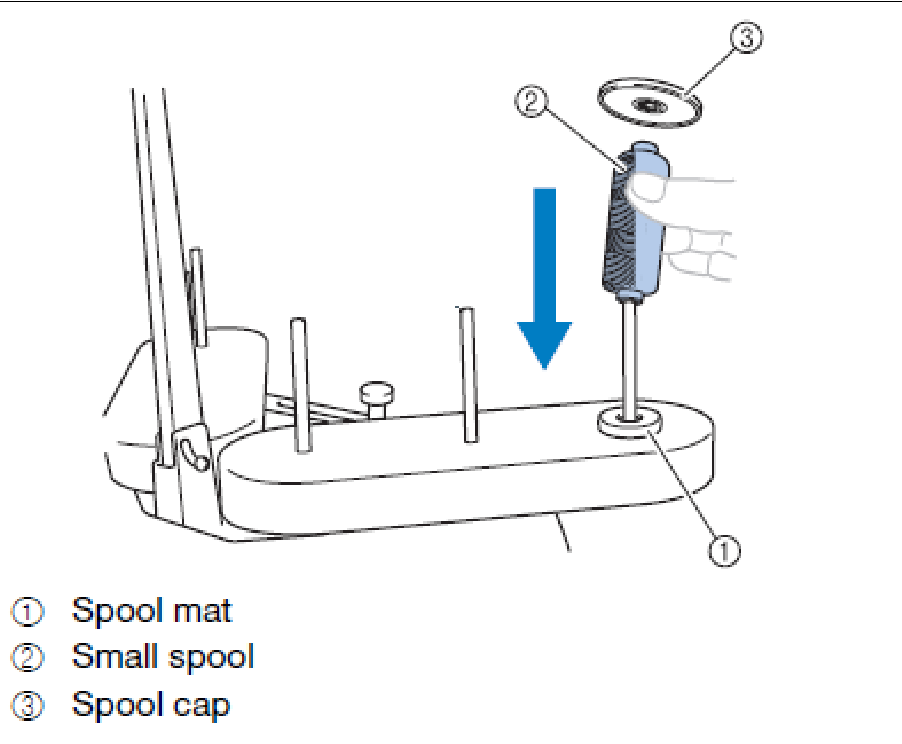
Place the required color on spool number one, indicated by the orange numbers on the machine. Our spools are shorter than the spool pins and require a spool mat under the spool and a spool cap above the spool.
You are allowed to bring in your own thread. We have 30 colors of Isacord 40 polyester thread available.
The machine detects when you are out of thread, please use all of a spool before requesting a new one
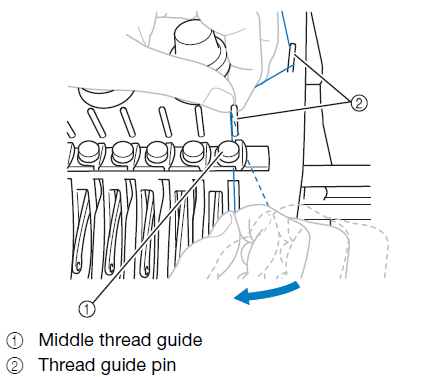
Run the thread through the thread guide directly above your spool, towards the front of the machine, and through the second thread guide as pictured.

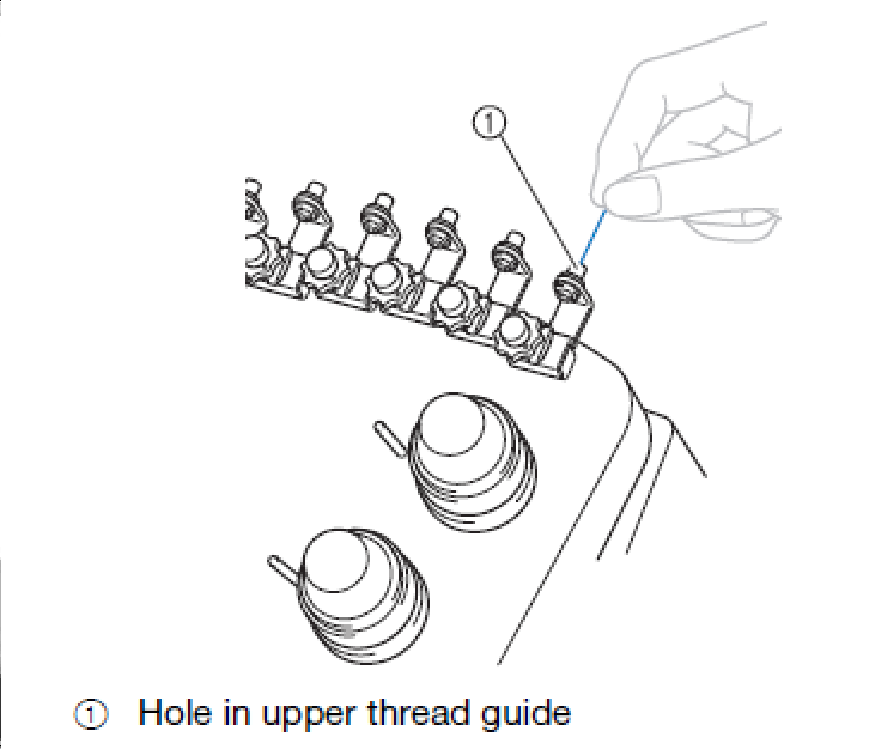
Run the thread through the hole in the upper thread guide
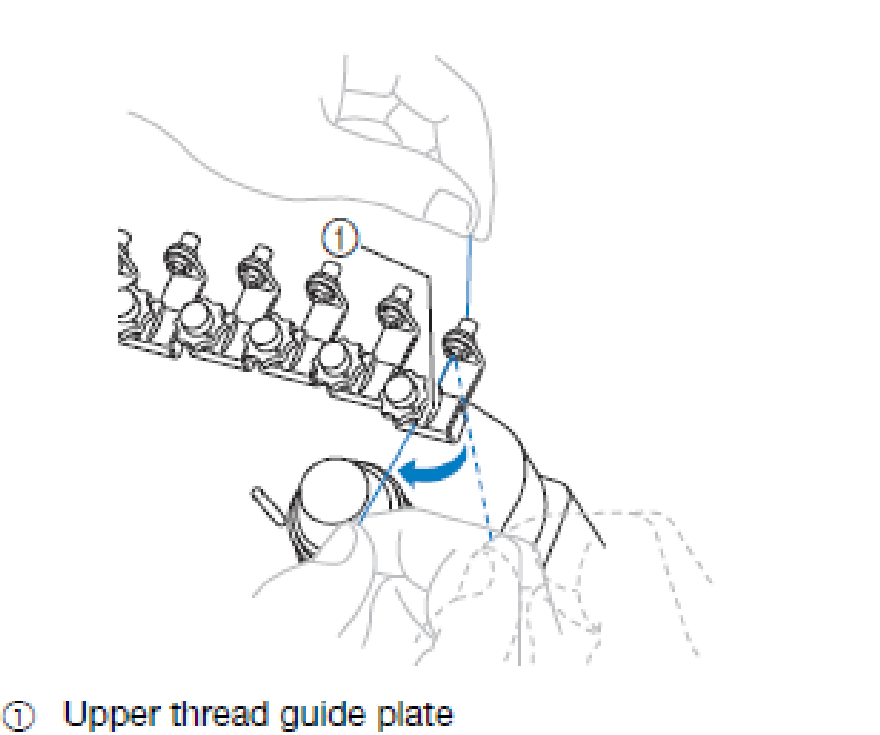
Run the thread under the guide plate from the right. It helps to hold the tread taught behind and in front of this guide while sliding it underneath.
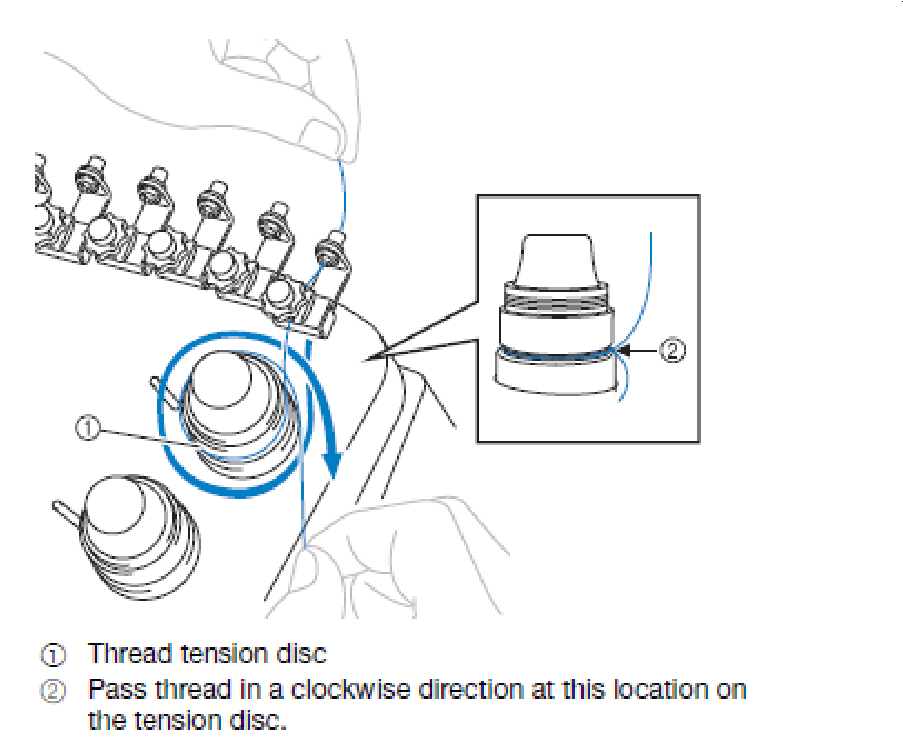
Wind your thread around the tension disk one time. Regardless of which needle you are threading the tension disks will be circled in a clockwise direction.
Each needle has a raised path that indicates where how your thread should run around the guide posts. Follow this path around the guide posts.
Run the thread through the next thread guide, just as you did on the first
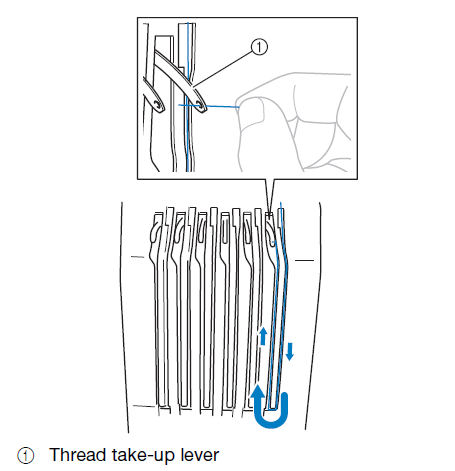
Run your thread down the slot directly underneath the lower thread plate, bringing it around the guard and back up.
Then run the thread through the take-up from right to left and bring it back down the left slide of the slot
Pass the thread down through the slot to the lower thread guide then through the hole in the lower thread guide
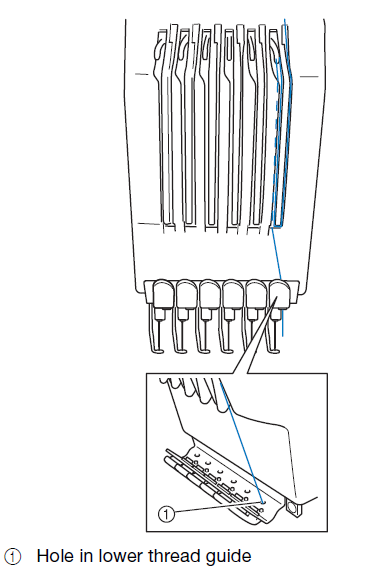
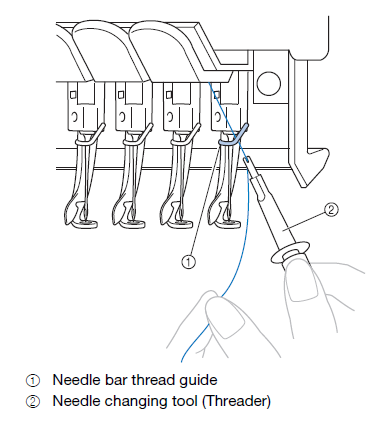
Pass the thread through the needle bar thread guide. Once done, pull about 6-8 inches of thread out so you have some slack to use the auto threader.
It can be helpful to use the needlechanging tool, located on the left side of the machine base, to push the thread through this needle bar thread guide. It is not required to use this tool
Use the auto threader
Using the auto threader is required. Do not thread the needle manually as this can leave threads hanging down that can get “sucked” into your embroidery project and create a mess.
Press the Autothreader button on the front of the control panel, this will swing the Autothreader down, surrounding the active needle.

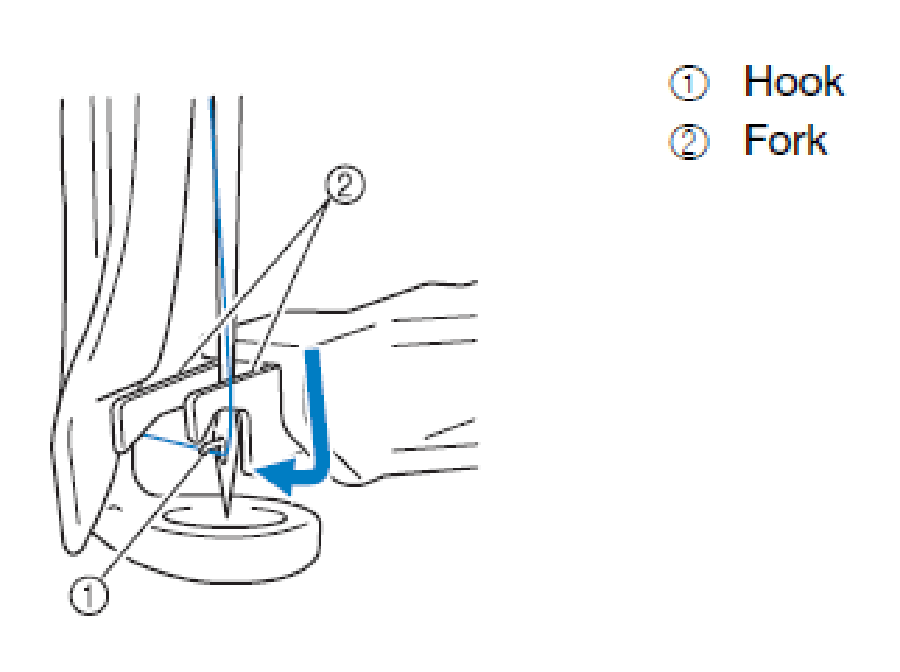
Run the thread on the outside right of the “fork”, under the “hook” and the guide on the presser foot (pictured on the left side of this image)
If the hook is not going through the eye of the needle the auto threader will not work. Get an explorer to help fix this issue
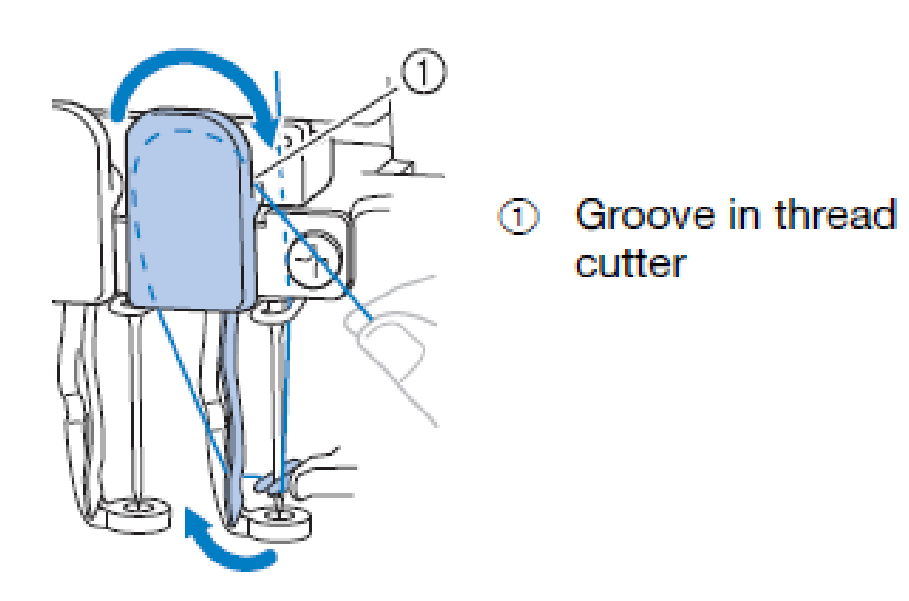
Bring the thread up and around the thread cutter. The thread should cut with some light pressure, and stay in place.
Press the Autothreader button again. This will pull the thread through the eye of the needle and hold it securely away from the work area.
Repeat these steps for your other spools of thread.
If you are loading thread without a design you can move the desired needle to the active position by clicking the “Change Needle” button at the bottom of the screen
Checking the Bottom Thread
Remove bobbin casing
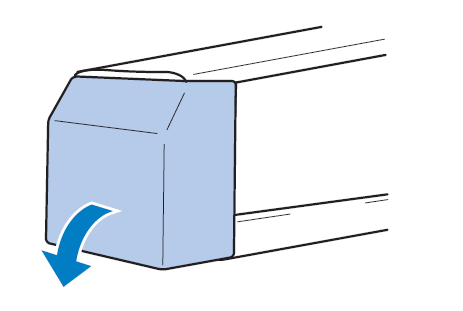
Lower the hook cover located underneath the needle carriage on the front of the machine. Refer to the “Embroidery Parts” section if needed
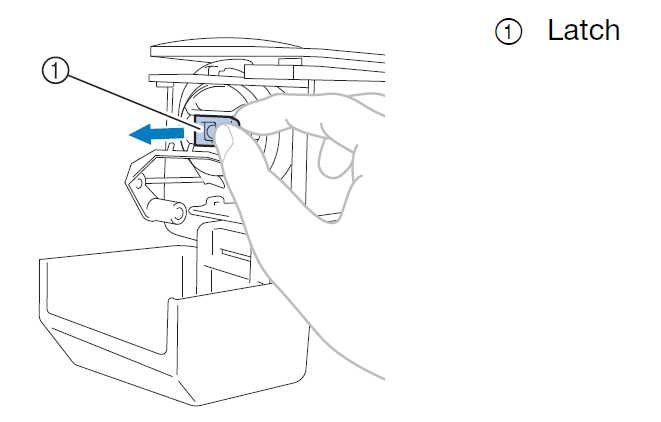
To remove the bobbin case, lift the “Latch” and pull it towards the front of the machine.
The “Thread Picker,” located in front of the bobbin case, may need to be lowered for easier access to the bobbin case. Gently lower it by pulling down towards the hook cover.
Check and/or change the bobbin
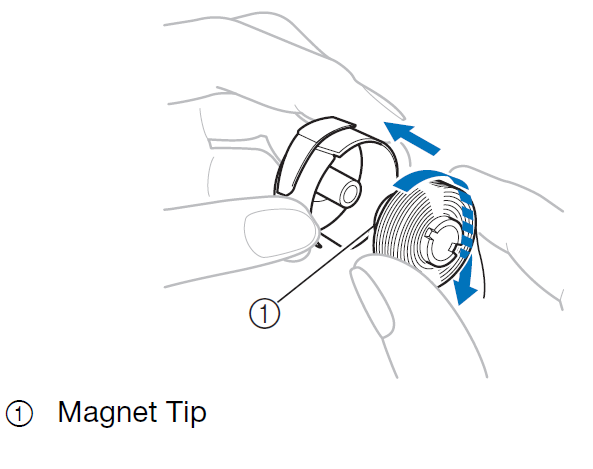
Check that the bobbin is correctly inserted, the magnetic tip (the black side) should be facing the bobbin casing as shown. Note the direction of the thread.
Extra magnetic prewound bobbins are kept in the tackle box next to the machine.
The machine will detect when the bobbin is out of thread. Do not replace the bobbin unless it is empty.
Run the bobbin thread through the “Thread Slit” and underneath the “Tension-adjuting Spring.”
When you pull on the thread, the bobbin should rotate clockwise
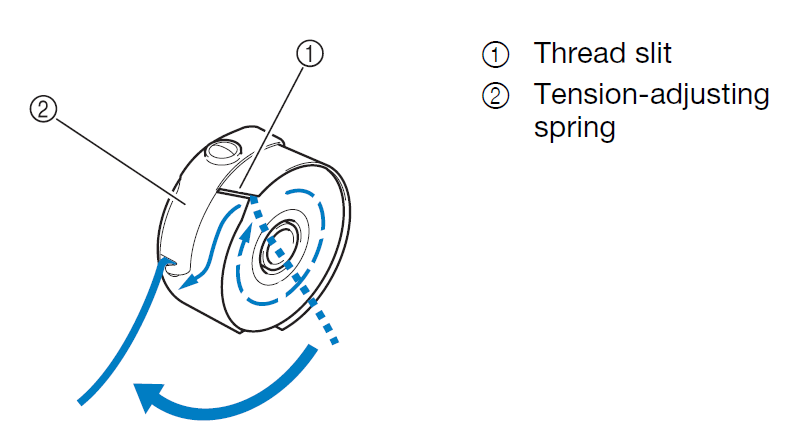
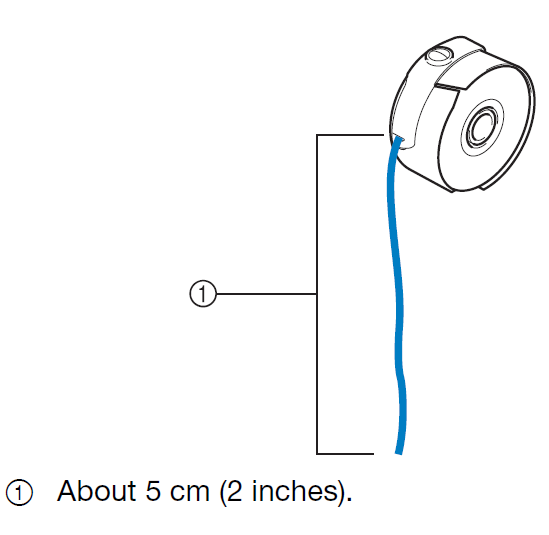
Pull the thread through the tension-adjusting spring until there is roughly 2 inches of thread showing.
Reinsert the bobbin casing
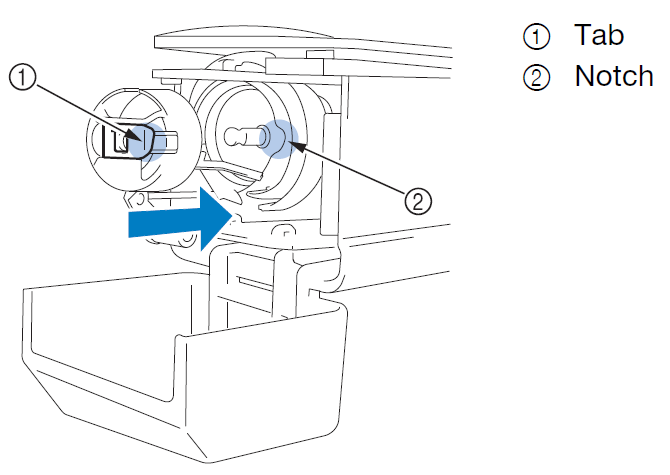
Press the bobbin casing into the hook, lining up the tab on the bobbin casing with the notch in the hook.
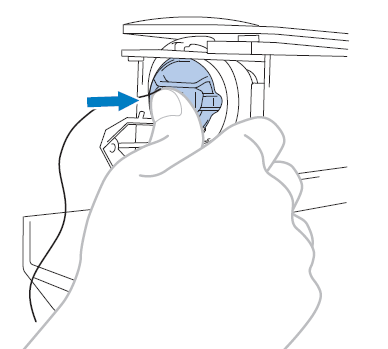
Make sure the bobbin case is fully inserted. It should feel as though it is snapping into place.
It may be helpful to lift the latch as you push the casing in. In this case, it won’t “snap” but should be fully inserted.
If you would like to bring your own bottom thread, metal bobbins are available in the tackle box. This guide does not go over how to use those bobbins, but the thread direction should be the same as the prewound option. You may have tension issues with these metal bobbins.
Hooping Fabric
Determine the size of hoop needed
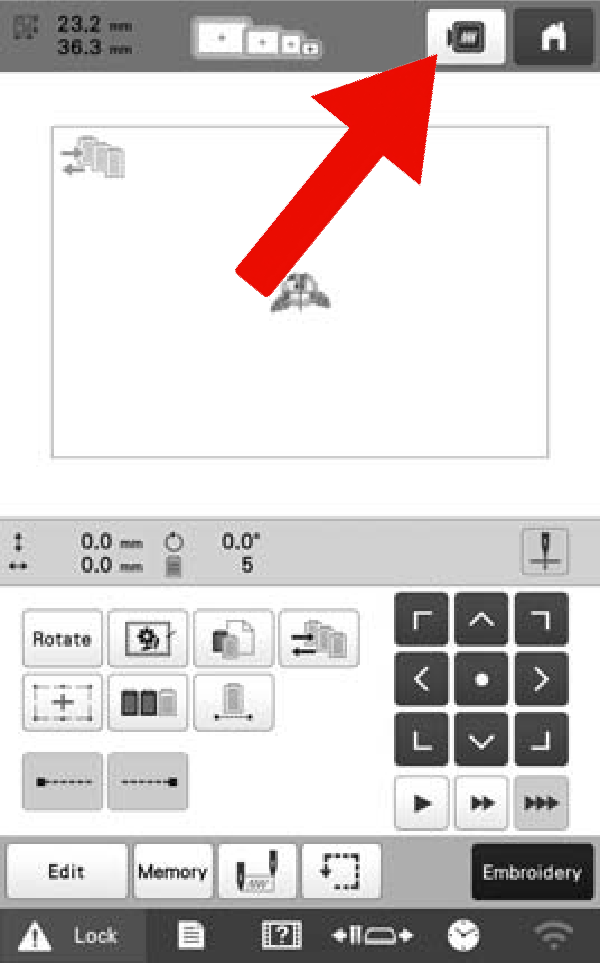
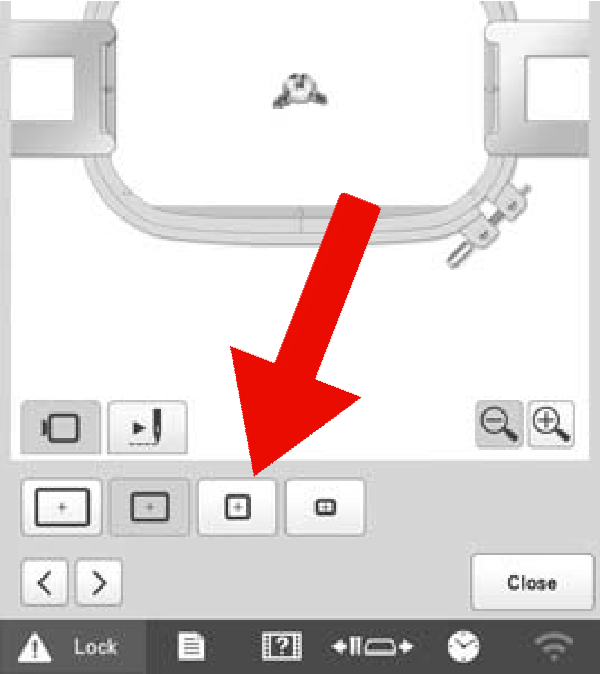
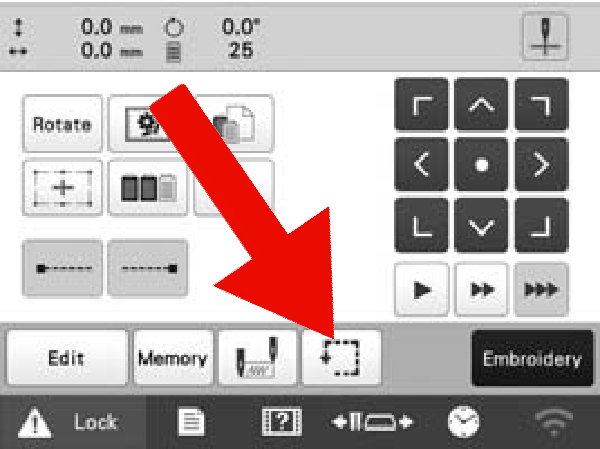
With your design loaded into the machine, click on the “Hoop Preview” button on the top of the screen.
Select your frame size by clicking the options near the bottom of the screen. Options that are greyed out and undetectable are too small for your design and can not be used.
The second to smallest option should work for most designs created in this training. You should aim for the smallest hoop that fits your design
For this training, you may only use the grey, nonmagnetic hoops as the aftermarket magnetic hoops do not have their sizes recognized by the machine.
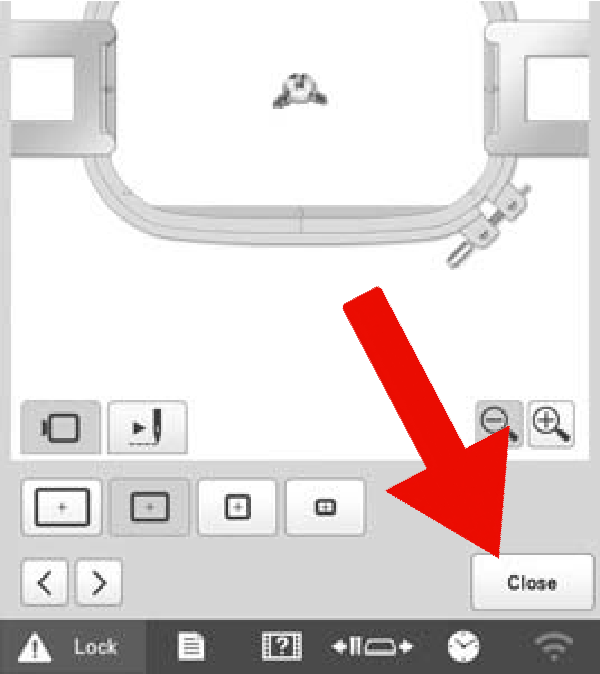
Once you are happy with your selection click the “Close” button in the bottom right of the screen
Hoop Your Fabric
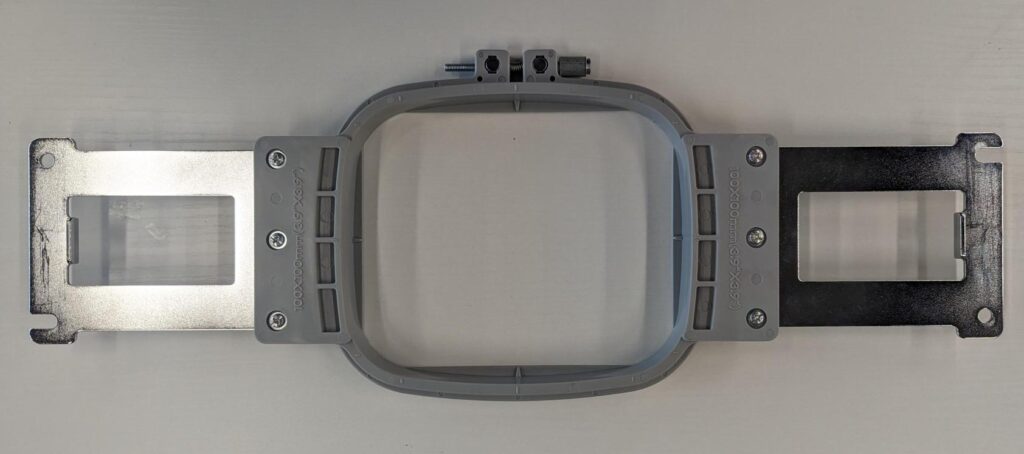
Grab the grey nonmagnetic frame that matches the one you chose in the previous step. Frames are located on the fabric cutting table, which the machine is facing.
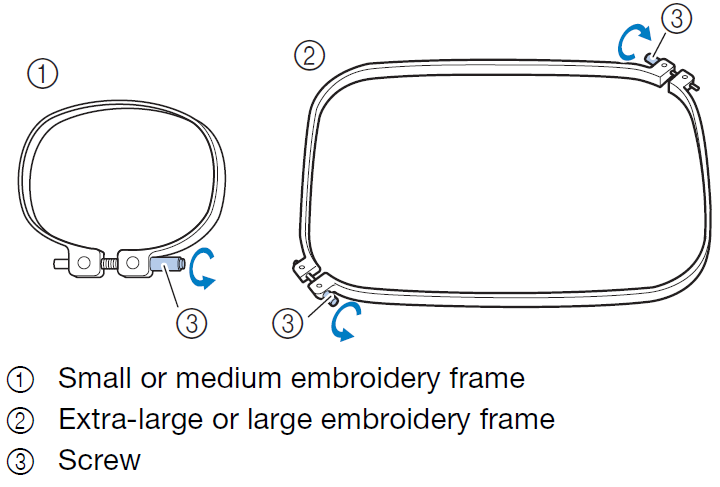
The frame has two parts. The outer frame has the thumb screw and the inner frame has the arms.
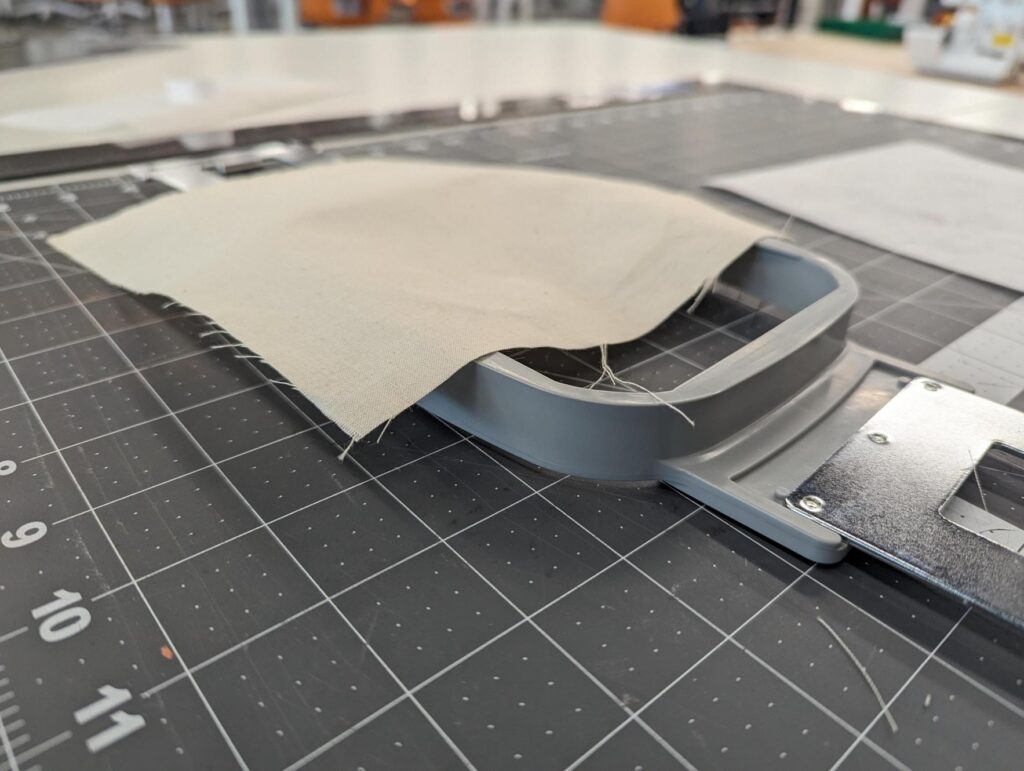
Cut a piece of muslin (pictured left), a roll of which is located on the side of the fabric cutting table, so that there is roughly 2-3 inches of overhang on all sides of the hoop (the opening, not the arms)
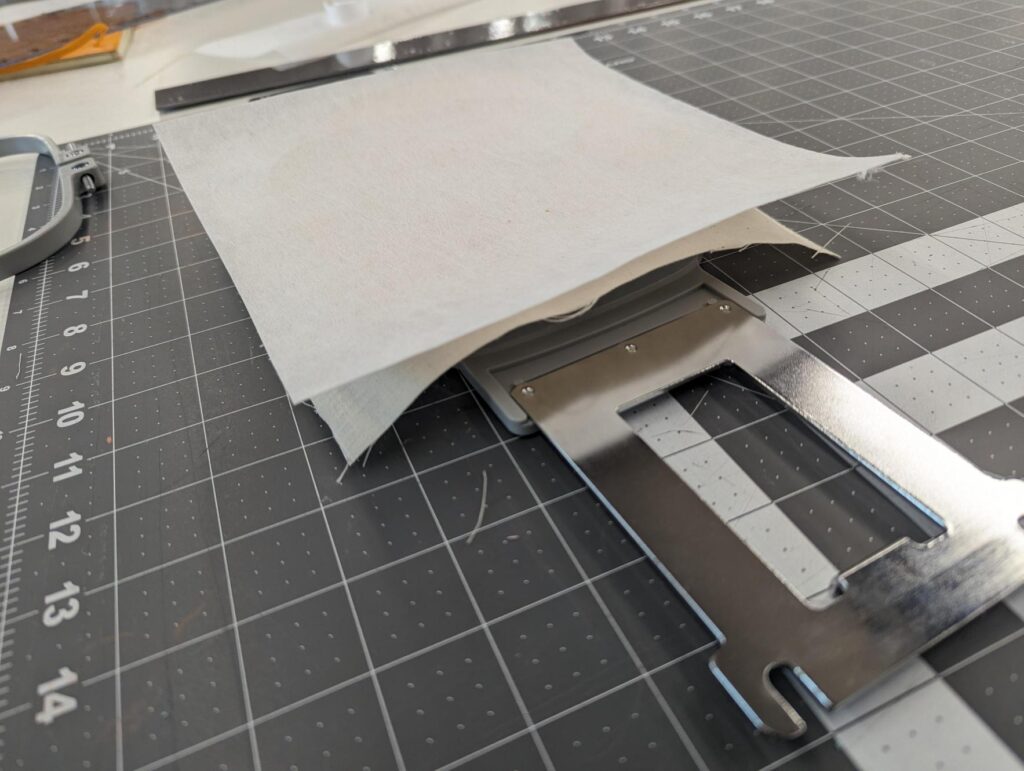
Cut a piece of “Cutaway” stabilizer (pictured right) located on the opposite side of the fabric cutting table to the same size. There is also pre-cut stabilizer in the same area, which you should use if it fits.

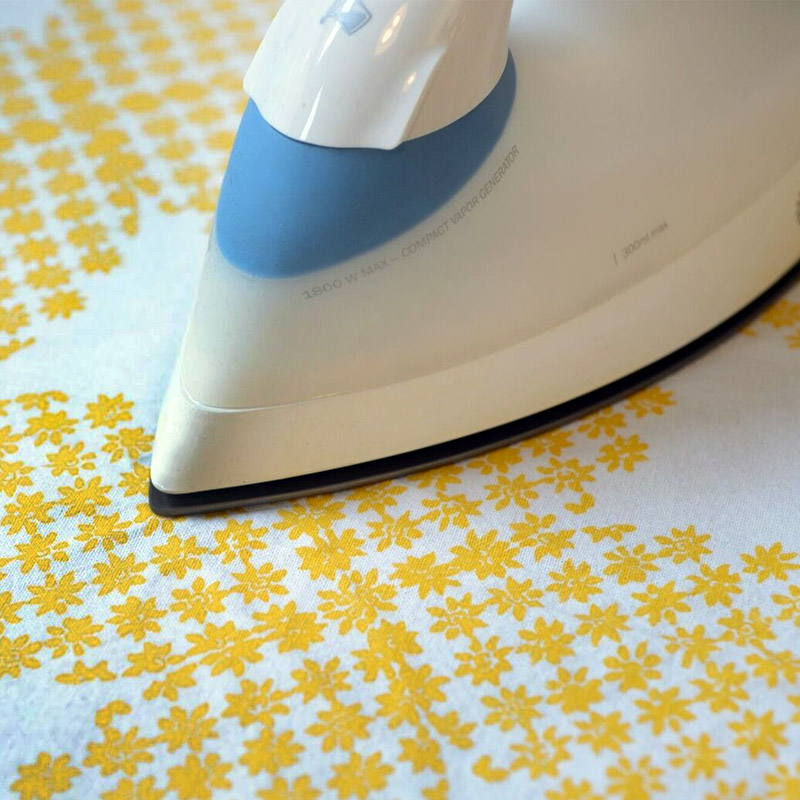
Optional step for better results: Iron your muslin before continuing. Consider doing this for all future projects to improve results.
Irons and ironing boards are located on our tool wall, near the screenprinting supplies
Loosen the outer frame and remove it.
The larger frames have two screws instead of the one on the smaller frames.
Place the inner frame (the one with the arms) face down.
Place the muslin on top of this frame so that it is centered around the opening of the frame.
This picture is meant to show the orientation of the frame, not the centering of the muslin.
Place the cutaway stabilizer on top of the muslin
Pre-tighten your outer frame and push it onto your inner frame. This should require some force but not be incredibly difficult. If it goes on too easily take it off, tighten the outer frame more, and try again.
Prefer a video? John Deer’s Embroidery Legacy has a great video on hooping. He places the backing and fabric on the outer frame instead of the inner frame.
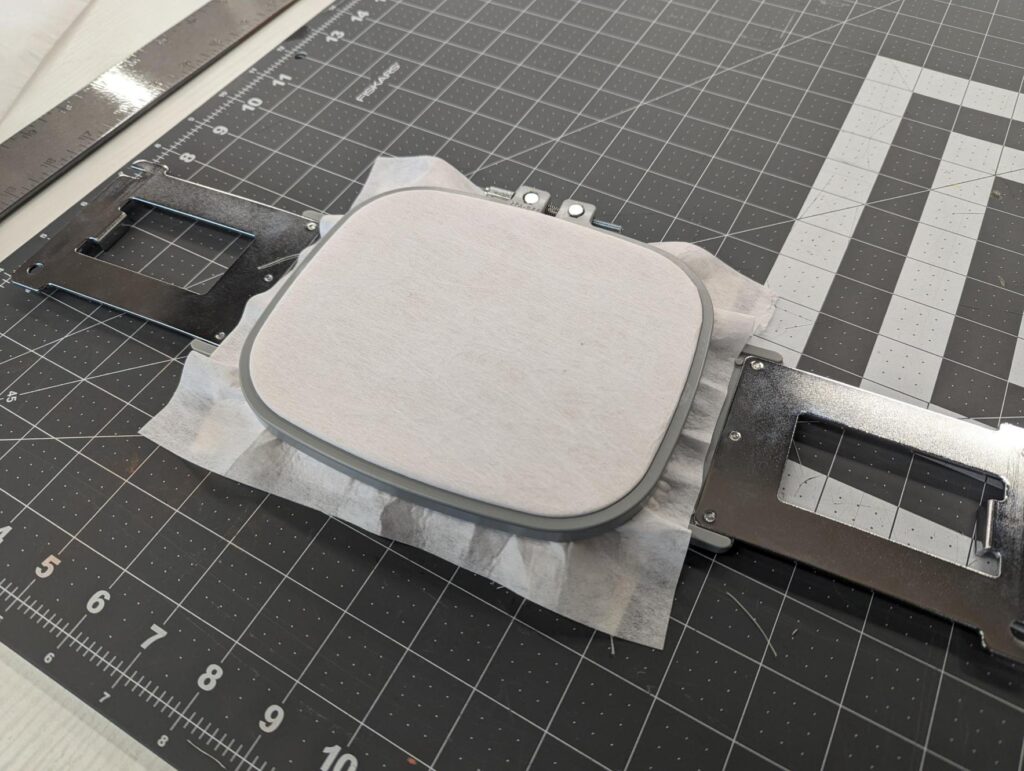
Tap your material, it should be “drum tight.” This means that it should have very little give when you tap it, similar to what you would expect a drum head to feel like.
It is best practice not to tighten the outer frame with a screwdriver or attempt to pull the material taught while it is hooped. This can cause “hoop burn” and/or puckering in your fabric. Instead, undo the hoop and try again.
Material that is too loose can cause needles to break.
Place your hoop onto the machine
In rare instances, the machine may have its arms removed, ensure that the arms are on the machine. If they are not please ask an explorer for help.
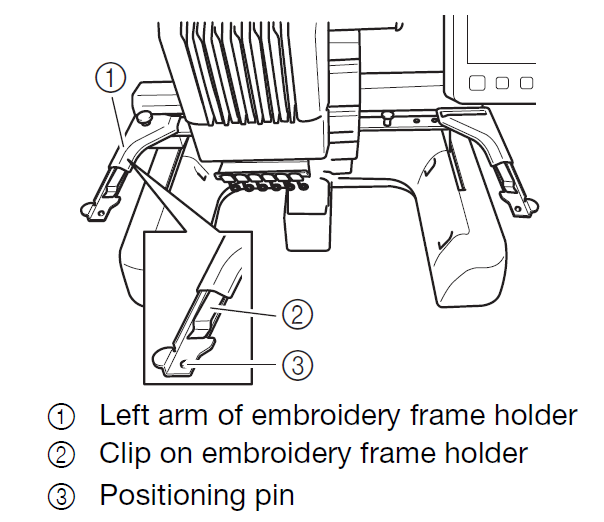
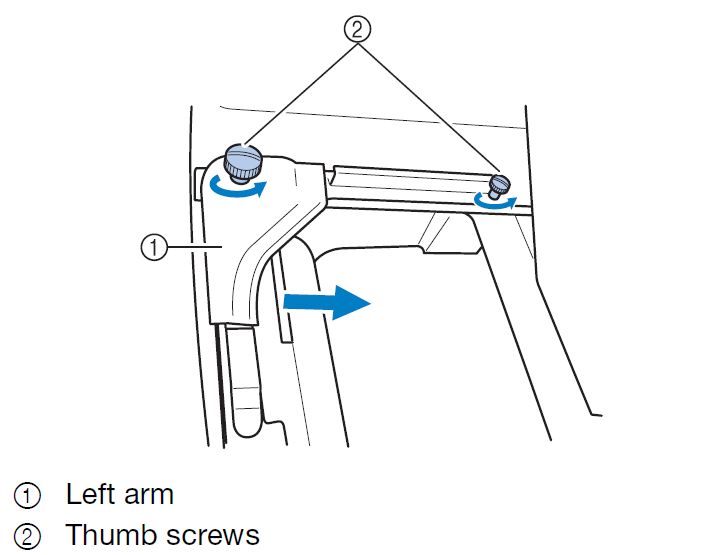
Loosen the “Thumb Screws” on the left side of the arm and slide the left arm until the distance of the machine arms matches the distance of your hoop arms. The smaller thumb screw should line up with an indication mark on the machine arms
Tighten the thumb screws when the arms are in the correct position
Only the left arm can be moved
Slide your hoop into the arms of the machine. The metal ends of your hoop should slide underneath the tabs of the machine arms simultaneously
Ensure the inner hoop (the part of the hoop with the arms) is facing up.
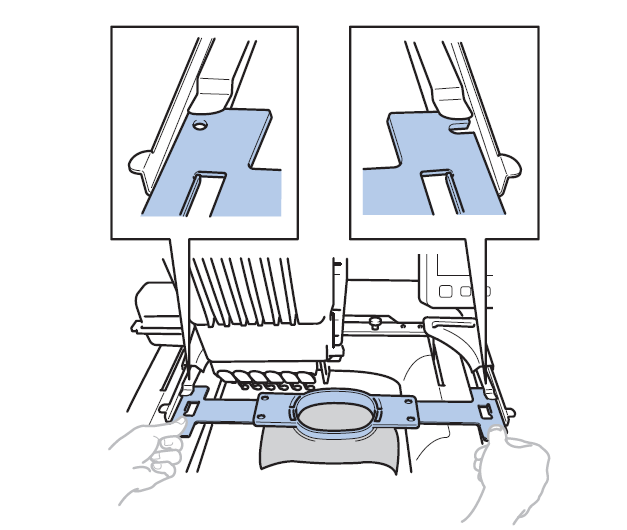
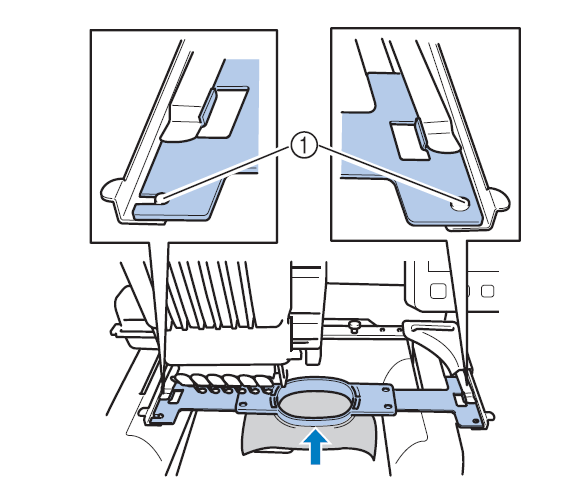
Push the hoop into place, ensuring that the hoop is flat. Make sure that the pins on the machine arms fit into the slot and hole of the embroidery hoop
If you get an error on the screen asking you to switch to a larger hoop, and you are sure that you have the correct hoop you may have to remove the machine arms, wait a few seconds, and attach them again. This is a known bug of the machine. Ask an explorer for help if needed.
Running the Machine
Double-check that your design will fit in your hoop
Click on the “Embroidery Settings” button on the bottom right of the screen
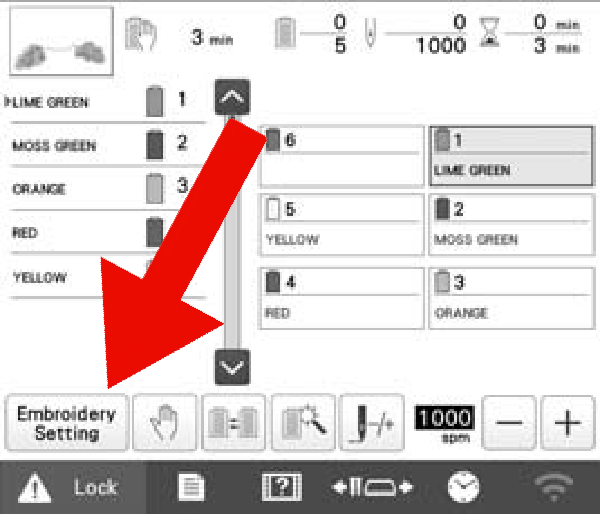
A warning message asking if it’s ok to cancel the embroidery. Click “OK” on this message
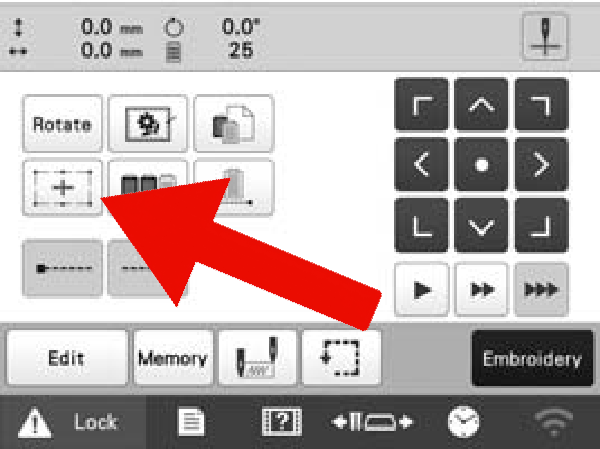
If the laser guide (a red cross that should be shining on your fabric) is not activated click on the “Embroidery Crosshair” button on the left of the screen underneath the “Rotate” button
Click on the “Trial embroidery key” in the lower middle of the screen. This will move the hoop.
Watch the laser and make sure that the middle of the red cross stays away from the edges of your hoop.
This step is incredibly important once you start using our aftermarket magnetic hoops, which can not be programmed into the machine. Always do this step
If you are confident that your design will not hit the edges of your hoop hit the “Embroidery” key in the bottom right of the screen
Set the stitch speed
Change the stitches per minute, or “SPM” to 700 using the plus and minus keys in the lower right of the screen. Each click will change the speed by 100 SPM.
Several factors dictate the speed at which you can run your embroidery. Generally lighter material and/or complex embroidery designs (with several color changes for example) require fewer SPM. Slower speeds are encouraged for better results.
Lock and run the machine
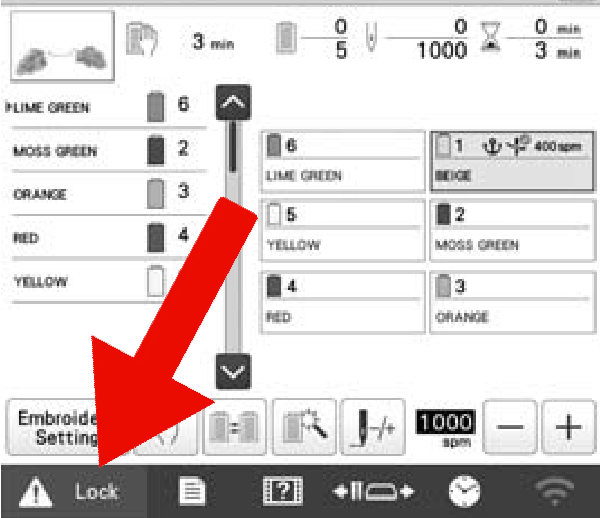
To run the machine you must first hit the “Lock” button in the bottom left of the screen
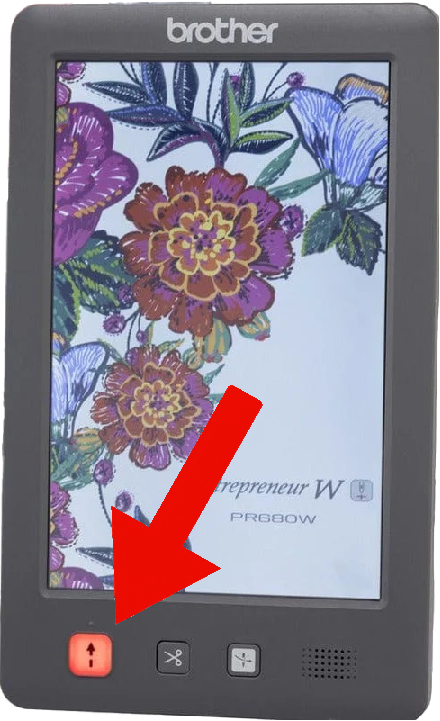
The “Start” button, on the bottom left of the control panel, should turn from orange or red to green. When you hit the green button the machine will start.
Clean Up
Remove the hoop
Lift the tabs on the machine arms and remove the hoop.
Separate your hoop by loosening the outer hoop and pulling the two sides apart

Remove jump stitches and excess stabilizer
Use some fabric scissors or orange-handled snips to cut away the walking/jump stitches
Cut the cutaway backing around your embroidery. If you would like, trim the muslin as well.
Clean up the area surrounding the machine
Please leave the area around the embroidery machine organized.
- Sweep up excess thread or fabric scraps and throw them away
- Unthread the machine
- Make sure the needle-changing tool used in the threading steps is in its holder on the left side of the machine base
- Turn the machine off
- Put your hoops away
- Push the chair in
Show this completed project to an explorer to get your DIY credential.
Resources
- Has some recommendations on backing/stabilizer type based on the material you are embroidering starting on page 12. It is a branded catalog that encourages the use of their product but the generalities of their recommendations are helpful.
Feedback
Offer us feedback on our DIY trainings. Let us know if there was something you found hard to follow or confusing so that we can improve our trainings for future users