A vertical bandsaw uses a long, thin blade with small teeth that rotates around two wheels to make curved and straight cuts. The vertical bandsaw in Woodworks is a woodworking bandsaw—it has the high cutting speed used for wood, with a (relatively) large-toothed blade.
Safety Considerations
Machine Anatomy

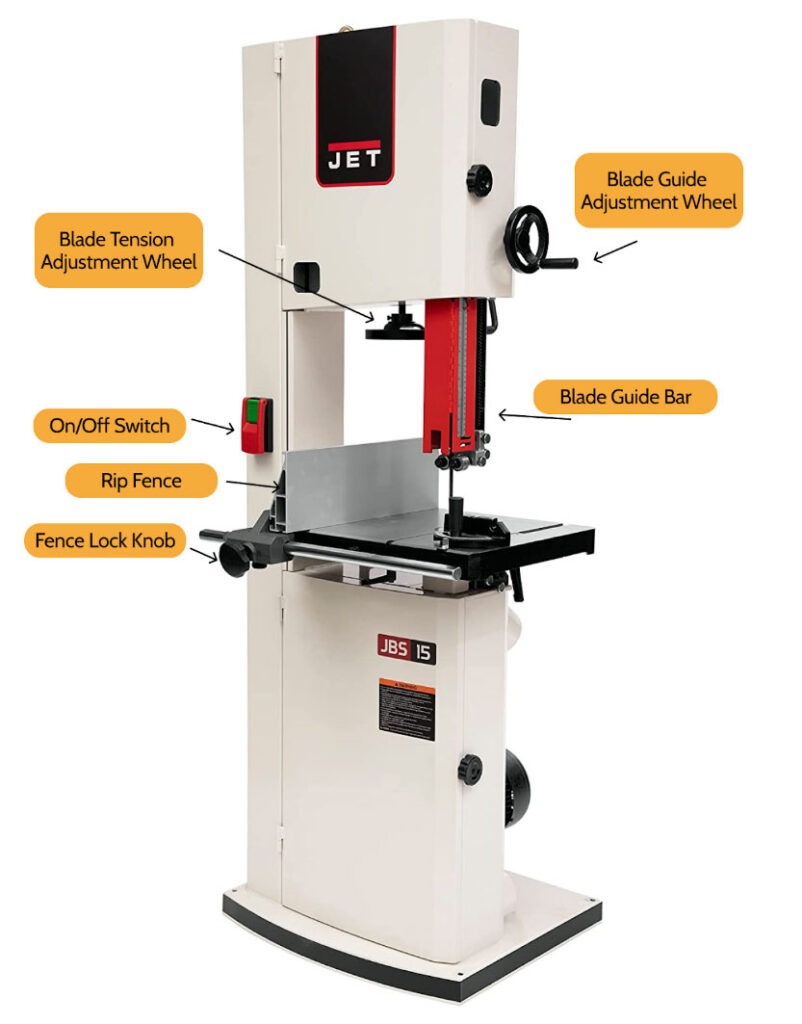
- On/Off Switch: Turns the machine on and off.
- Blade Tension Adjustment: Controls the tension on the blade, ask an Explorer to adjust!
- Blade Guard: Keeps the blade in place and protects the user from the blade.
- Rip Fence: Helps guide straight cuts, can be oriented vertically (for larger, thicker material) or horizontally (for thinner material).
- Fence Lock Knob: Secures the rip fence into place.
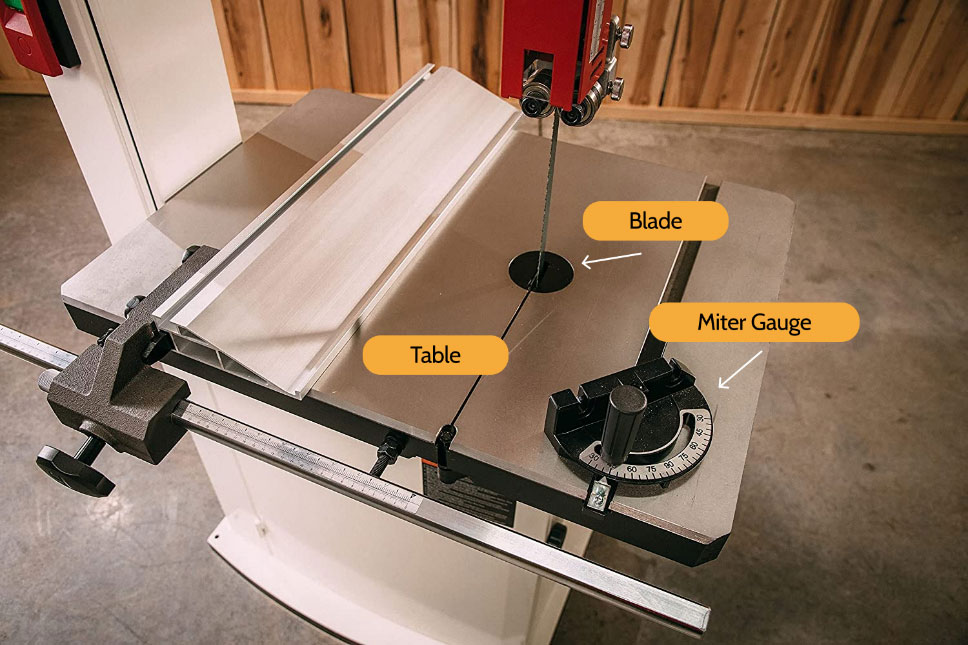
- Blade: A serrated metal band that forms one continuous loop and moves downward to cut through material.
- Miter Gauge: Allows for material to be held at a specific angle while cutting.
- Table: Provides a surface to hole your material while cutting.

Operating the Machine
Adjusting the Blade Guard
- Make sure the machine is off and the blade has come to a complete stop before adjusting the blade guard.
- Loosen lock knob and raise or lower guidepost using blade guard adjustment wheel.
- Position blade guard approximately ⅛”-¼” above the highest point of your material.
- Tighten lock knob.
Making a Straight Cut on Straight Stock
- Make sure the machine is off and the blade has come to a complete stop before beginning to adjust the saw.
- Slide the rip fence onto the fence rail.
- Slide the fence until the distance between the fence and the blade is the desired width.
- Tighten the fence lock knob.
- Turn on the dust collection system.
- Place the workpiece on the table and place it flush against the fence.
- Adjust the blade guide bar following the steps outlined above.
- Turn on the bandsaw.
- Wait a few moments for the blade to speed up, then feed the workpiece through the saw, holding the piece between the blade and the fence while keeping fingers clear of the blade. Thinner material can be pushed through faster than thicker material—you should determine feed rate based on the sound and feel of the cut.
- When the cut is complete, turn off the bandsaw and wait for the blade to come to a complete stop before removing your workpiece.
- Remove the fence to reset the saw for the next user while cleaning up.
Making a Curved Cut on Flat Bottomed Stock
- Mark your curve. Look at the bandsaw blade—is the radius of your curve about 3 times the width of the blade? If it’s smaller than that—see below and use relief cuts. Even if it’s not smaller than that, it’s never a bad idea to use relief cuts!
- Turn on the dust collection system.
- Adjust the blade guide bar following the steps outlined above.
- Turn on the bandsaw.
- Wait a few moments for the blade to speed up, then feed the workpiece through the saw to follow the curve, keeping fingers clear of the path of the blade. This means your fingers should not ever be in front of the blade—even if the piece is between your fingers and the blade!
- Thinner material can be pushed through faster than thicker material—you should determine feed rate based on the sound and feel of the cut.
- When the cut is complete, turn off the bandsaw and wait for the blade to come to a complete stop before removing your workpiece.
Best Practices
Relief Cuts

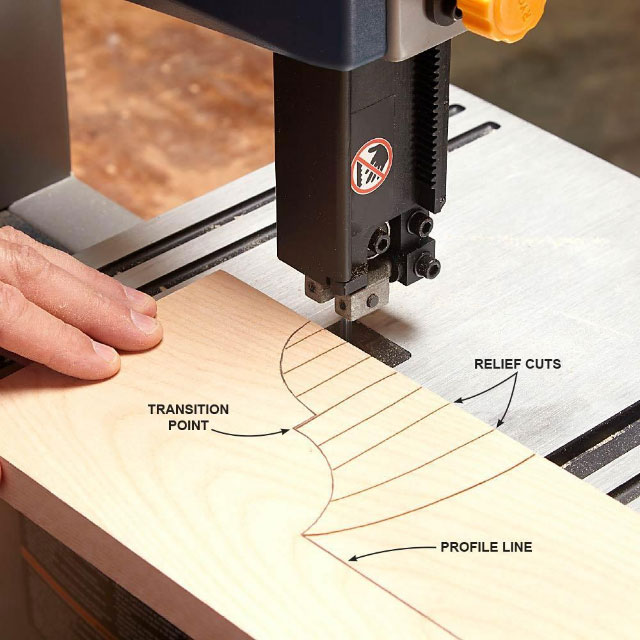
- A relief cut is a cut that lies perpendicular to the curve of your desired cut, and edges right up against it
- Relief cuts provide flexibility in cutting curves with a bandsaw: you are less likely to break the blade when the wood capturing the blade is allowed to escape.
- You can still break a blade by trying to cut a too-tight curve!
- A properly executed relief cut can greatly improve the quality of your bandsaw cut.
- The tighter the radius of the curve, the closer together your relief cuts should be.
Transition Points
- As you can see in the image above, transition points between types of curves are important to note
- As you reach a transition point, it can be helpful to stop, reevaluate, and figure out the best angle of approach for your next cut.
- Use the transition points as a way to take off excess material, if you have not done so already.
- Avoid backtracking along curves whenever possible. While backtracking is occasionally necessary, you can plan for it and avoid it by using relief cuts and cutting away waste material as you go.
